Prerequisites
-
Make sure that you have Cloud Terminal Integration enabled (for information on how to do this, see the Enable Cloud terminal integration guide).
-
Make sure that you have a signing certificate selected. To check this, log in to SAFEQ Cloud Web UI and navigate to Security > Security options >scroll down to PKI and encryption section. The Signing certificate field must not be blank.
-
Konica Minolta MarketPlace is installed on the MFD.
Limitations
Card readers
-
Keyboard Wedge: In order to use Card Readers with Keyboard Wedge, the MFDs must have a correct Loadable Device Driver installed.
-
When the card reader is in keyboard mode, you must select the US keyboard layout.
-
If you use a card reader in the Keyboard mode, the users won't be able to swipe their cards when the input field is focused.
-
Other Card Readers: See the manufacturer's documentation for installation and setup.
Cloud print
-
Toner save (economy printing) is not supported.
-
Printing 2 or more pages per sheet is not supported.
Copying
-
The Zoom function depends on MFD's ability to autorotate the original. If this function is restricted or not supported, zooming may not work as expected. Autorotate restriction is configurable in device administration: Utility > Administrator Settings > System Settings > Restrict User Access > Restrict Operation.
-
The Zoom function depends on MFD's detection of paper tray's paper sizes. For some devices, you may need to configure the paper sizes in paper trays manually.
Scanning
-
Automatic paper size detection depends on the MFD's capabilities. A3 models generally have good detection, but smaller A4 devices do not.
-
The device cannot recognize papers with mixed sizes of mixed formats (AB and inch formats. For example, A3 and Legal sized papers). Therefore, the output will be cropped to the nearest format device is set to
-
If the MFD units are set to inches, it will expect inch-sized originals. Otherwise, it will expect AB-sized originals.
-
You can change the units in device settings > Utility > System Settings > Measurement Unit Settings.
-
Scanning with an open scanner cover may result in the wrong paper size detection.
-
-
When scanning mixed paper sizes, the paper size of the document is set to the largest paper in the tray, and smaller pages have blank spaces.
Accounting
-
Accounting is not supported when using Native copy or Advanced (native) scan functionality.
Cloud Terminal registration in SAFEQ Cloud Web UI
If you see "Device has not been registered to SAFEQ Cloud yet" message too often on your MFDs, this will be resolved after the update of SAFEQ Cloud to version 3.45 and the update of the Cloud Terminal to version 2024.06.02. Once you register your MFDs with the Cloud Terminal in SAFEQ Cloud again (see the Registering the Cloud Terminal in the SAFEQ Cloud Web UI section of this document), the terminals will be able to automatically re-register themselves in SAFEQ Cloud.
Port switching
The 2024.06.02 terminal version supports port switching on server port 443. This change has introduced a limitation to the terminal when switching from the SAFEQ Cloud primary server to the SAFEQ Cloud secondary server. In this situation, an error may occur, accompanied by an error message that mentions "invalid token provided" in the details. To resolve this, you must reinstall the terminal.

Paper detection
-
MFD detects paper according to the configured marketing area. For the US marketing area, US paper sizes (Letter, Legal, etc.) are detected correctly. For A-format paper sizes (A3, A4), the European marketing area must be selected.
-
Marketing area is selected in service menu and requires support from your printer supplier.
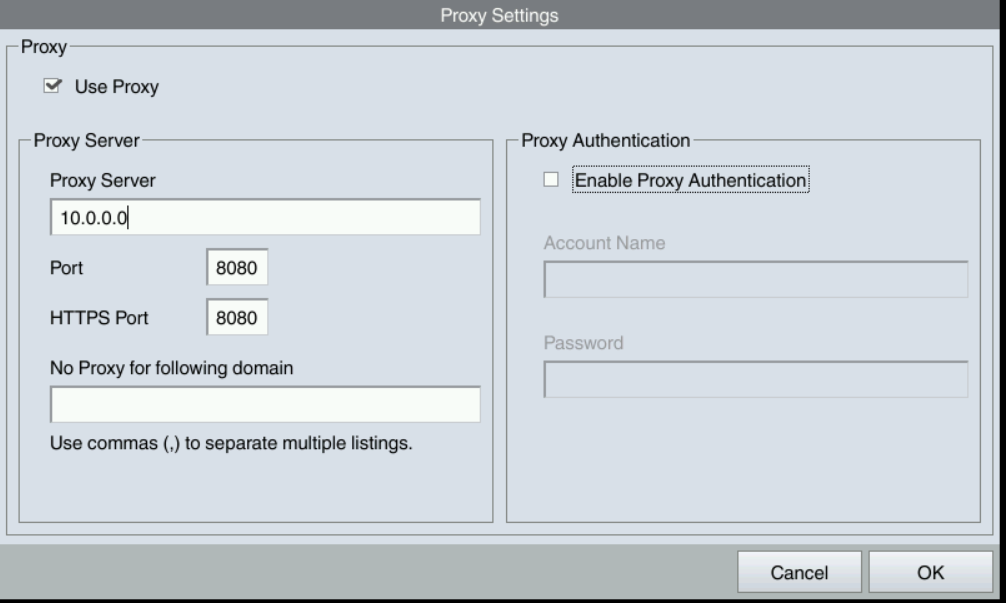
Proxy settings
If your MFD needs to access the public Internet via a dedicated (non-local) gateway, such as a VPN with a proxy server, you must perform the following steps in the MFD settings of the browser.
-
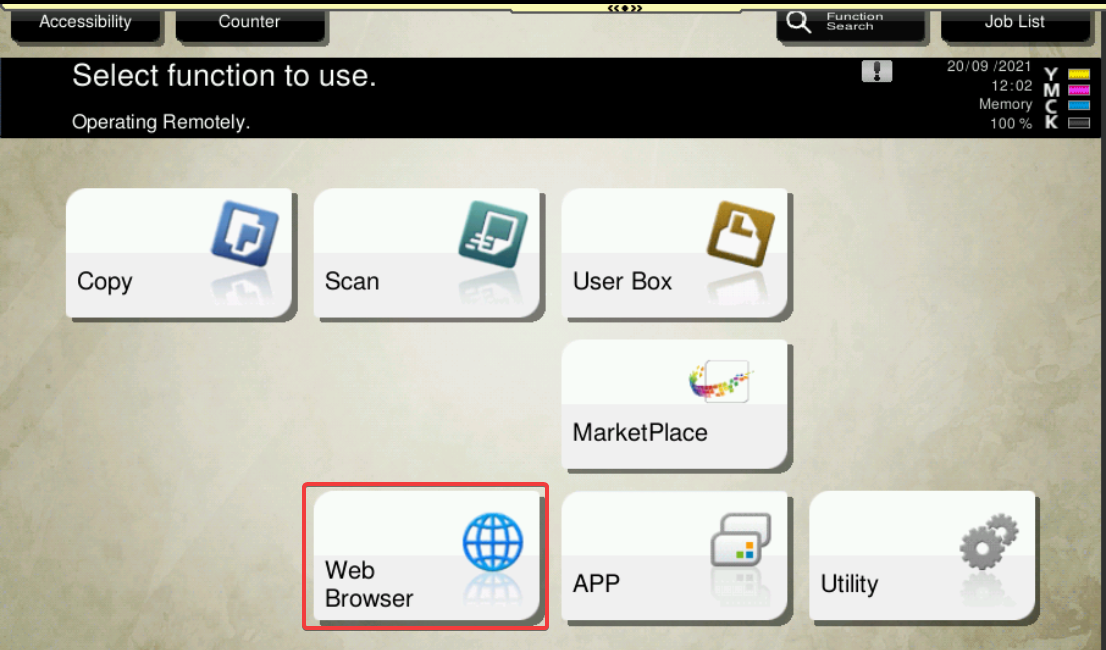
On the MFD panel home screen, tap Web Browser.
-
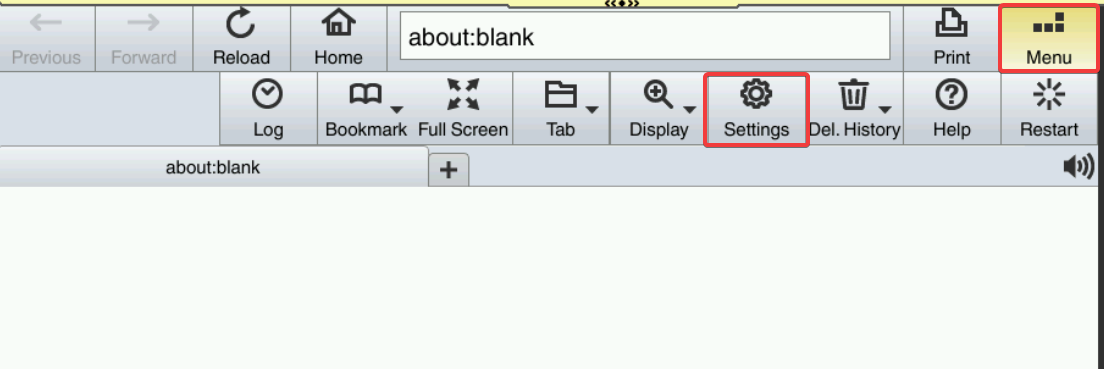
In the Web Browser, tap Menu and then tap Settings.
-
Authenticate with the Administrator password.
-
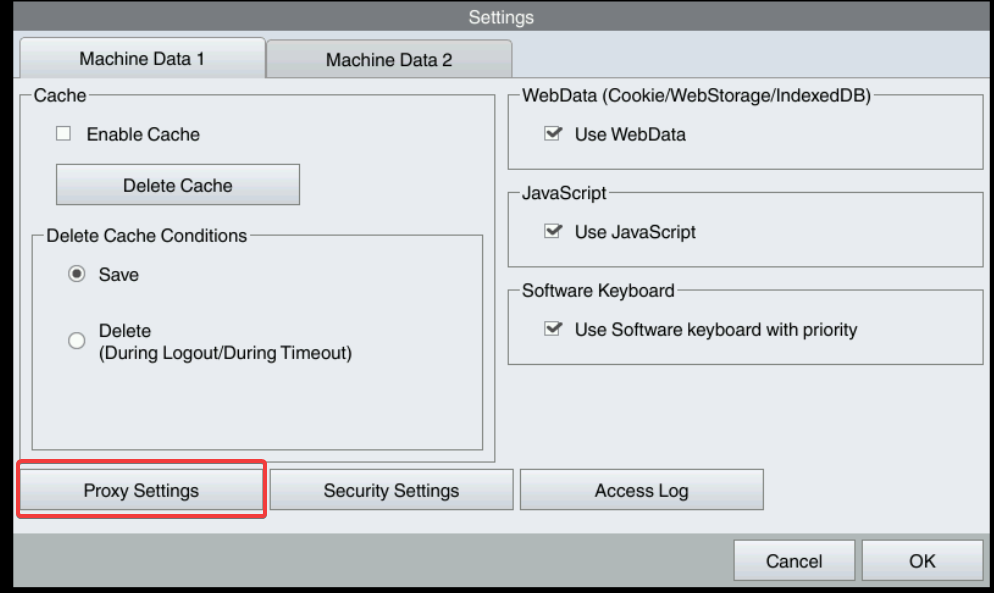
Tap Proxy Setting.
-
Check the Use Proxy checkbox and enter the Proxy Server address and ports.
-
If the Proxy server needs authentication, check also Enable Proxy Authentication checkbox and fill Account Name and Password in Proxy Authentication settings.
-
Tap OK to save the proxy settings.
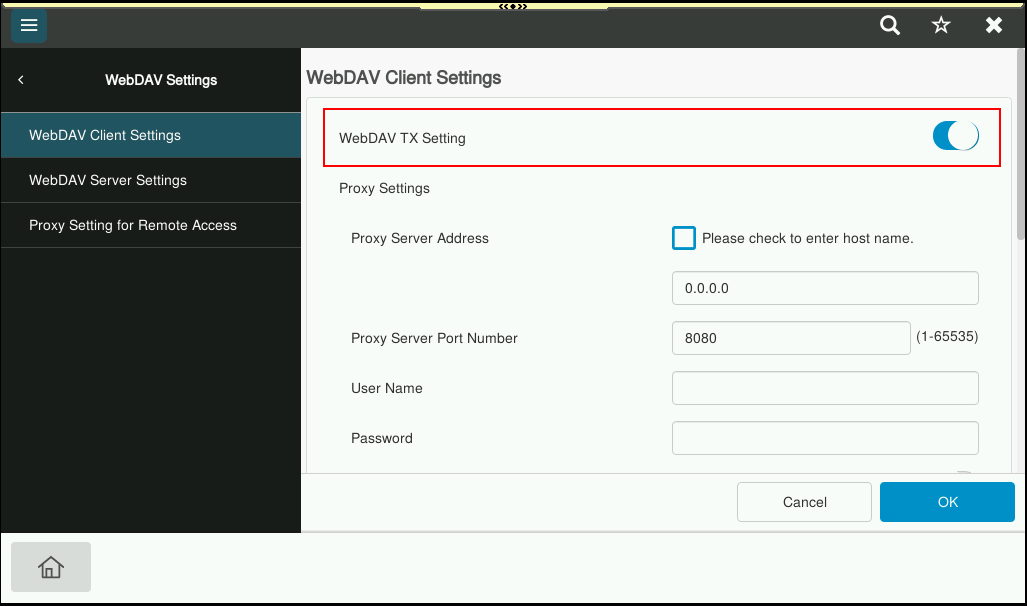
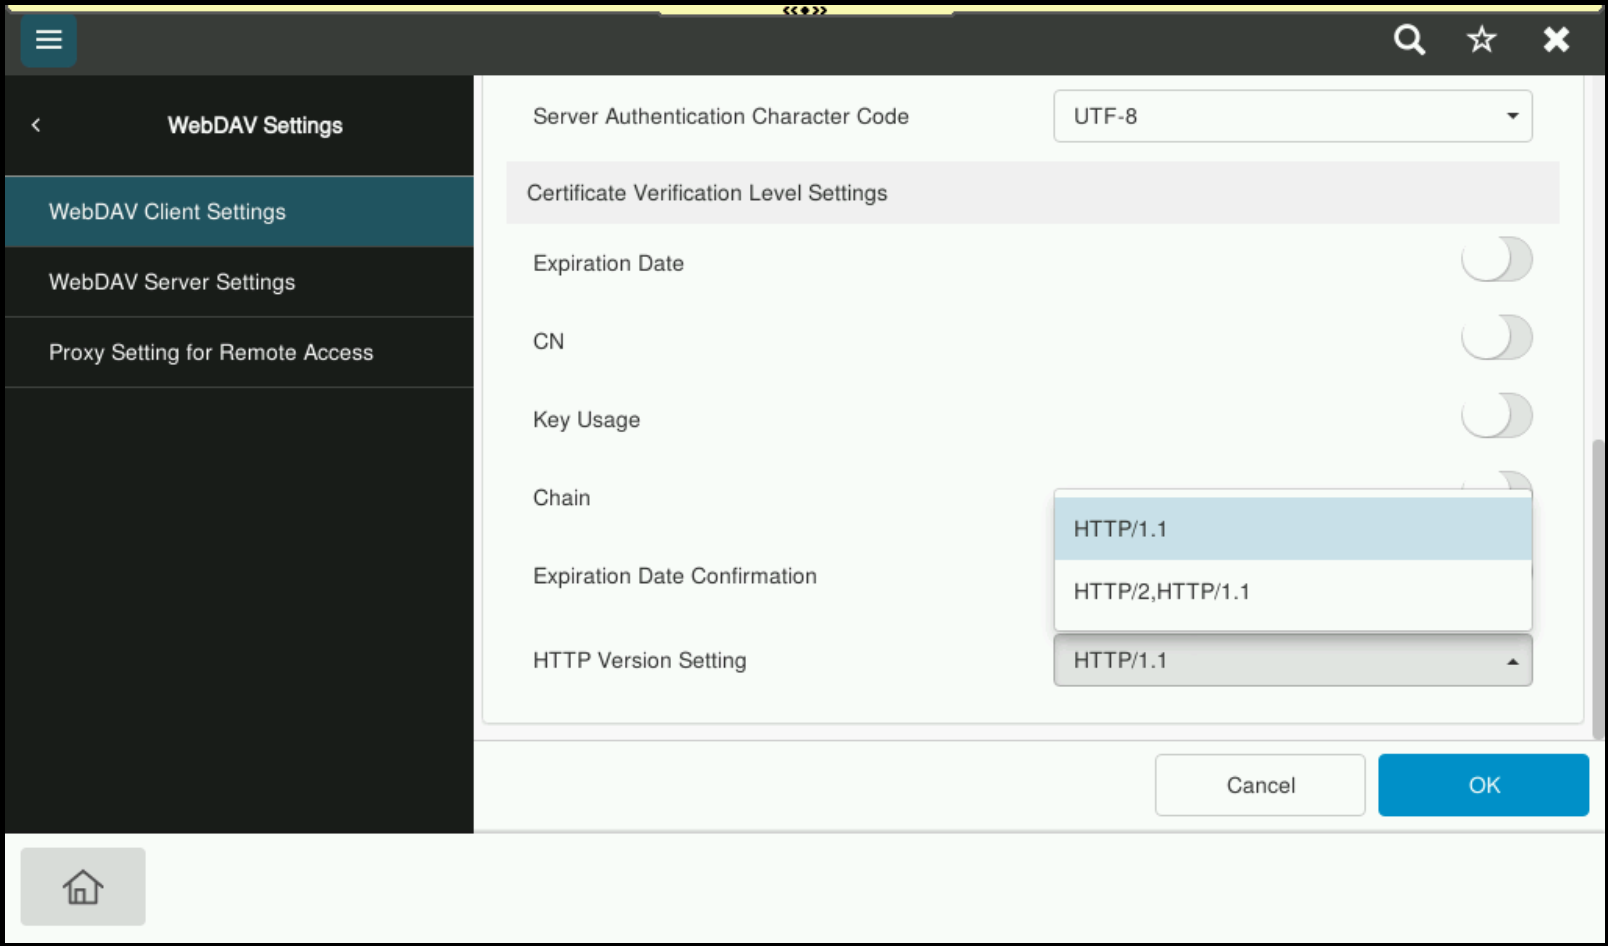
Webdav settings
To allow scanning on the terminal, ensure the following options are selected in MFD settings under Network > WebDAV Settings > WebDAV Client Settings
WebDAV TX Setting is enabled:
HTTP Version Setting is set to HTTP/2,HTTP/1.1:
Installing the Konica Minolta Cloud Terminal
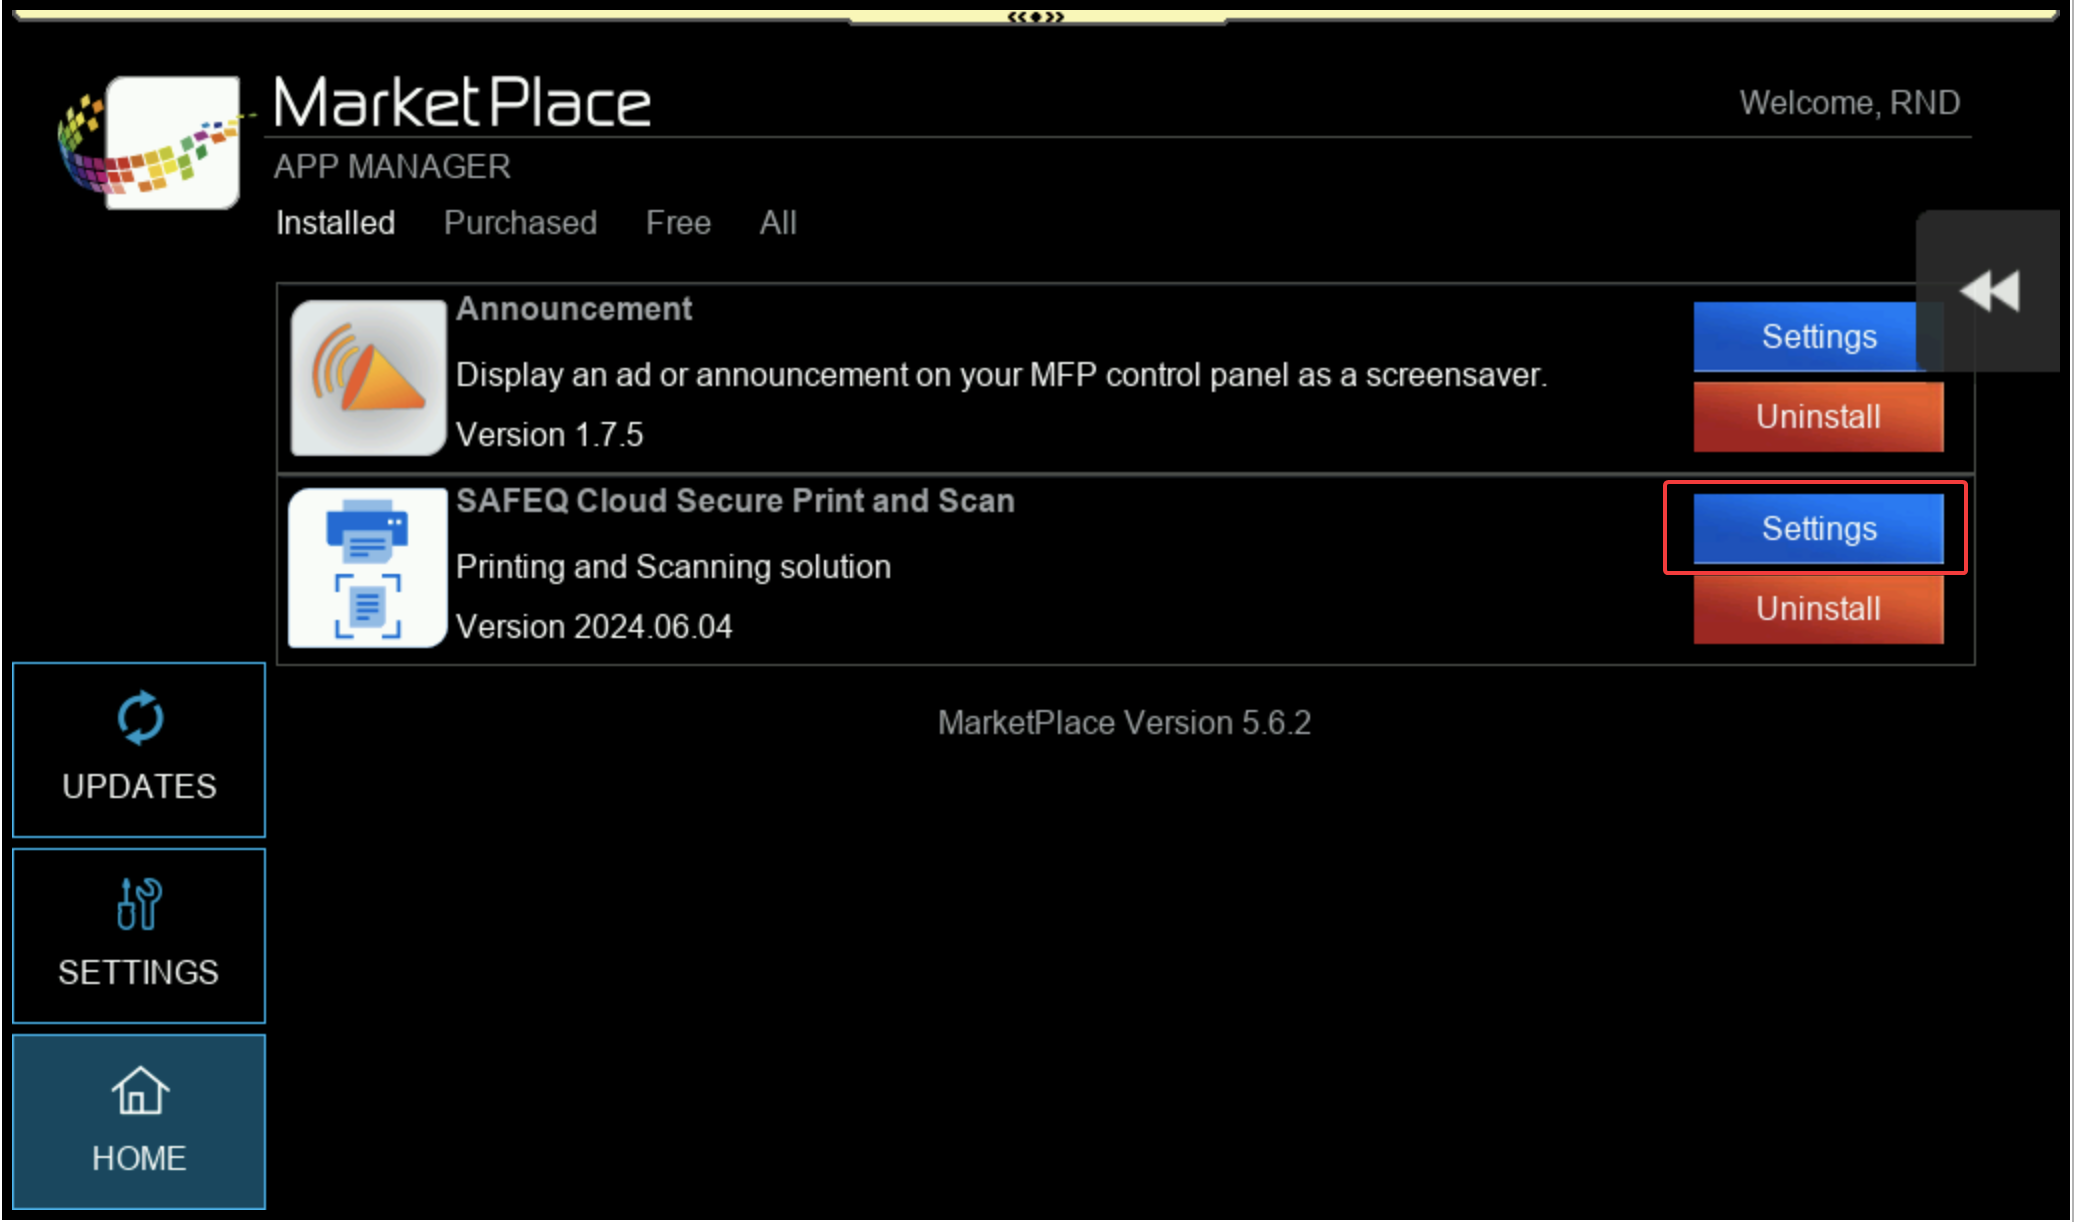
Install the terminal from Konica Minolta MarketPlace.
The name of the application in MarketPlace is SAFEQ Cloud Secure Print & Scan.
For remote installation, see https://help.konicaminoltamarketplace.com/nib/en/installing/manage-licenses/.
For installation at the MFD, see https://help.konicaminoltamarketplace.com/nib/en/installing/using-at-mfp/.
The Konica Minolta Cloud Terminal supports copying app settings. See https://help.konicaminoltamarketplace.com/nib/en/installing/manage-licenses/#copying-app-settings.
To copy the settings, log in to Marketplace at the MFD or set up periodical sync in the Marketplace app at the MFD. Note that the screensaver on the MFD must be enabled.
The installation via Konica Minolta Marketplace can take up to 2 hours. To speed up the installation, tap the Marketplace logo on the MFD panel to trigger the sync immediately.
Configuring the terminal
-
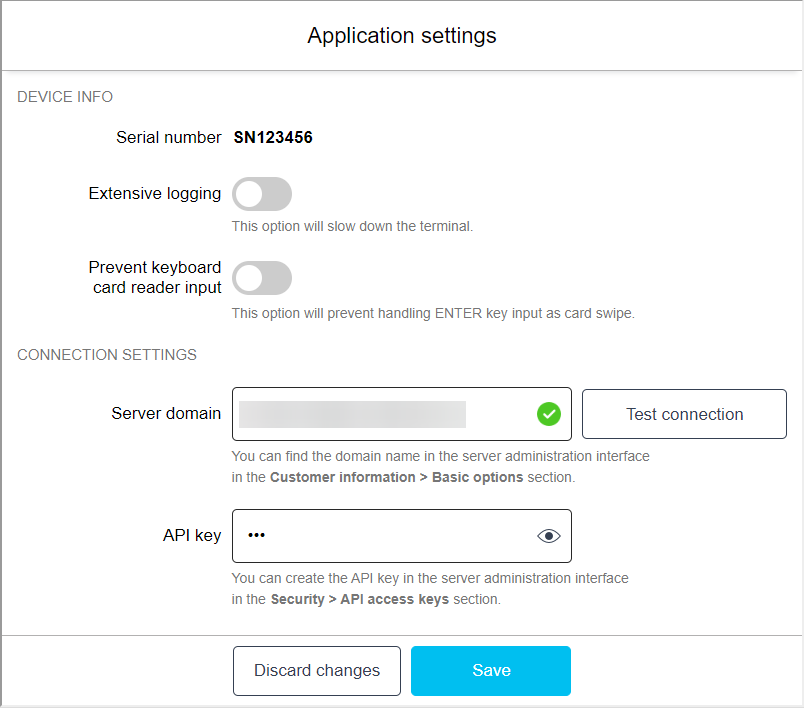
In Marketplace, click Settings next to the application name.
-
On the Application settings screen, fill in your domain and your API key.
-
You can also enable extensive logging. This option allows outputting all log levels from terminal into a log file. This might be useful for troubleshooting purposes. However, be aware that this option will slow down the terminal.
You can find the logs here:
-
https://<MFD-IP>:8091/IWS/log/script.log
-
https://<MFD-IP>:8091/IWS/log/system.log
You will need your machine administrator credentials to access them.
-
-
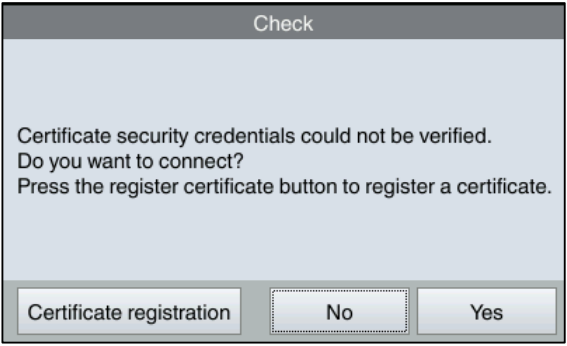
When you tap Test connection or when you attempt to save the configuration, the following window may appear on older MFDs that do not recognize the Let's Encrypt certification authority. Tap Certificate Registration to save the server certificate in the MFD.
-
Tap Save and log out.
Adding Konica Minolta printer and Embedded configuration in SAFEQ Cloud Web UI
These steps are optional and if not performed, the Konica Minolta printer will be added automatically after the endpoint is authorised, see Registering the Cloud Terminal in the SAFEQ Cloud Web UI section of this page.
-
Have the MFD's serial number and IP address at hand.
-
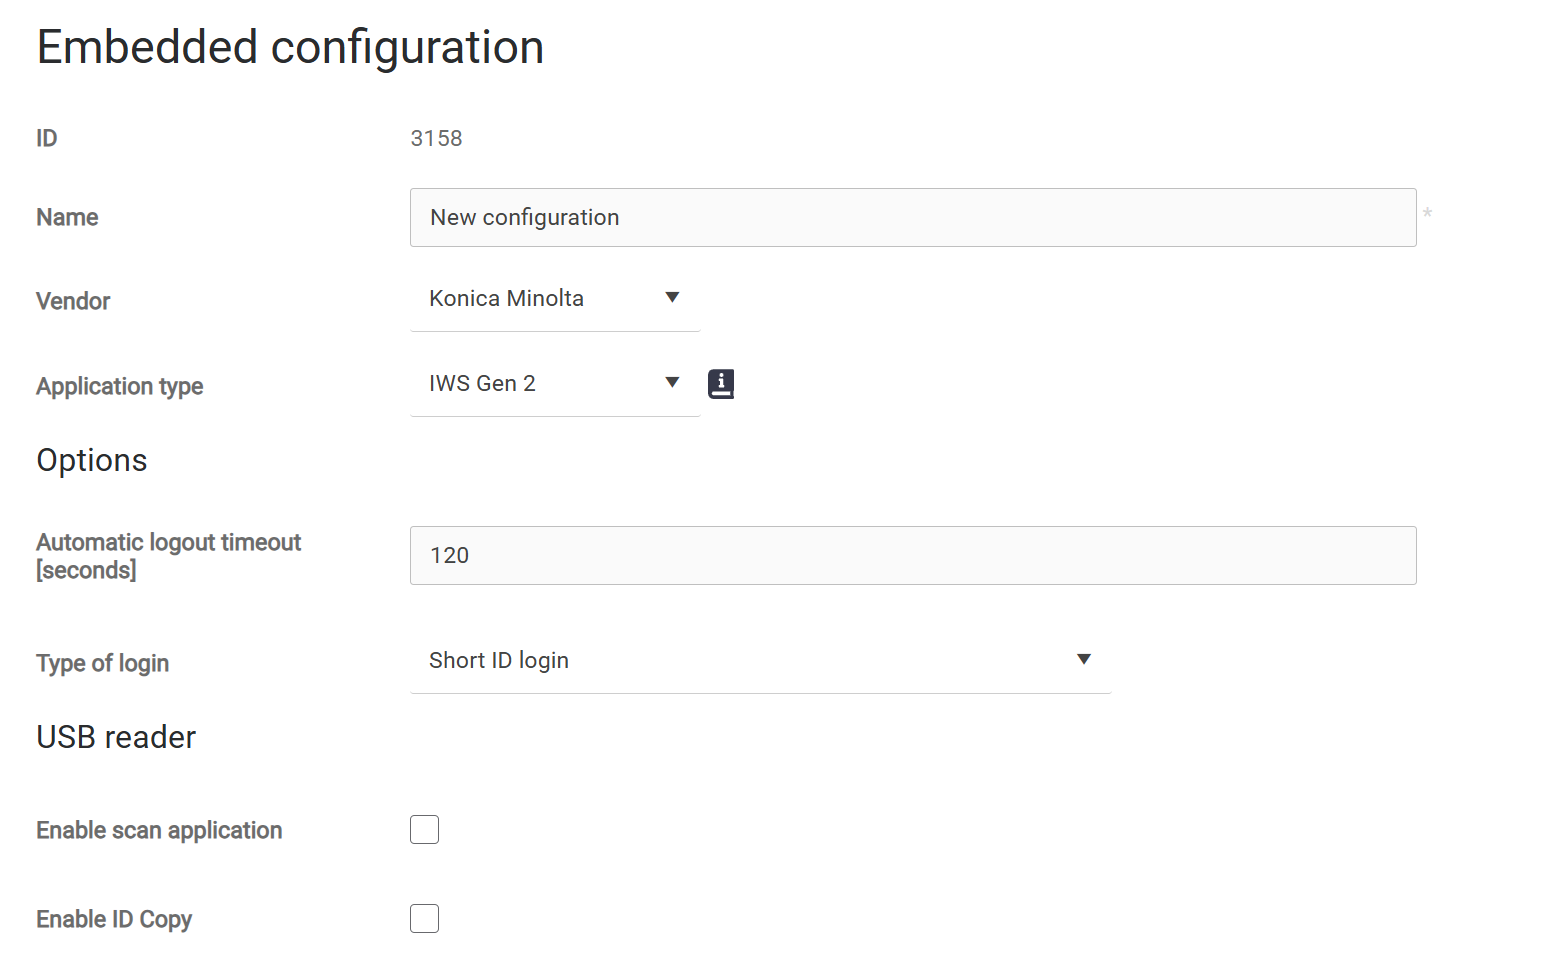
In the SAFEQ Cloud Web UI, go to Printers > Embedded templates.
-
If not done already, create an embedded configuration for Konica Minolta by clicking Add.
-
In Vendor, select Konica Minolta .
-
In Application Type, select IWS Gen 2.
-
Fill in the rest of the configuration according to your needs and click Save. For more information on embedded configuration, see Embedded Terminals' configuration.
-
Enable ID Copy adds the ID Copy quick action to My quick actions screen on the MFD. This instant action allows users to copy both sides of their ID/IC card and print them out on one sheet of paper.
-
-
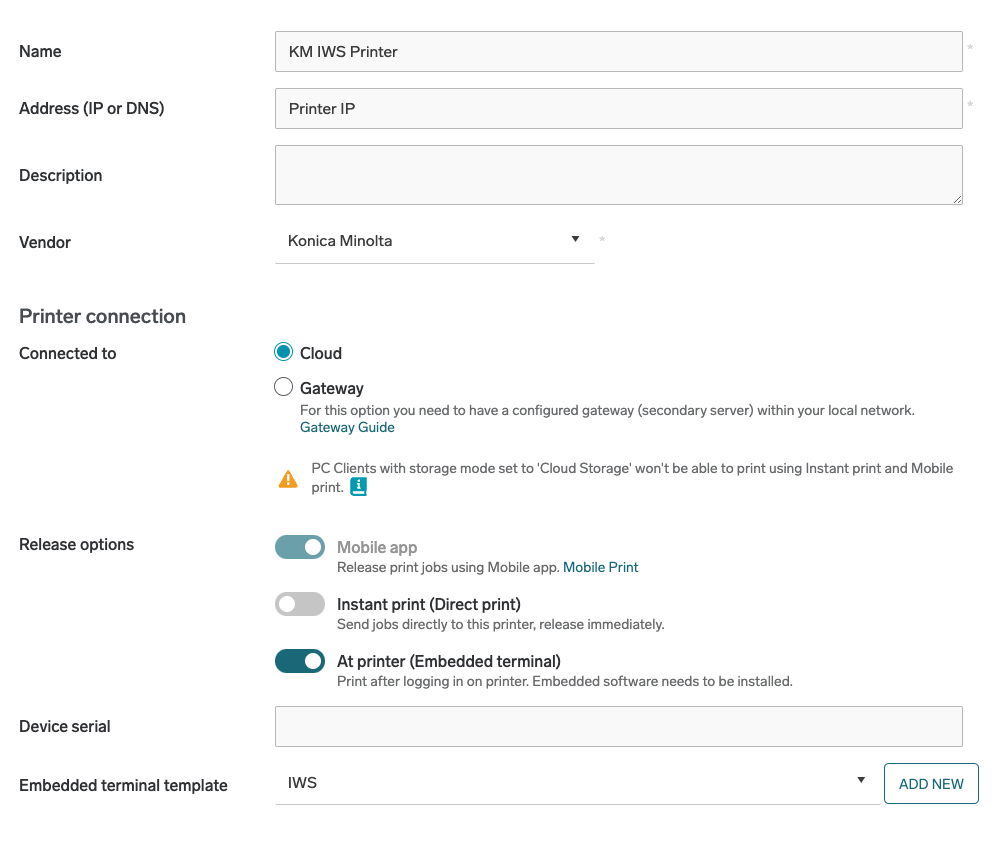
Go to Printers (Output Ports).
-
Click Add.
-
In Vendor, select Konica Minolta.
-
In Device serial, enter the serial number.
-
Fill in the rest of the required information according to your needs.
-
In Embedded configuration, select your Konica Minolta embedded configuration from the list.
-
Click Save.
-
The MFD will now display a login screen with your chosen authentication type. If not, tap Reload.
Registering the Cloud Terminal in the SAFEQ Cloud Web UI
-
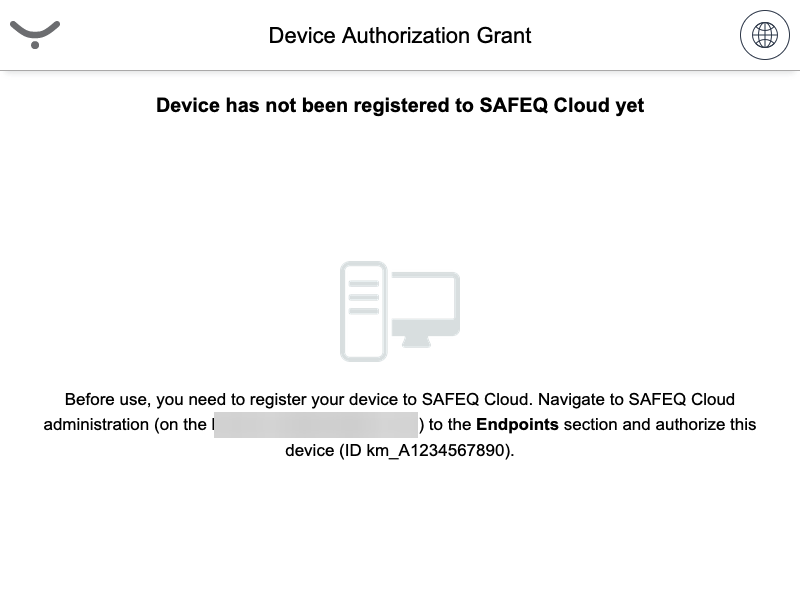
After the terminal installation and configuration, you will see the following screen. Note down the endpoint ID.
-
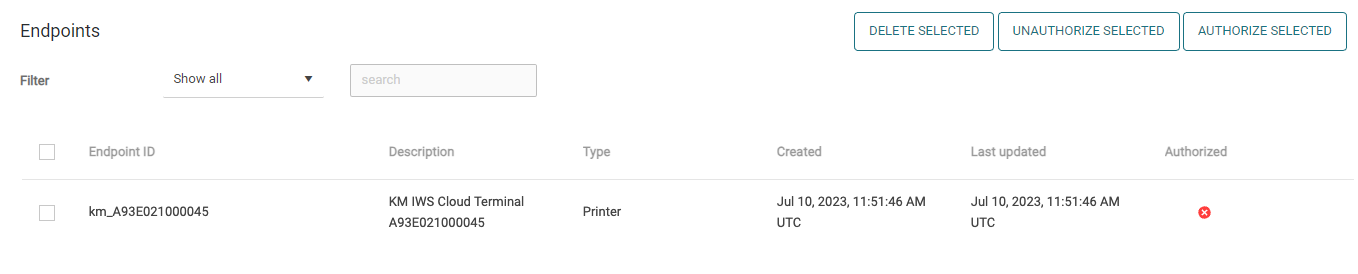
In SAFEQ Cloud web UI, go to Security > Endpoints and find the entry that contains the endpoint ID from the previous step.
-
Select the entry and click Authorize selected.
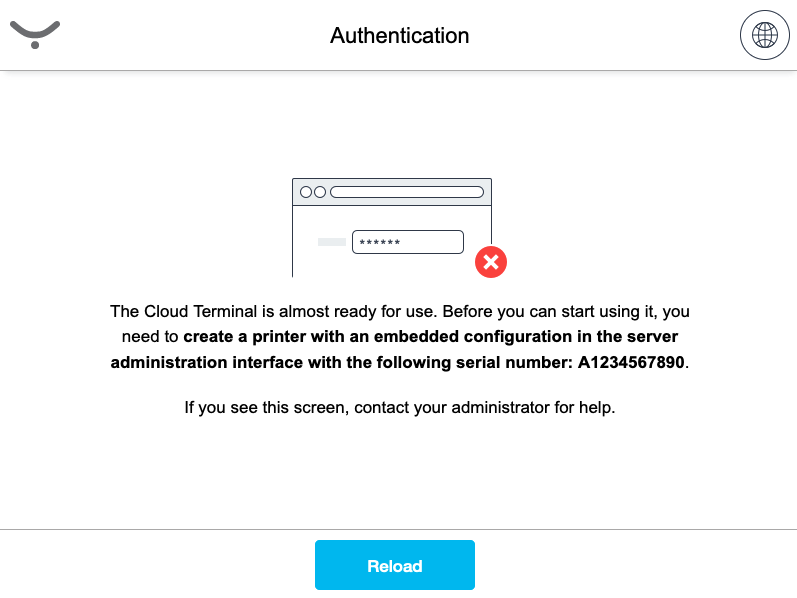
If you see the following screen on the MFD, it means that you haven't added the MFD in SAFEQ Cloud Web UI. See section Adding Konica Minolta printer and Embedded configuration in SAFEQ Cloud Web UI of this page.