
Installing YSoft SafeQ Management Server on MSSQL AlwaysOn Availability group
1. Preconditions
- Correctly configured Windows Failover Cluster with installed MSSQL 2016, MSSQL 2017, or MSSQL 2019 enterprise edition (on both nodes of cluster).
Tip: you can follow f.e. following guide: [1] Step-By-Step: Creating a SQL Server Always On Availability Group
- Enabled SQL Server 2016/2017/2019 AlwaysOn Availability Groups feature.
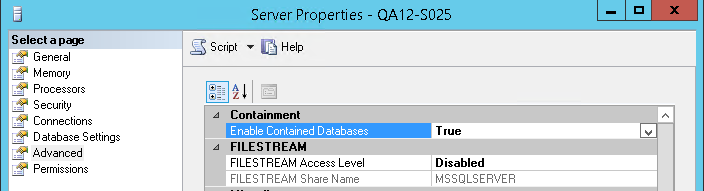
- Enabled Contained Databases.
2. Installation steps
2.1. Using Server installer package
Use this package if you want to deploy more roles on this server (Management Server, Spool Server, Scan Server, Mobile Print Server)
- Run Server installer package on any server
- On the Server environment screen select the First server installation scenario
- On the Database configuration screen select the External Microsoft SQL database server option
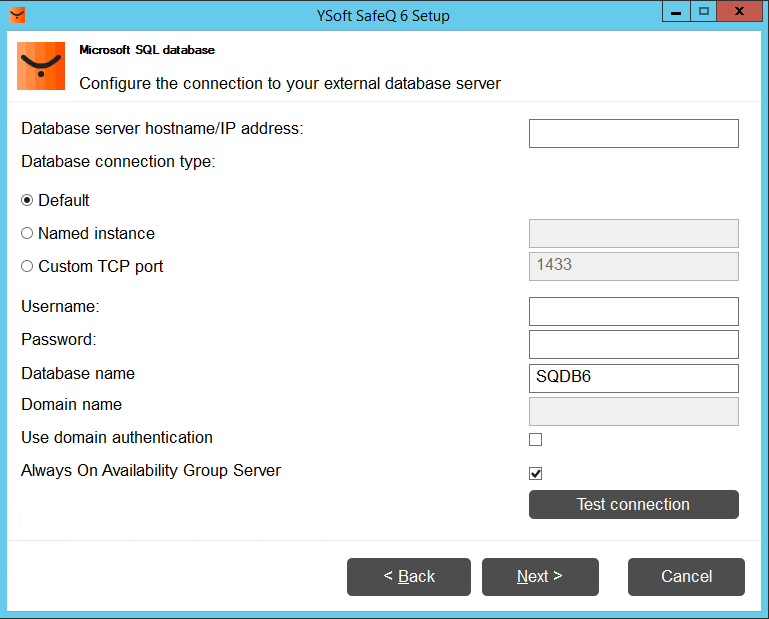
- Fill all required fields in the Microsoft SQL database screen:
- As database connection string set the IP/hostname of the master node of your MSSQL cluster (Windows Failover Cluster)
and check the Always On Availability Group Server checkbox
- Proceed until installation is finished
2.2. Using Management Server subsystem installer
Use this installer if you want to deploy only the Management Server role.
- Run YSoft SafeQ Management Server installation on any server
Continue in installation process until YSoft SafeQ Management Server installation settings screen and select the I want to customize my YSoft SafeQ installation checkbox

- On the Installation mode screen select the Install a new YSoft SafeQ Management Server (or the first node of a new YSoft SafeQ Management Server cluster) option
- Select the Use an existing external MSSQL database server option
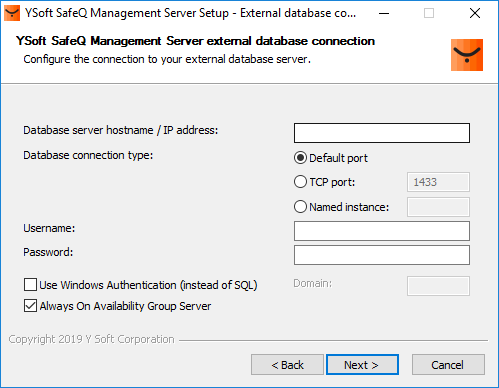
- Fill all required fields to the MSSQL database connection:
- As database connection string set the IP/hostname of the master node of your MSSQL cluster (Windows Failover Cluster)
and check the Always On Availability Group Server checkbox
- Proceed until installation is finished
2.3. Using an external database for a data warehouse on the same server
After YSoft SafeQ Management Server installation finishes, open SQL Server Management Studio and connect to the Database Engine as System Administrator (user sa) and run the following queries:
|
Do not forget to change the database name in the queries above. The queries have the default data warehouse database name in them (i.e. SQDB6_DWH), change it to the correct YSoft SafeQ data warehouse database name you have chosen for your deployment.
3. After installation
One of the possible solutions for correct environment setup is the following guide:
3.1. Create AlwaysOn High Availability group
- Navigate to Microsoft SQL Server Management Studio, where the databases are created (SQDB6 and SQDB6_IMS, optionally also SQDB6_YPS - if you are using YSoft SafeQ Payment System)
- Set Recovery model of both SQDB6 and SQDB6_IMS databases to Full (SQDB6_YPS is configured this way by default)
- Perform Full Backup of all SQDB6* databases
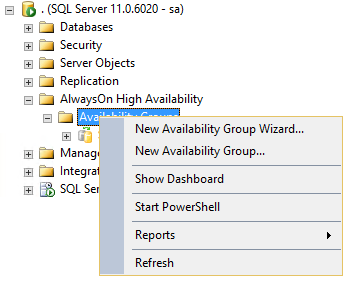
- Navigate to AlwaysOn High Availability > Availability Groups > New Availability Group wizard...
- In the Specify Availability Group Name page enter the name of the Availability group
- Next, select all SQDB6* databases
- In the Specify Replicas page > Replicas tab, click the Add Replicas button and connect to the second SQL Server that you joined as nodes in your Windows Server Failover Cluster and configure the following [1]:
- Automatic Failover: Checked
- Synchronous Commit: Checked
- Readable Secondary: No
- In the Endpoints tab verify that the port number is 5022
- In the Listener tab, select Create an availability group listener option and enter the following [1]:
- Listener DNS name: Name that you will use in your application connection string
- Port: 1433
- Add IP Address in Add IP Address dialog box
- Select Full as Initial Data Synchronization.
- Proceed until Always On Availability Group is created
3.2. Proceed with the following steps and set up YSoft SafeQ 6
- Navigate back to the server where your YSoft SafeQ Management Server is installed
Navigate to <install_dir>\Management\Conf\safeq.properties file, edit it, and set the following:
CODEdatabase.host = <Listener DNS name>Navigate to <install_dir>\Management\ims\application.properties file, edit it and replace the IP address in the spring.datasource.url with the Listener DNS name:
Change
CODEspring.datasource.url = jdbc:sqlserver://<IP address>:1433;databaseName=SQDB6_IMS;applicationName=IMSTo
CODEspring.datasource.url = jdbc:sqlserver://<Listener DNS name>:1433;databaseName=SQDB6_IMS;applicationName=IMS
- Save changes and restart YSoft SafeQ Management Service and YSoft Infrastructure Service services
- Repeat steps 1.-4. on all Management Servers in cluster
3.2.1. If you are using YSoft SafeQ Payment System, reconfigure it as well
- Navigate to the server where your Payment System is installed
- Navigate to <install_dir>\YPS\ps-conf\environment-configuration.properties file, edit it and replace the IP address in the database.url with the Listener DNS name:
Change
CODEdatabase.url=jdbc:sqlserver://<IP address>:1433;databaseName=SQDB6_YPS;To
CODEdatabase.url=jdbc:sqlserver://<Listener DNS name>:1433;databaseName=SQDB6_YPS;
- Save changes and restart YSoft SafeQ Payment System service
- Repeat steps 1.-3. on all servers where is Payment System installed