
Relevant Products
Configure SAFEQ Cloud environment with trusted certificates is available in PRO PRINT PRO MFD
Certificates overview
The internal communication between the secondary gateways and the primary server and also between the SAFEQ Cloud Clients in local storage mode and the primary server is protected with TLS encryption.
By default the built-in SAFEQ Cloud certificates are used for that and the user must explicitly authorize each of the gateway or SAFEQ Cloud Client before it can connect to the primary server. SAFEQ Cloud uses mutual TLS authentication, meaning that the primary server checks the certificates of the connecting clients and every client also checks the server certificate to which it connects. This is different from the common web browser behavior and requires an elaborated setup which is explained in this chapter.
When trusted certificate policy is enabled the endpoint authorization mechanism is no longer used and it is not necessary to authorize each Client manually.
Trusted certificate policy can be set on the account level under account settings, PKI and encryption section:
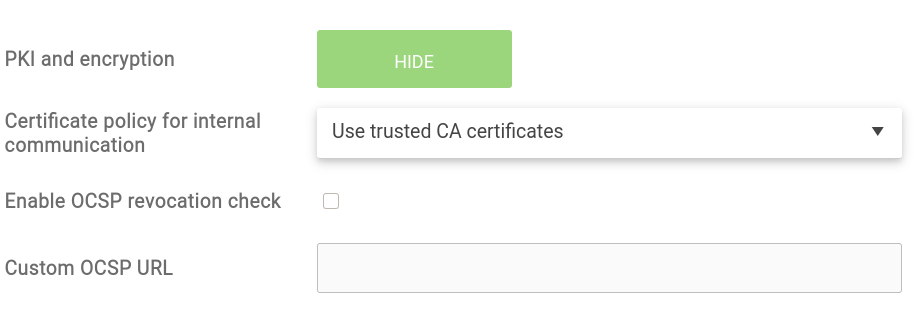
Two OCSP settings are related to the certificate revocation protocol. They should be used in the way instructed by the corporate PKI administrator.
Setup preparation
In this example we assume the following setup: one on-premise primary server, one gateway, one SAFEQ Cloud Client. For each of them a separate certificate chain must be prepared which might look like this:
Acme-CA-Root
       Acme-CA-Intermediate
                primary-host
Acme-CA-Root
      Acme-CA-Intermediate
              gateway-host
Acme-CA-Root
     Acme-CA-Intermediate
           pcclient-host
Here we have three certificate chains, for the primary server, for the gateway and a SAFEQ Cloud Client. Each certificate chain consists of two CA certificates (root and intermediate) and an entity certificate which corresponds to it’s usage. In the production environment it is possible that multiple intermediate certificates are used or no intermediate certificates at all.
If the cloud primary server is used the first setup step can be skipped, in this case the certificate chain for the primary server is not needed.
For server and gateway the chains must be exported to a PFX (PKCS12) file. For SAFEQ Cloud Client running on Windows the chain should be placed into Windows certificate store.
Primary server setup
This step is only needed if primary server is hosted in the customer’s network. We assume that the certificate chain from the above example is exported to “primary-host.pfx” file and the password for it is “changeit”.
Configuration steps:
-
Copy the primary-host.pfx file to the primary server, under
/opt/safeqcloud/confdirectory (for example by using any of SSH/SFTP utilities) -
Make sure this file is readable, e.g. has
-rw-r--r--permissions -
Open the
/opt/safeqcloud/conf/application.conffile in the editor (please don’t use standard notepad application as it might corrupt the file), locate and change the following two settings:-
default-keystore-file = "/opt/safeqcloud/conf/primary-host.pfx" -
default-keystore-password = "changeit"
-
-
Restart primary server with
systemctl restart safeq-cloud-server -
Validate that the certificate is used correctly with openssl command:
openssl s_client -servername primary-host -connect localhost:2560, where primary-host should match the hostname from the certificate. The command should dump the correct server certificate on the console. If it returns a fallback “localhost” instead please check the above two settings are correct, the pfx file is readable and the password matches.
If the root CA certificate is not issued by the global certificate authority it must be added also to standard Java cacerts keystore with the following command:
sudo /opt/safeqcloud/jre/bin/keytool -importcert -file cacert.crt -keystore /opt/safeqcloud/jre/lib/security/cacerts
Where cacert.crt contains a root certificate (Acme-CA-Root). The password for the cacerts file is “changeit”. When prompted whether to trust the added certificate please type “yes” and press enter.
Account setup in the SAFEQ Cloud web portal
The Certificate policy for internal communication option should be set to Use trusted CA certificates, as shown on the above picture.
If the CA certificates are not issued by the global certificate authority but by the corporate PKI they must be marked as “trusted” in the SAFEQ Cloud server:
-
Export all CA certificates from the certificate chain into separate .cer or .der files. So the Acme-CA-Root and Acme-CA-Intermediate must be exported to separate files in X.509 encoded format (could be also base64).
-
Under CERTIFICATES section in the account settings import those CA certificates under “Trusted CA certificates” panel:

If CA certificates are the global ones (e.g. Digicert, Globalsign, etc) there is no need to import them as they are part of the standard trusted CA bundle.
Primary server is now ready to accept connections from trusted clients.
Setting up gateway in unattended mode
If the root CA certificate of the primary server is not issued by the global certificate authority it must be added to a truststore and this truststore must be specified in the unattended installation file, so that the gateway will trust the primary certificate to which it connects. The truststore is a PKCS12 file which can be created using Java keytool command: keytool -importcert -file acme-ca.cer -alias acme-ca -storetype PKCS12 -keystore acme-ca.pfx. This command will produce acme.ca.pfx file which can be specified as a truststore for the gateway installation.
In the unattended configuration file please specify the following options:
HCP_DEFAULT_KEYSTORE="/full/path/to/gateway-host.pfx"
HCP_DEFAULT_KEYSTORE_PASSWORD="gateway-pfx-password"
HCP_DEFAULT_TRUSTSTORE="/full/path/to/acme-ca.pfx"
HCP_DEFAULT_TRUSTSTORE_PASSWORD="acme-ca-pfx-password"
Setting up SAFEQ Cloud Client for trusted connection
Before installing or configuring the SAFEQ Cloud Client make sure the Windows certificate store contains the correct certificate chain. See the first paragraph for an example of the chain. Refer to Installing SAFEQ Cloud Client on Windows chapter for details. When installing SAFEQ Cloud Client enable the local storage mode and Use pre-configured system certificate for secure communication option and specify the subject of the entity certificate or of it’s issuer (CA certificate). This can be a substring. SAFEQ Cloud Client will use this certificate for communication with the server.
If local storage mode is not used in the SAFEQ Cloud Client the trusted certificate setup is not needed.
If the SAFEQ Cloud Client can connect to the server the notification icon will have an idle gray color. If it is yellow it means there is a network issue or the certificate setup is not correct. Please check the SAFEQ Cloud Client log file under C:\ProgramData\safeqclientcore\logs\safeqclientcore.log. Make sure all root and intermediate CA certificates are imported into SAFEQ Cloud as previously described.