
Relevant Products
SAFEQ Cloud Client with Quick installation is available in BREEZE PRINT BREEZE MFD PRO PRINT PRO MFD
Advanced isntallation is available in PRO PRINT PRO MFD
SAFEQ Cloud Client installer can be downloaded from SAFEQ Cloud Web UI.
SAFEQ Cloud Client can be installed in two ways:
-
Quick installation – preconfigured installation without advanced options
-
Advanced installation – advanced options are enabled during the installation
SAFEQ Cloud Client can be installed by any type of user defined on the Windows machine. After installation of SAFEQ Cloud Client, it should be visible in Apps and features for all the users. If another user was logged in during SAFEQ Cloud Client installation, the icon corresponding to SAFEQ Cloud Client will appear only after a re-login.
For general requirements and prerequisites, see System requirements.
Quick installation
Limitations
-
The client can not be installed in local storage mode.
-
The Client can only be installed in the default folder.
-
Ghostscript will not be installed.
-
The Client is installed with the SAFEQ Cloud OAuth2 login authentication type.
-
Once the Client is installed, the Configuration option is removed from the menu.
Do the following to install SAFEQ Cloud Client using the quick installation type:
-
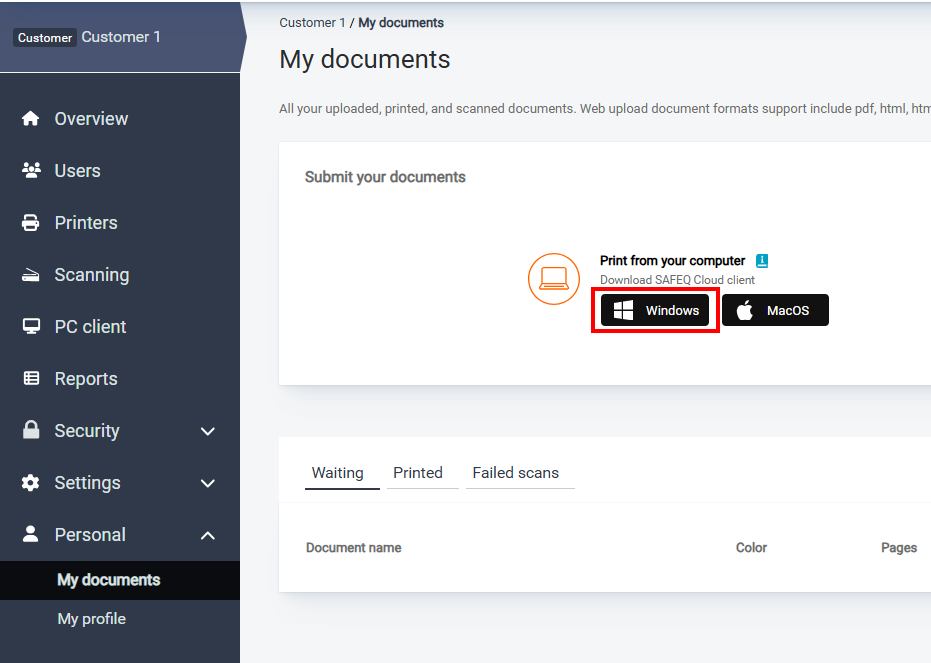
Log in to your Web UI, navigate to Personal > My documents, and select Windows.
-
Run the downloaded installation file.
-
On the next screen, read the license agreement and consent by clicking I Agree.
-
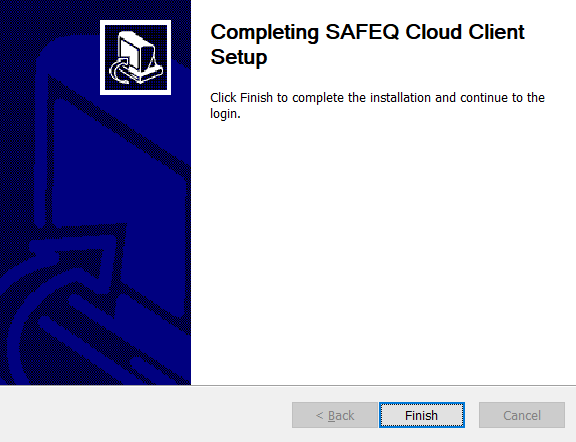
Wait until the SAFEQ Cloud Client is installed, and then click Finish.
-
Log in on the login screen opened in your web browser.
-
The application starts automatically.
Advanced installation
Do the following to install SAFEQ Cloud Client using the advanced installation type:
-
Log in to your Web UI, navigate to Personal > My documents, and select Windows.
-
Remove [domain] from filename and run the downloaded installation file.
-
On the welcome screen, click Next.

-
On the next screen, read the license agreement and consent by clicking I Agree.
-
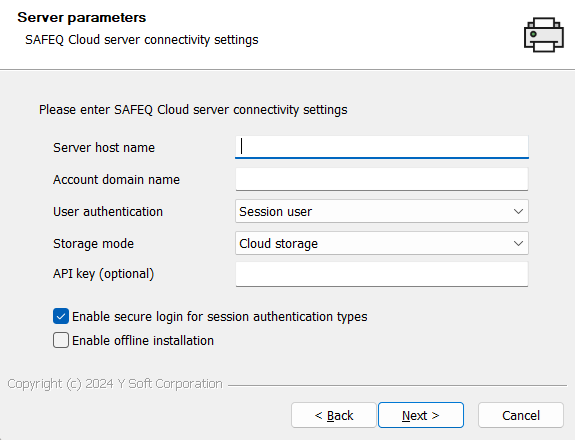
Fill in the server connectivity parameters.
-
Server host name – address or host name of the SAFEQ Cloud server to connect to. For “Local storage mode” the address should be the account DNS of the SAFEQ Cloud primary server, usually the same as Account domain name.
-
Account domain name – domain name of the target account. It can be found in SAFEQ Cloud Web UI on the Customer information tab.
-
User authentication – select user authentication type.
-
Storage mode – select where SAFEQ Cloud Client stores the data: Cloud storage, Local storage, and Hybrid (direct print locally, secure print to cloud).
-
API key – API key from the account settings. If omitted the default (restricted) API key will be used. Default API key will be removed in the future product versions.
-
Enable secure login for session authentication types – enable SAFEQ Cloud Client registration as an endpoint which must be authorized by the administrator to use insecure login types (such as Session User or User Principal Name).
-
Enable offline installation – install SAFEQ Cloud Client without registering or checking server connectivity. Please see this section for details.
-
-
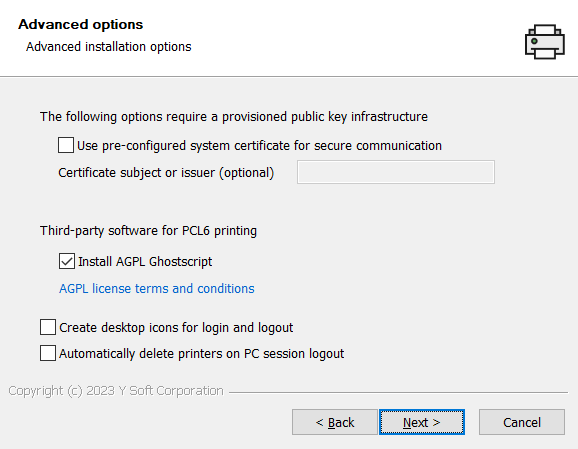
Modify the advanced options
-
Use pre-configured system certificate for secure communication – for TLS connectivity use the default certificate from the PC certificate store. NOTE: This option requires a managed public key infrastructure environment or a manually configured private key chain in the certificate store.
-
Certificate subject or issuer – search pattern to choose for a client certificate from the Windows certificate store.
-
Install AGPL Ghostscript – install AGPL Ghostscript software which is necessary for PCL6 printing.
-
Create desktop icons for login and logout – create login and logout icons on the desktop. Clicking on login icon will prompt the user to login to SAFEQ Cloud Client (if custom login type is activated). Clicking on logout button will perform SAFEQ Cloud Client logout and delete the printers.
-
Automatically delete printers on PC session logout – when user logs out from the operating system or shuts down PC the printers will be removed.
-
-
Select the target directory and click Install.
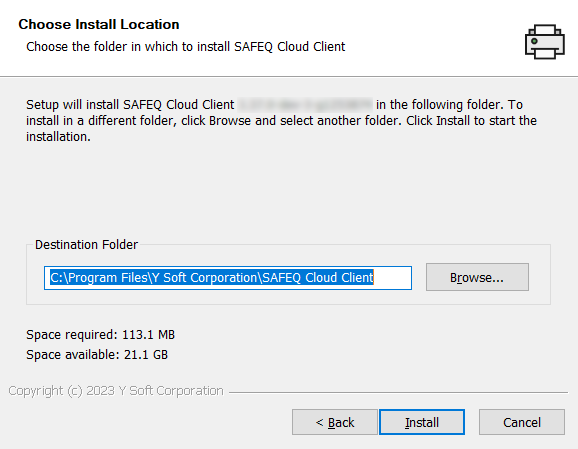
-
Wait while the SAFEQ Cloud Client is being installed and then click Finish.
-
After installation, the application will start automatically.
Unattended installation
Parameters /GATEWAYADDRESS and /ACCOUNTDOMAIN are mandatory when installing SAFEQ Cloud Client in unattended mode.
All parameters are ignored if the SAFEQ Cloud Client filename contains the account domain in [] as such an installer is intended for a quick install only. If installing in unattended mode, ensure the [account domain] is removed from the SAFEQ Cloud Client filename if present. The generic version of the SAFEQ Cloud Client can be downloaded from Installation Files.
Windows installer accepts several command-line parameters for unattended installation:
-
/ACCOUNTDOMAIN=yyy– chooses account domain name. -
/AGPLGHOSTSCRIPT=true|false– Accept the AGPL license and install Ghostscript software which is needed for PCL6 printing. The default value isfalse. -
/ALLOWCONFIGURATION=true|false– enable or disable the ability for the end-user to configure the SAFEQ Cloud Client after installation. The default value istrue. -
/ALLOWREMEMBERLOGIN=true|false– enable or disable the ability for the end-user to remember custom login information. The default value istrue. -
/APIKEY=xxx– Specify a custom API key. The default is to use the built-in restricted API key. -
/AUTHTYPE=0|1|2|3|4|5|6– User authentication type: 0=Session user (default), 1=Session user + domain name, 2=Custom login, 3=User principal name, 4=Microsoft Entra OAuth2, 5=OpenID Connect, 6=SAFEQ Cloud OAuth2 login -
/CERTSTORE=true|false– enable or disable using a TLS certificate from the system certificate store. The default value isfalse. -
/CERTSUBJECT=xxx– choose a system certificate with X.509 subject or issuer matching xxx (partial string match can be used). Only relevant with/CERTSTORE=trueoption. -
/COLOR=true|false– set default value to color (true) or BW (false). The default value isfalse. -
/CUSTOMDRIVER="Driver name" - will use Windows V3 Print Driver, instead of SAFEQ Cloud universal print driver.Windows V3 drivers ONLY. The print driver must be already installed/available at the workstation. If not found, it will default to SAFEQ Cloud universal print driver.
Number of features may not be available, depending on the print driver used, including possibility to change finishing options or use conversion triggers. YSoft also does not guarantee nor supports in any way that the document produced by the custom driver will be properly printed by the target printer. Ensuring compatibility between a print driver and the printer is solely in the responsibility of the vendor and / or the customer.Advanced only: driver can be changed in the C:\ProgramData\safeqclientcore\safeqclientcore.conf, the custom-driver="xxx" parameter.
If run from powershell, triple quotes needs to be used as it seems PowerShell has problem escaping spaces otherwise on newer W11/W10 builds. From command line use single quotes. /CUSTOMDRIVER="""PCL6 Driver for Universal Print 2" -
/D=fullpath– install the application to an alternate path (e.g./D=d:\SAFEQ Cloud). The default isC:\Program Files\Y Soft Corporation\SAFEQ Cloud Client -
/DELETEPRINTERSONLOGOUT=true|false– enable or disable printer deletion on PC session logout (e.g. user logout from Windows). The default is false. Manual logout from the SAFEQ Cloud Client application will still remove the printers. -
/DESKTOPICONS=true|false– the installer will create Windows desktop login and logout buttons for Custom Login (authtype=2). The default isfalse. -
/DIRECTOFFLINEPRINT=true|false– enable direct offline printing functionality. The default isfalse. -
/DUPLEX=true|false– set default value to duplex (true) or simplex (false). The default value istrue. -
/GATEWAYADDRESS=xxx– chooses SAFEQ Cloud gateway address. -
/KEEPDEFAULTPRINTER=true|false– if set totrue, the default print queue is not changed by SAFEQ Cloud Client. -
/LOGINPOPUPTYPE=0|1|2– specify the type of the login popup: 0=no popup, 1=informational bubble, 2=dialog. The default value is0. -
/OFFLINE=true|false|legacy– the installer will skip connection to SAFEQ Cloud during the installation. Please see this section for details. The default value isfalse. -
/PAPER=A3|A4|A5|Letter– choose the default paper format for the driver (if different from the Windows system locale). -
/PDFA=none/2u– choose whether to disable PDF/A-2U document conversion in the driver. It is enabled by default. -
/REMEMBERLOGIN=true|false– turn on or off the login remembering option. The default value isfalse. -
/S– Run the installer in unattended mode. -
/SECURESESSIONLOGIN=true|false– enable secure session login for session authentication types. This option is applicable only when AUTHTYPE is set to 0 (Session user), 1 (Session user + domain name), or 3 (User principal name), which are considered insecure login types. This parameter is ignored during updates. The default value is true, meaning the SAFEQ Cloud Client registers an endpoint, requiring administrator authorization. When set to false, no endpoint is created, and the SAFEQ Cloud Client will only function if both Allow unauthenticated requests and Allow untrusted endpoints are enabled in the API key settings. -
/STORAGETYPE=0|1|2– specify the type of storage: 0 = cloud, 1 = local storage, 2 = hybrid (direct print locally, secure print to cloud). The default value is0. -
/SYNCPERIOD=nn– automatic synchronization period, in minutes. The default period is 60 minutes. -
/UPGRADE=true|false– perform a full clean installation discarding the previous configuration (false) or upgrade the existing installation and keep the previous configuration (true). The default value isfalsefor new clean installations andtrueif a previous installation was detected. -
/USESERVICEACCOUNT=true|false– controls whether the SAFEQ Cloud Client runs under a restricted virtual service account instead of the default Local System account. Default value isfalse, meaning the SAFEQ Cloud Client is installed to run with administrative privileges under the built-in Local System account. When set totrue,the SAFEQ Cloud Client is installed to run without administrative privileges. A virtual NT SERVICE account is automatically created during installation and granted the necessary permissions to add and remove printers.When /
USESERVICEACCOUNTis set totruethe Auto-update feature and custom print drivers cannot be used, as both require administrative privileges. -
/RESETCONFIG=true|false– When used with /UPGRADE=false, it wipes out configuration files and creates new ones, effectively performing a clean installation. If not provided, it defaults to false.
Examples of SAFEQ Cloud Client usage:
-
Unattended installation of SAFEQ Cloud Client to
D:\Programs\SAFEQCloudClientdirectory:safeq-cloud-client-2025.02.06.2-setup.exe /S /GATEWAYADDRESS=x.x.x.x /ACCOUNTDOMAIN=acc1 /D=D:\Programs\SAFEQCloudClient -
Installation of SAFEQ Cloud Client with Trusted certificate:
safeq-cloud-client-2025.02.06.2-setup.exe /S /GATEWAYADDRESS=x.x.x.x /ACCOUNTDOMAIN=acc1 /SYNCPERIOD=60 /SYNCDRIVER=true /AUTHTYPE=0 /ALLOWCONFIGURATION=true /ALLOWREMEMBERLOGIN=true /REMEMBERLOGIN=false /LOGINPOPUPTYPE=0 /STORAGETYPE=1 /CERTSTORE=true /DUPLEX=true /COLOR=true