Contents
-
Required services
-
Creating a printer for IWS
-
Creating an Embedded configuration for IWS
-
Certificates
-
API Access keys
Prerequisites
-
Konica Minolta IWS Cloud Terminal has to be completed beforehand
1. Open SAFEQ Cloud Web UI https://<domain_name>:8443
2. Enter the required credentials in order to login into SAFEQ Cloud.
3. Make sure that you have the following services under the server:
-
terminal client
-
document output
-
messaging
-
mobile – The mobile service should have the below ports set correctly:

The login should not be enabled since this is handled by the SAFEQ Cloud server.
For Y Soft hosted Accounts the Primary services are already configured accordingly and ready to be used.
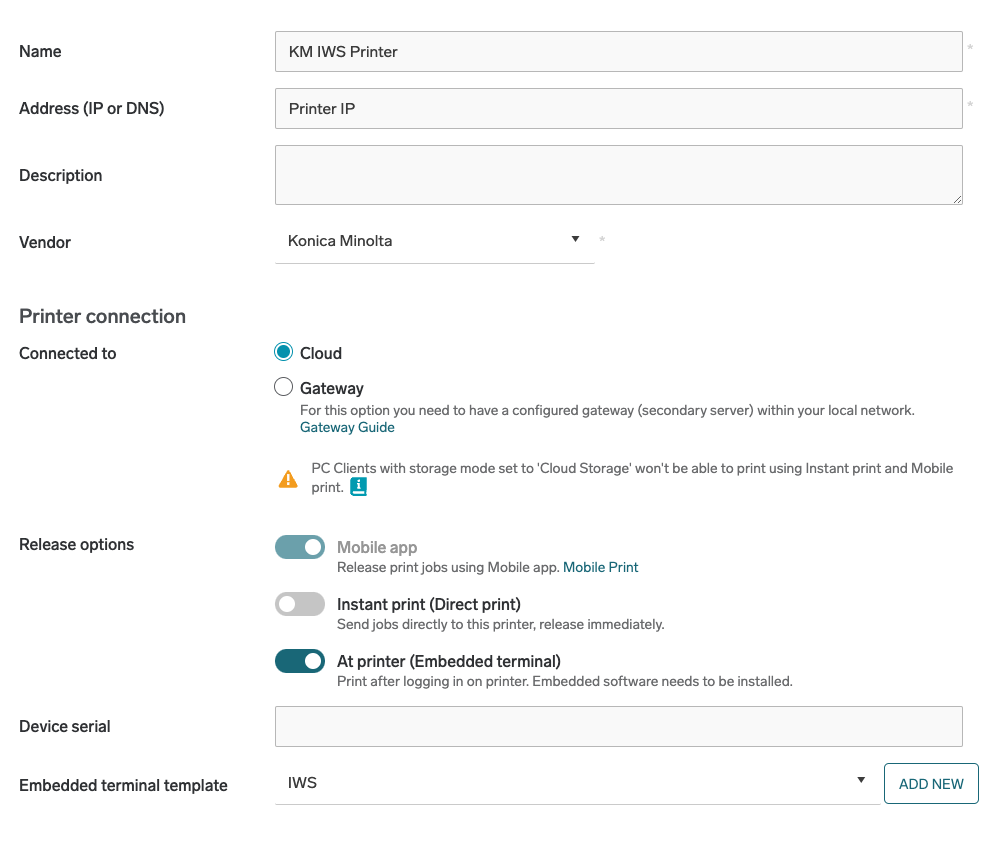
4. Create the Konica Minolta printer under the customer and add information in the fields:

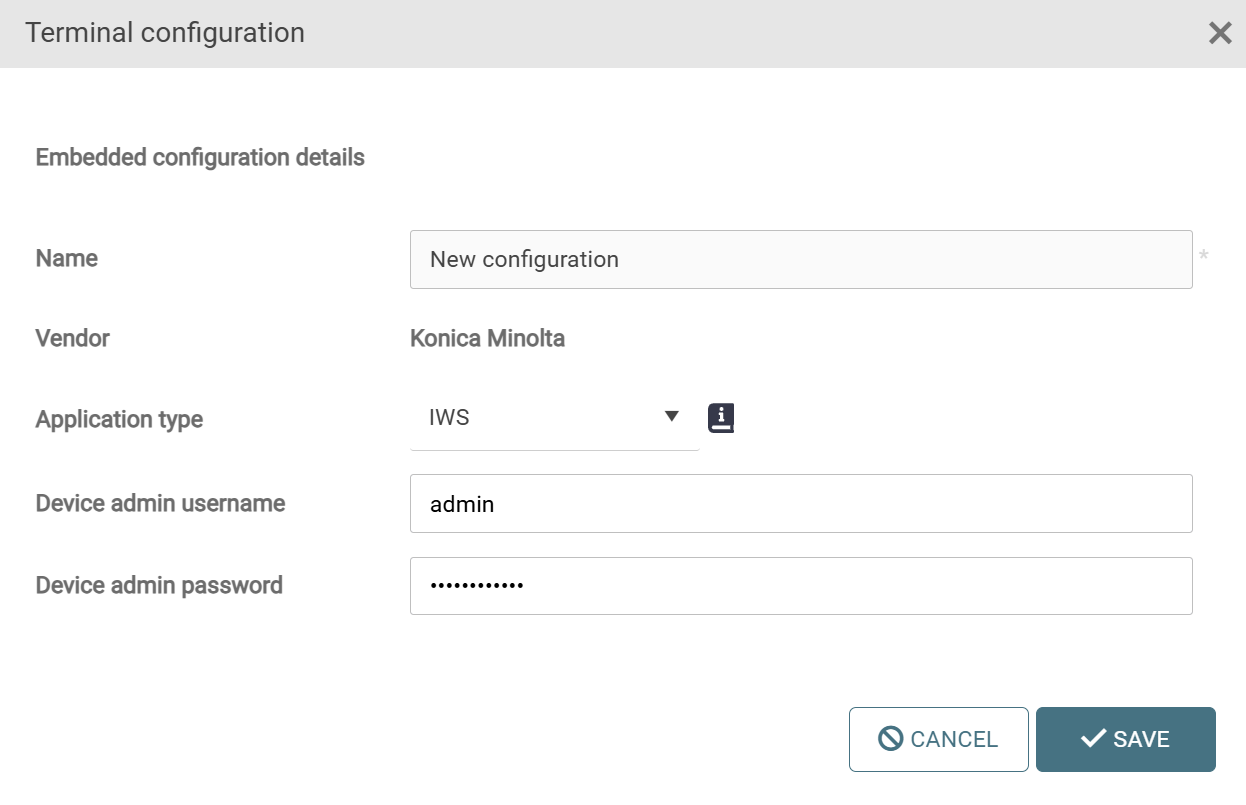
4.1. An Embedded Configuration needs to be created by clicking ADD:

The Embedded Configuration will be later edited (step 6.) in this documentation.
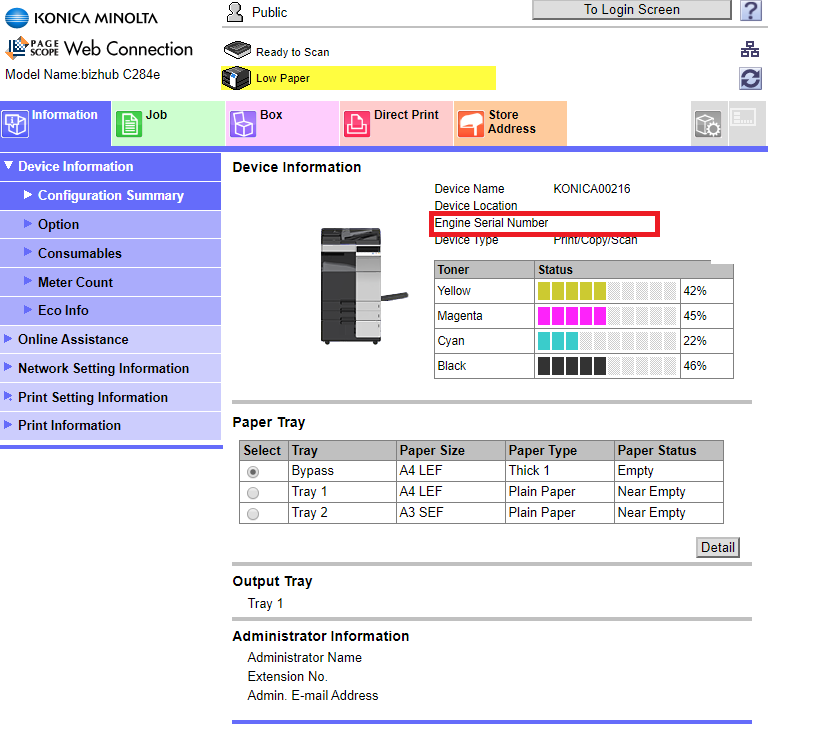
4.2. Device serial number from the printer can be retrieved from here:
Device Information → Configuration Summary → Engine Serial Number

5. In the tree, go to Settings > General settings > Messaging and add a SMTP configuration. Fill in all the required details.
6. Edit the Embedded configuration created previously under the customer. In addition to the mandatory fields (Name, Vendor, valid device admin username and password), fill in:
-
For Application Type select IWS
-
Uncheck Enable settings
-
Check Enable Scan Application
-
Select the SMTP Configuration
-
Select the printer in Mapped Devices (should be already selected from step 4.1.)
If Enable settings is checked, then the user will have the possibility to change the settings for the IWS application.
If it remains unchecked, then the user will not be able to modify the settings within the App. In this case only an Administrator that has access to the Marketplace will be able to configure the settings.
The native applications (Advanced Copy, Scan, Fax, Other Installed Applications) can be enabled/disabled from the embedded configuration.

7. Add one Input Port under the customer. Select Port Type as Pull Queue for it.
8. Adding a Certificate for IWS:
-
For Accounts that are hosted in the Y Soft Cloud (EU, US, UK, AP), there is no need to create a new certificate for IWS.
-
For on-premises Accounts that have a Self-Signed Certificate, it is required to have a Certificate under “Private Certificate chains”:
-
Click Create
-
Select from the drop-down the Account domain name
-
Click Generate
-
In the Application settings (described at step 6.) uncheck “Verify SSL”. Verifying the SSL connection here means that the IWS application will validate the server certificate. This will only be possible when connecting the IWS app to the Y Soft Cloud servers (as stated above) and using their deployed certificates. When using a self-signed certificate for an on-prem installation, or when deploying your own ca certificate in the cloud the IWS application is not able to verify the validity of the server certificate and so this checkbox should be unchecked in this case.
-
Imported Self-Signed Certificates will not work in this case.
9. In the Settings > General settings > Mobile Print section under the account, select from the drop-down the mobile service and make sure that “Enable MDM Single Sign On” is unchecked.
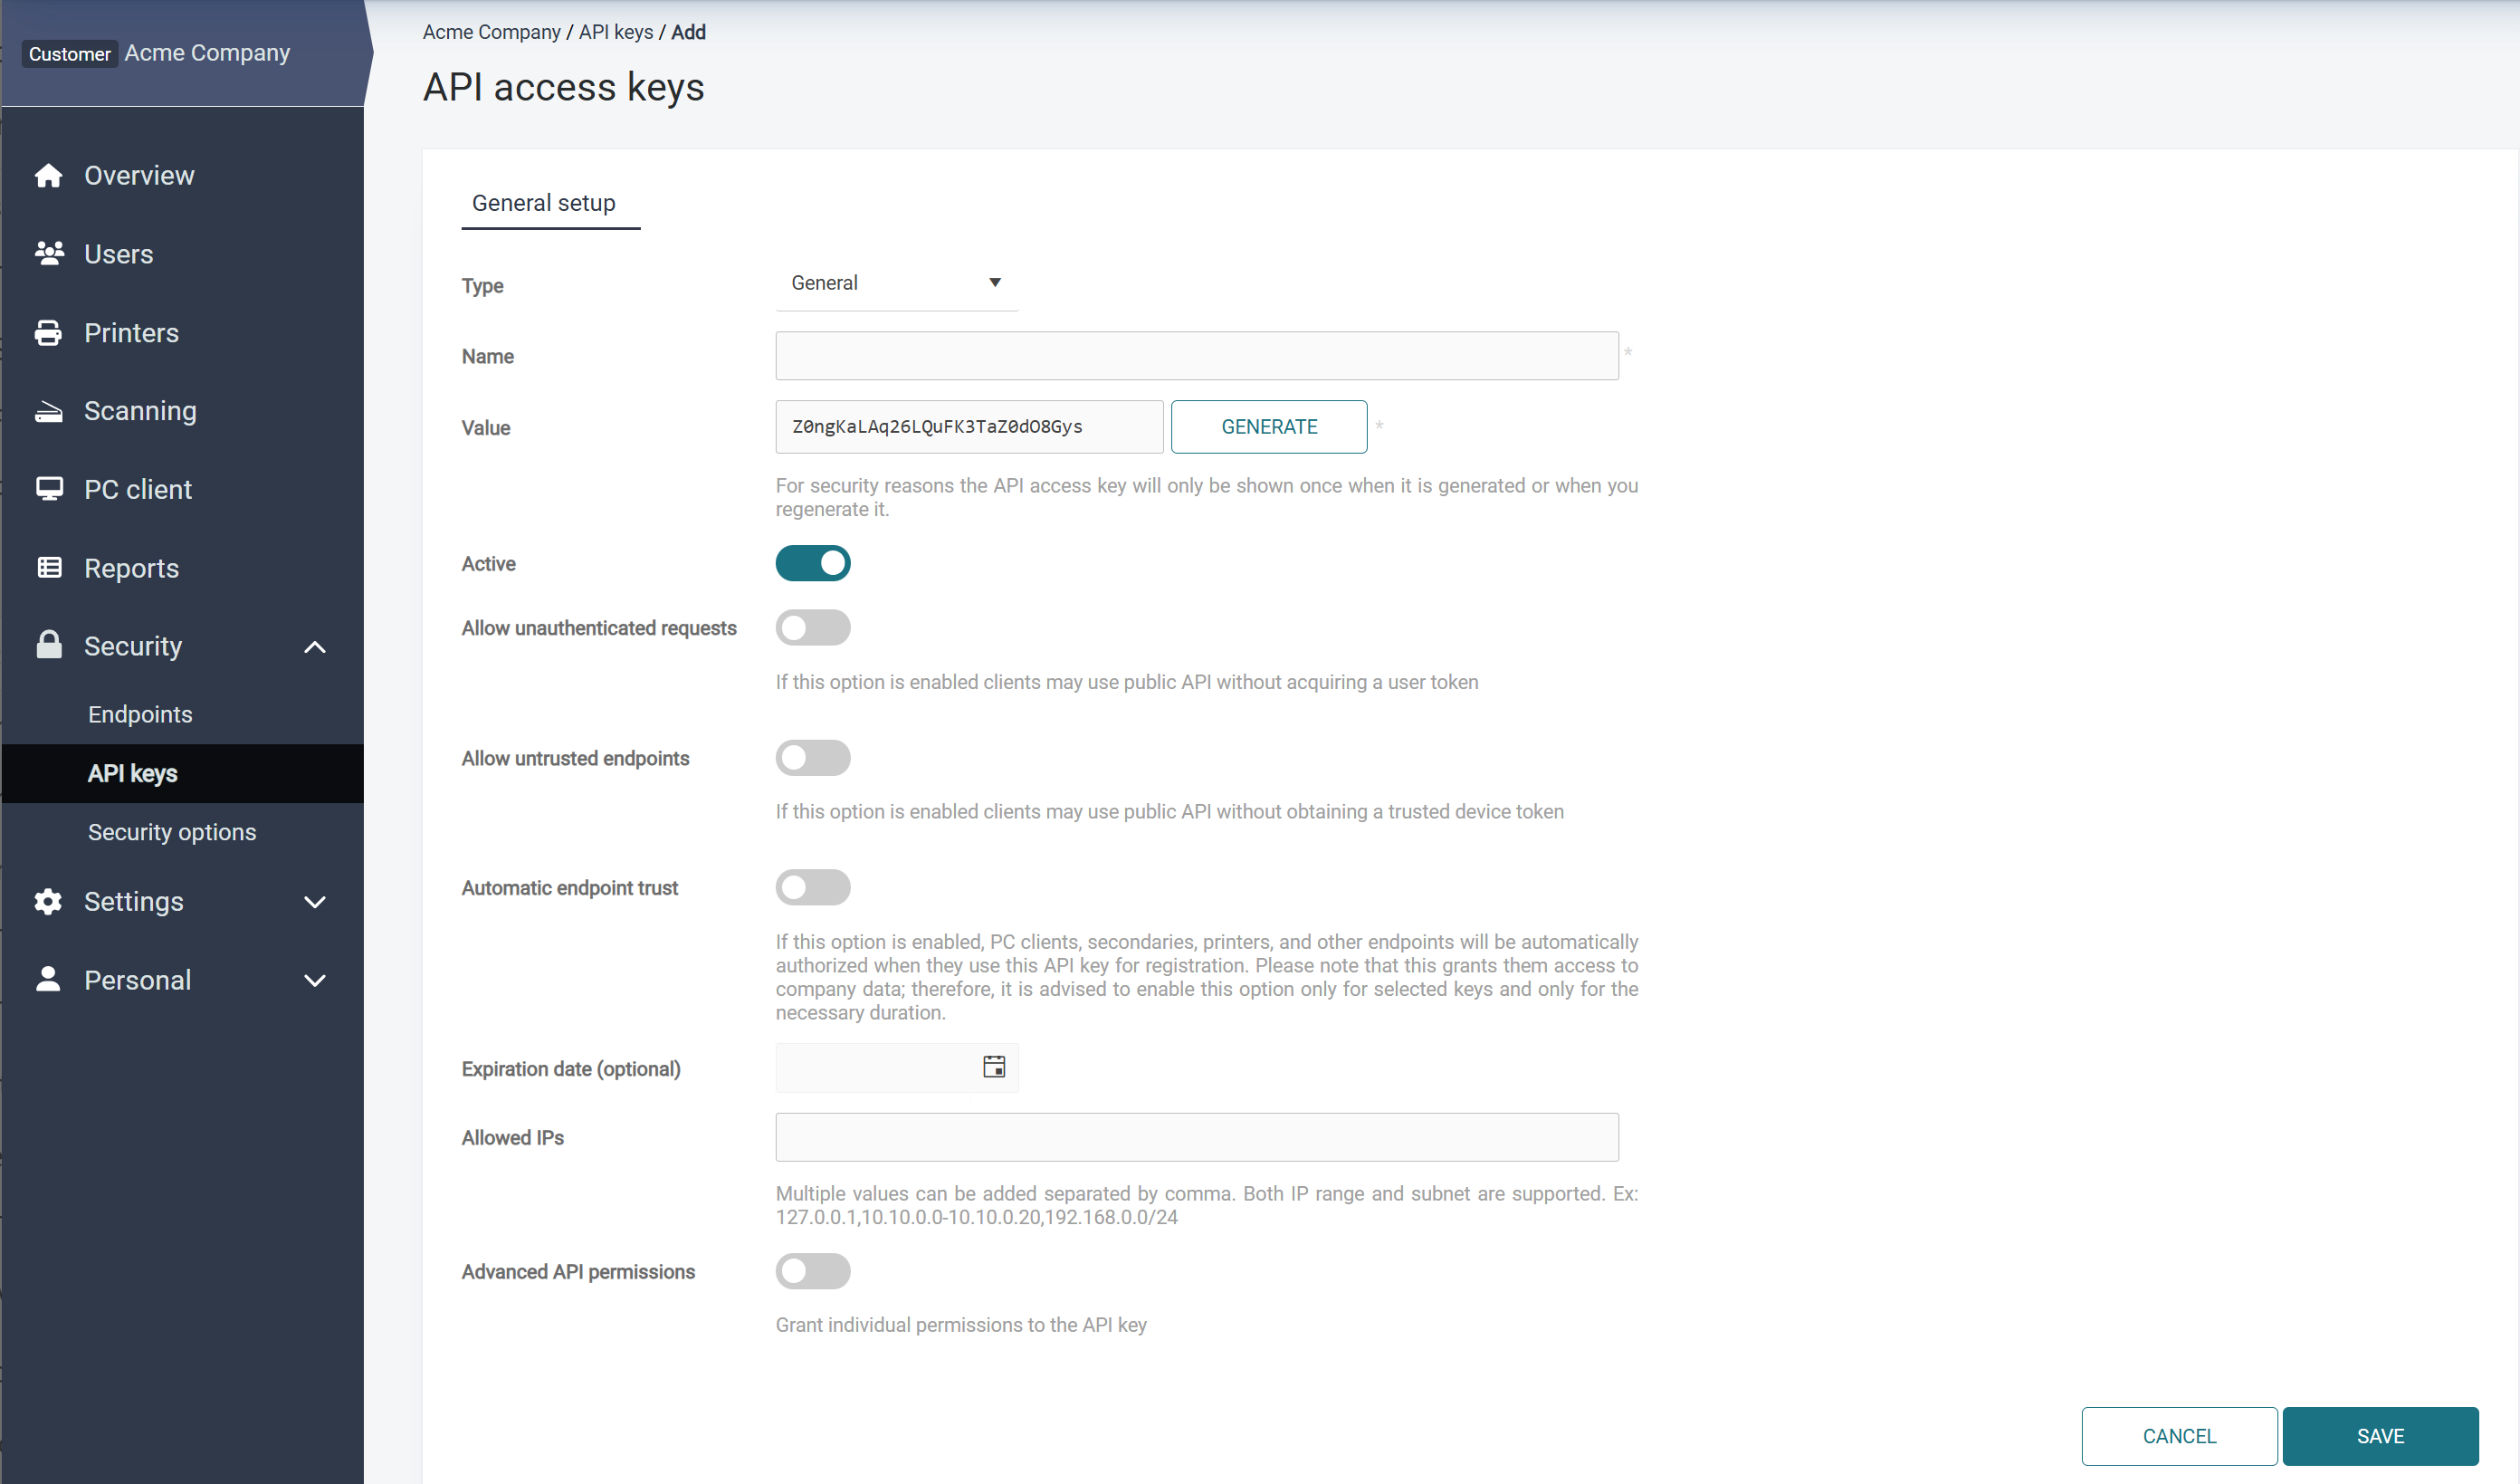
10. Add an API access key:

Allow untrusted endpoints must be checked and the other checkboxes must be unchecked for the key to work properly.
The default API access key can be used, however the same set up as in the above image must be made for it.
Other options availble on the embedded page:
-
Enable native card reader – the native/non-native setting will only determine how the card is read/handled on the device side: “native” means that the full card number length is used, “non-native” means that the card number is truncated.
-
Enable card conversion bypass – IWS applies a conversion of the card number passed from the Loadable Device Driver. When opted out of the conversion, the card number stored in SAFEQ Cloud should be the raw card number passed by the Loadable Device Driver to IWS.
