
Relevant Products
Microsoft Entra is available in BREEZE PRINT BREEZE MFD PRO PRINT PRO MFD
SAFEQ Cloud supports Microsoft Entra ID (formerly Azure AD) authentication for authenticating Microsoft Entra ID users to SAFEQ Cloud.
You can configure Microsoft Entra ID authentication to use either OpenID Connect (OIDC) authentication, service access authentication (implemented via Service Account), or both types simultaneously. Configuring an authorization provider with OIDC and service access can be helpful when you require enhanced security, user convenience, and support for all possible authentication options when authenticating into SAFEQ Cloud (e.g., Web UI, MFD terminal, etc.).
Be aware that OIDC on its own is incompatible with SAML Single sign-on. If you wish to use SAML, enable Service Account Authentication as well.
For the breakdown of the advantages of OIDC and service access authentication methods, refer to the Authentication providers section.
General settings
To add Microsoft Entra ID Authentication provider, perform the following steps:
-
Log in to SAFEQ Cloud Web UI and go to Users page and Authentication providers tab.
-
Click Add.
-
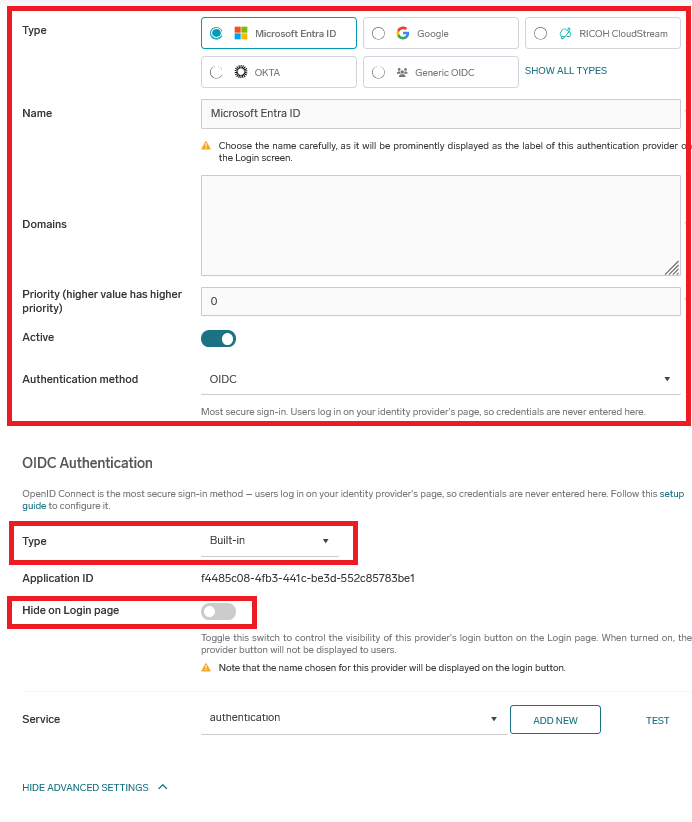
In Type, select Microsoft Entra ID.
-
Fill in the general settings:
-
Name – An internal name used for identifying the particular authentication provider configuration. Should be prefilled with the selected Type.
-
Domains – The domain names of the authenticating users. Add here the domain aliases that the users can use to log in. At least one domain in the list should match the domain part of the fully qualified username. If strict domain validation is disabled, SAFEQ Cloud will attempt to authenticate the user with all domains in the list when the username does not contain any domain, in the order defined in the list. If strict domain validation is enabled or the username contains a domain, SAFEQ Cloud will attempt to authenticate only with the domain in the credentials.
For example, to allow user john.doe@acme.com to log in via this Authentication provider, enter the acme.com domain here.
Microsoft Entra ID's limitation is that the domain in the user's email address must match the Microsoft Entra ID tenant domain. Otherwise, SAFEQ Cloud cannot synchronize the email address with the user.
For example, if your Microsoft Entra ID's tenant domain is mycompany.com and there is a user with username john.doe@mycompany.com and e-mail john.doe@privatemail.com, the john.doe@privatemail.com e-mail won't be visible to SAFEQ Cloud.
-
Priority – A number that determines the order in which authentication providers will be called until one succeeds. Higher-priority providers will be tried first.
-
Active – If enabled, the authentication provider will be used for authentication. If disabled, this authentication provider will not be used for authentication. You can use this to disable the Authentication provider temporarily.
-
Authentication method - types of authentication, which can be used for user validation and data synchronization
-
-
In the next steps, choose the authentication method.
-
OIDC
-
OIDC Built-in authentication – The default option suitable for most use cases. We do not recommend disabling it. This is the most convenient option if you don't need any special configuration or don't want to set up your own Microsoft Azure App registration (OIDC client) manually.
-
OIDC Customizable authentication – Choose this option if you need to configure your own custom Microsoft Azure App registration.
-
-
OIDC together with Service account authentication – Choose this option if you have card IDs and/or PINs stored in your authentication provider and you wish the users to be able to log in with cards or PINs at the MFDs.
-
Only Service account authentication – This is a legacy type of authentication and we do not recommend using it in newly set up Authentication providers.
-
When the OIDC authentication is enabled (using either Built-in or Customizable config), you can choose whether to hide a login button for this authentication provider on the Login page via the Hide on Login page switch.
OIDC Built-in configuration
When using the built-in OIDC authentication, users will log in via a predefined SAFEQ Cloud Microsoft Azure application (commonly named SafeQ - Authentication, its App ID can be found in authentication provider configuration in OIDC section).
-
Log in to SAFEQ Cloud Web UI and go to Users page and Authentication providers tab.
-
Click Add and fill in the general settings (Type, Name, Domains, Priority, Active).
-
Select OIDC in Authentication method drop down list.
-
OIDC Authentication section – in Type drop-down list, choose Built-in and fill in the fields accordingly
-
Hide on Login Page - Enable this option to hide the Microsoft Entra ID button on the SAFEQ Cloud login page. Otherwise the name displayed on the button is taken from the Name field.
Example:
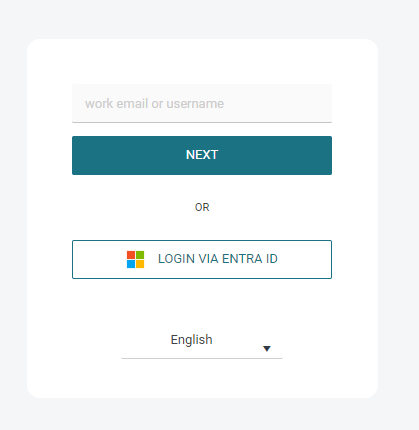
If the Hide on Login Page option is enabled, no "Login via <Provider Name>" button will be displayed on the login screen. To authenticate via such an authentication provider, users need to fill in the username containing a domain matching the authentication provider, which will redirect them to the OIDC authentication flow (the same way as clicking the "Login via <Provider Name>" button.
-
-
Service account authentication: select OIDC + Service account in authentication method, if you wish to use service account together with OIDC. See the Service account authentication section of this page.
-
This is an example of the final configuration::
-
Click Save.
-
Microsoft Entra ID users can now log in to SAFEQ Cloud.
Every user logged in via this provider will have the Authenticated Users group assigned. You can use this group to manage access controls. See Access Control.
When users sign in for the first time, they must consent to the predefined Microsoft Azure application. To prevent prompting each user individually, you can grant tenant-wide admin consent to application in advance.
Note: The predefined Microsoft Azure application will appear in Enterprise Applications only after the first consent is granted by any user, or after an administrator approves a user-initiated request.
For more information, see https://learn.microsoft.com/en-us/entra/identity-platform/permissions-consent-overview.
Service account authentication
When using the SAFEQ Cloud Microsoft Entra ID Service account authentication without OIDC, multi-factor authentication (MFA) is not supported.
If you require MFA, enable OIDC for your Microsoft Entra ID provider as described above. This allows users with MFA to authenticate through the Web UI and client workstations.
At the MFD terminal, username/password login is always available only when MFA is disabled.
This method enables authentication on MFD using data from a remote identity provider (e.g., card, PIN, or credentials). It also allows displaying user department in accounting reports and enables lookup of Microsoft Entra ID users in web UI even before their first interaction with SAFEQ Cloud. Customers who use self-registered cards, API-imported cards, or do not require department reporting typically don’t need to activate it.
To configure Microsoft Entra ID authentication using a service account, first, you need to create an App registration in Microsoft Azure. To do that, perform the following steps:
Registering a new Microsoft Azure app
-
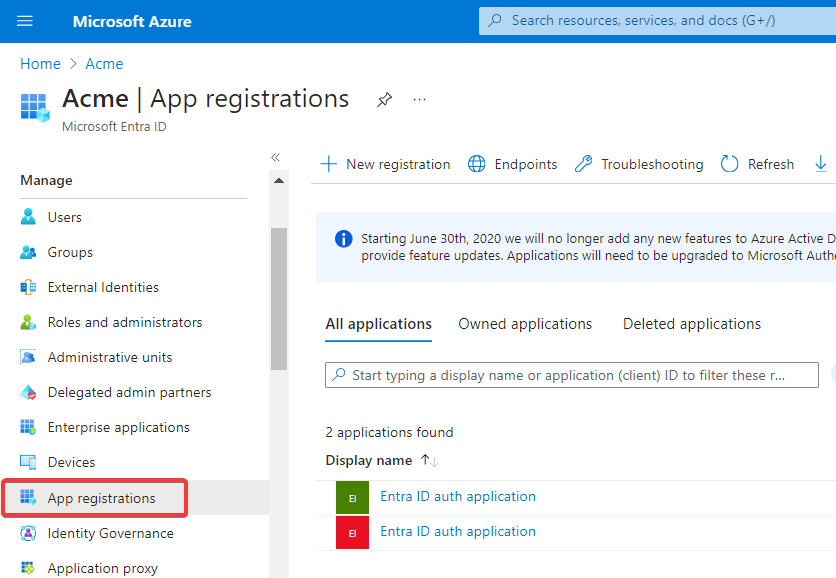
Log in to Azure Portal and click Manage Microsoft Entra ID.
-
Click App registrations.
-
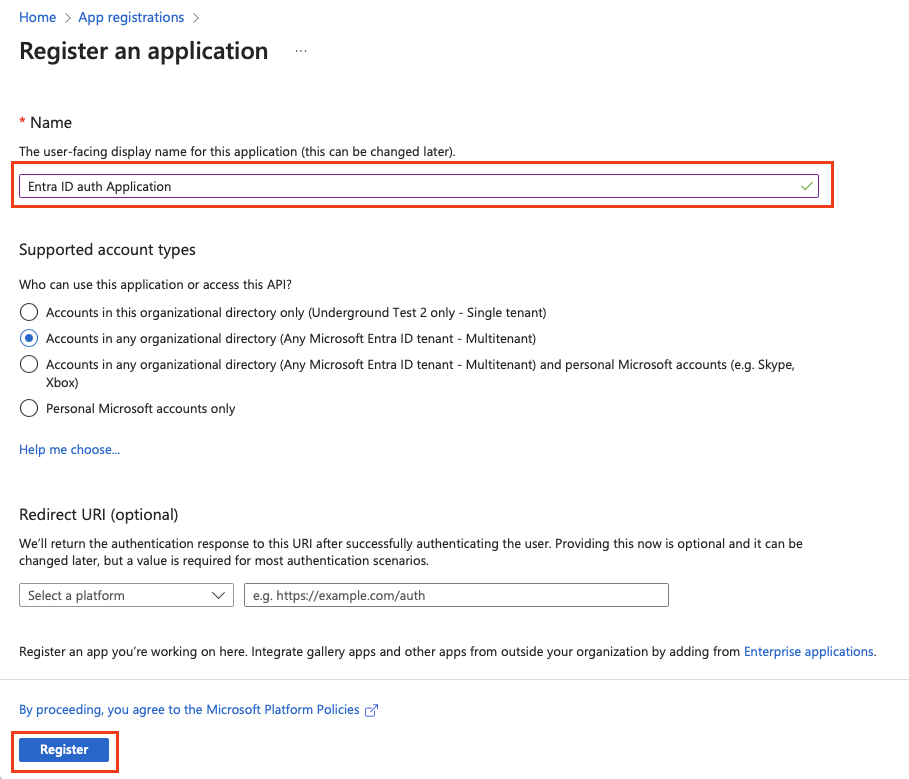
Click the +New registration button.
-
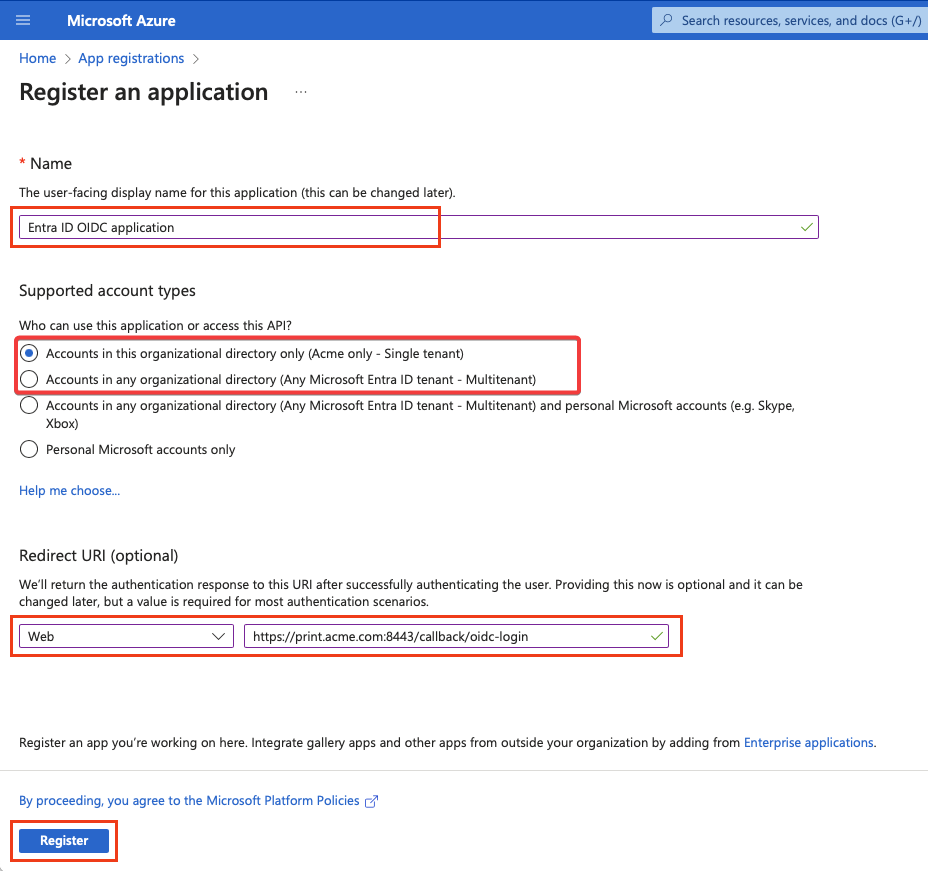
Enter the name of your new application, select one of the supported account types, and leave the Redirect URI field empty.
-
Click Register.
-
Click API permissions.
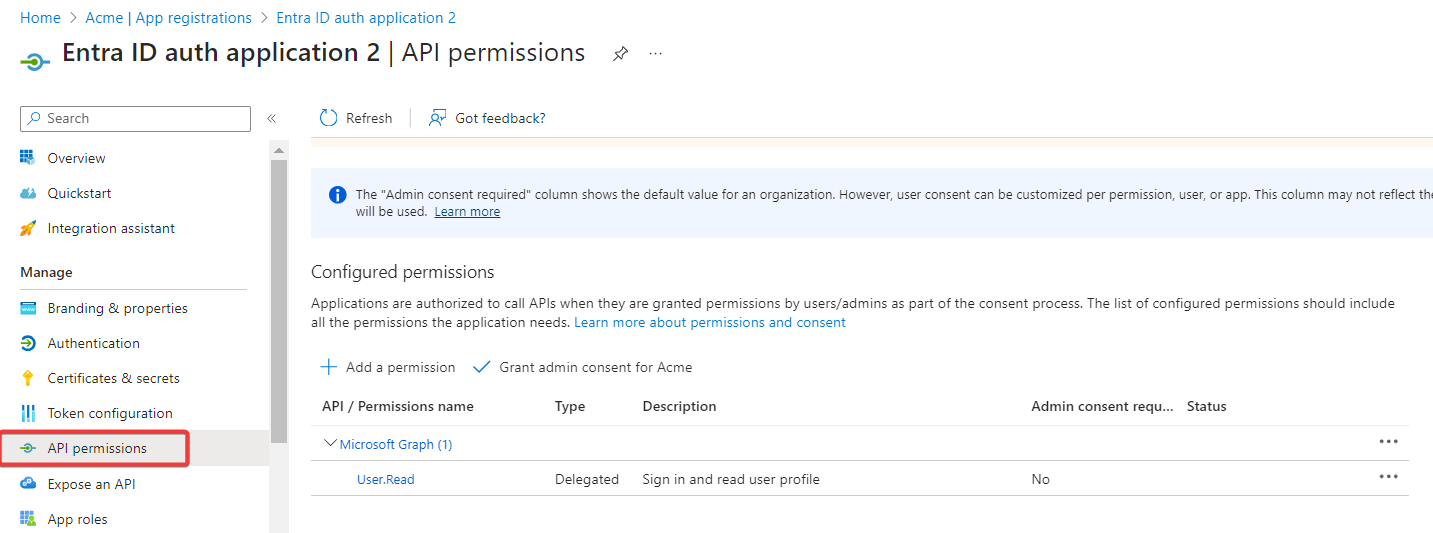
-
Click Microsoft Graph (1) and delete the User.Read permission.
-
Click Add a permission.
-
Select Microsoft Graph from Commonly used Microsoft APIs.
-
Click Delegated permissions.
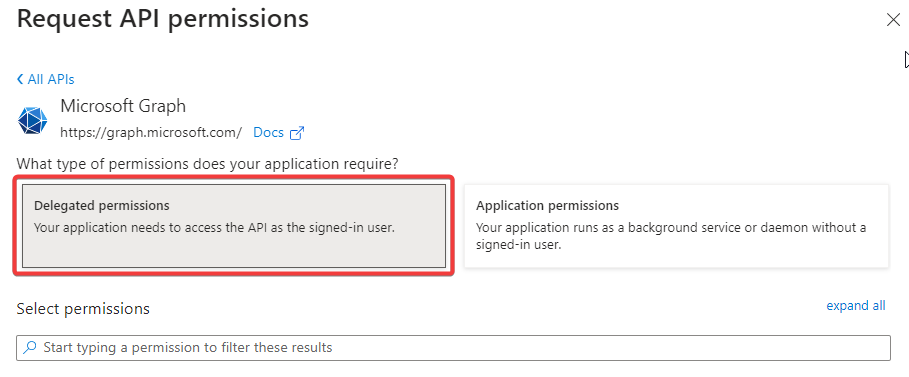
-
Search for the permissions required, and then click Add Permissions.
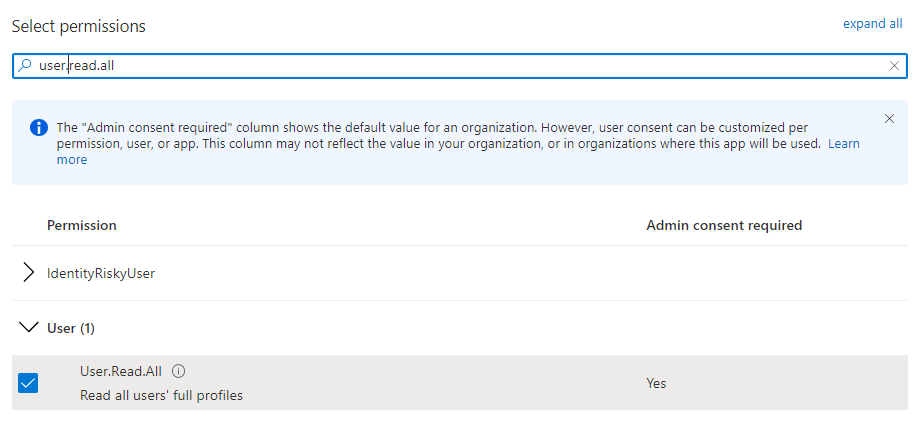
Minimum Permissions Required are:-
GroupMember.Read.All – Allows the app to list groups and to read their properties and all group memberships on behalf of the signed-in user
-
User.Read.All – Allows the app to read the full set of profile properties, reports, and managers of other users in your organization on behalf of the signed-in user.
Additional permissions may be required to read custom attributes or similar. Add them based on your specific configuration of Microsoft Entra ID and attribute mapping configured in SAFEQ Cloud.
-
-
Grant the admin permissions by clicking Grant admin consent for, then click Yes to approve.
-
Your App Registration should now display the following.

-
Click Authentication and Set Allow public client flows to Yes.
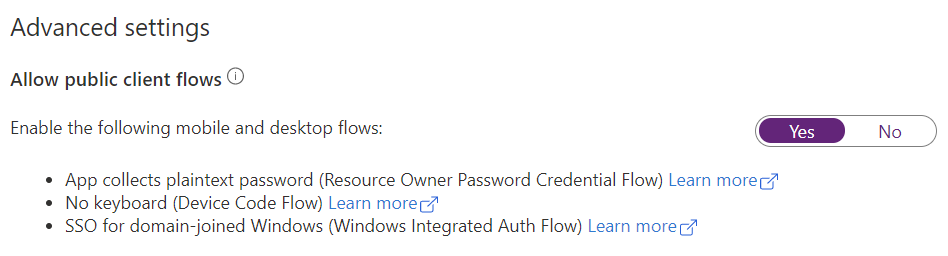
The Service account needs the Allow public client flow functionality for fetching information about a particular user or group from Entra ID and for username/password authentication. Namely, the Username+password type of login on MFDs, the Manual login authentication type in the SAFEQ Cloud Client, and logging in to SAFEQ Cloud Web UI without OIDC. If you wish to use the Service account, the Allow public client flow must be enabled
Note that SAFEQ Cloud doesn't store the usernames and passwords, but that they are passed through SAFEQ Cloud to Entra ID for validation. Therefore, they might potentially be intercepted by attackers on the way.
-
Microsoft Entra ID app configuration for Service account authentication is now complete.
-
To allow authentication using PINs and cards stored in Microsoft Entra ID or to display user’s department in reports, follow:
Synchronizing user card, PIN or department from Microsoft Entra ID
Creating an Authentication provider in SAFEQ Cloud
This Authentication provider will use the app registration which you have just created.
-
Log in to SAFEQ Cloud Web UI and go to Users page and Authentication providers tab.
-
Click Add and fill in the general settings (Type, Name, Domains, Priority, Active).
-
Select Service Account in Authentication method drop down list
-
Service Account Authentication – this section applies to service account settings
-
Application ID – The ID of your registered Azure App.
-
User name – Name of the user to be used for the Microsoft Graph API access.
-
Password – Password for the above-mentioned user.
-
Cache expiration in seconds – The time the authentication information is kept in the internal cache to reduce the calls from SAFEQ Cloud to Microsoft Entra ID. We recommend at least 2 minutes.
-
Custom attributes – Expand custom attributes to change the Microsoft Entra ID attributes in which usernames, card IDs, ShortIDs, and others are stored.
-
Service – Select which Authentication Service will communicate to this Microsoft Entra ID server. In case no service is already created, you can add it by clicking Add. If the primary server has only one authentication service, or if there's only one authentication service in general, it is pre-selected by default.
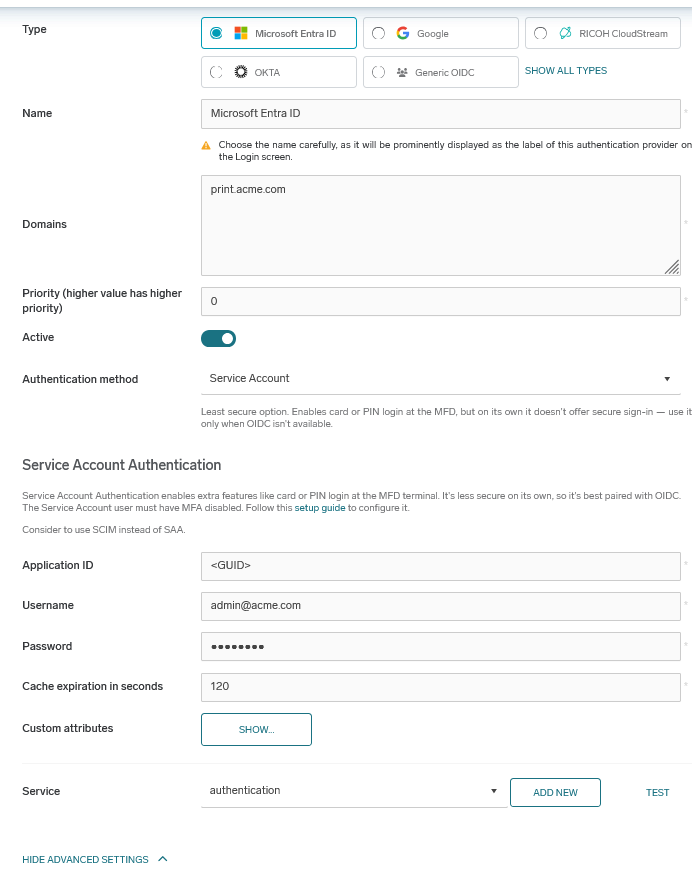
-
Click Save.
-
-
The Microsoft Entra ID users can now log in to SAFEQ Cloud.
Every user logged in via this provider will have the Authenticated Users group assigned. You can use this group to manage access controls. See Access Control.
Card ID and Short ID synchronized through Entra ID are not going to be visible in the user profile in SAFEQ Cloud Web UI. This does not prevent users from using these authentication methods.
OIDC Customizable configuration
If you want to configure custom Microsoft Entra ID OIDC authentication, you must first configure Microsoft Azure App registration and then use it for the authentication provider in SAFEQ Cloud. To create a new Microsoft Azure App registration, perform the following steps:
Registering a new Microsoft Azure app
-
Log in to Azure Portal and click Manage Microsoft Entra ID.
-
Click App registrations.
-
Click the +New registration button.
-
Enter your new application's name, choose Single tenant (Accounts in this organizational directory only) or Multitenant (Accounts in any organizational directory) account type. However, we recommend Single tenant. Fill in the Redirect URI field. The Redirect URI pattern is: https://<account-domain>:<port>/callback/oidc-login
-
The port for callback URIs is, by default, 8443. Example: https://print.acme.com:8443/callback/oidc-login
-
In environments with reverse proxy infrastructure, do not specify the port number in the URL, meaning the default HTTPS port 443 will be used. Example: https://print.acme.com/callback/oidc-login
-
The account domain is your domain defined in SAFEQ Cloud. It must be the same as the Callback domain selected in the Authentication Provider form, which you will fill in later.
-
-
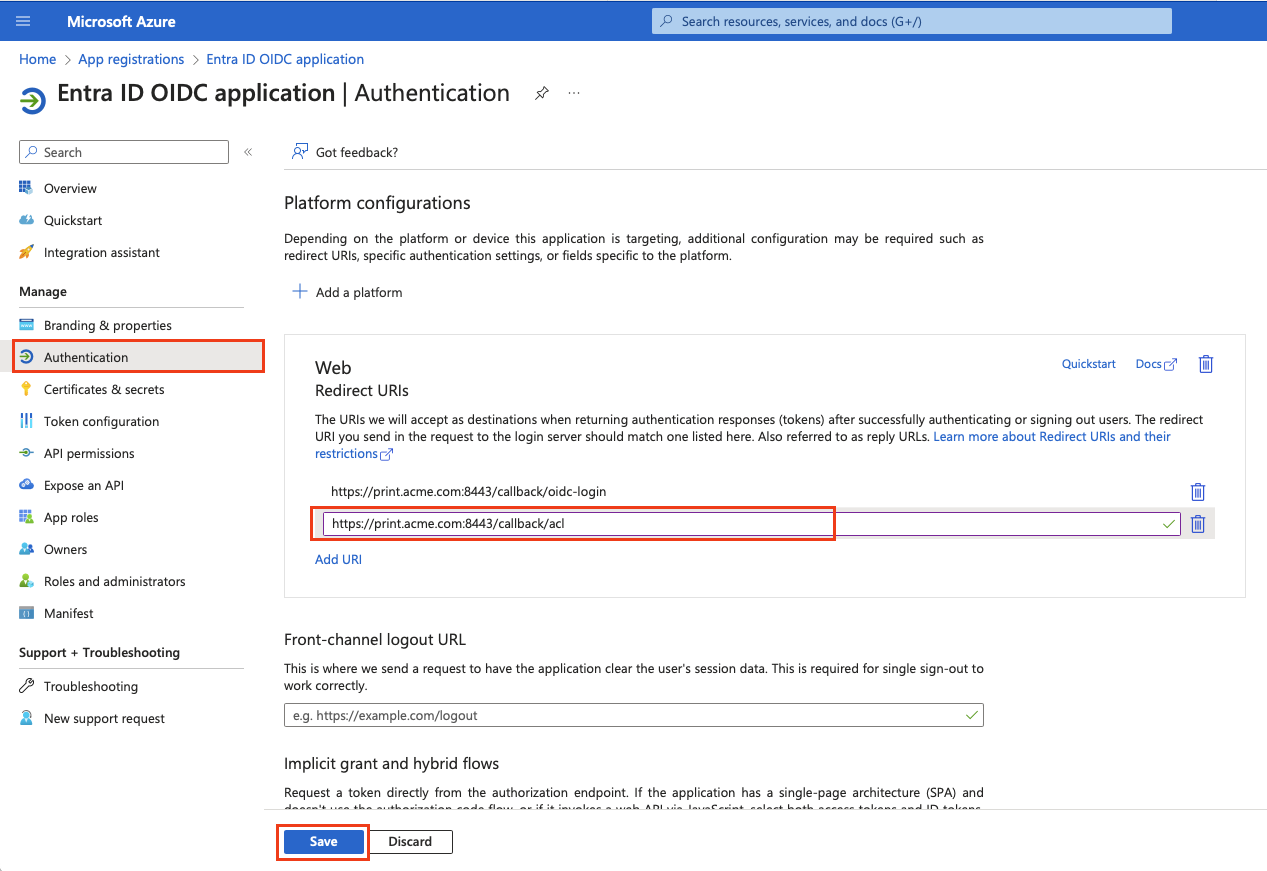
Go to Authentication. In the Web section, click Add URI and fill the URI with a pattern: https://<account-domain>:<port>/callback/acl
-
The port for callback URIs is, by default, 8443. Example: https://print.acme.com:8443/callback/acl
-
In environments with reverse proxy infrastructure, do not specify the port number in the URL, meaning the default HTTPS port 443 will be used. Example: https://print.acme.com/callback/acl
-
The domain is your domain defined in SAFEQ Cloud. It must be the same as the domain selected in the Authentication form, which you will fill out later.
-
Keep the Front-channel logout URL empty.
-
-
Click Save.
In total, there should be these callback domains defined:
-
https://<domain>:<port>/callback/oidc-login. For environments with reverse proxy: https://<domain>/callback/oidc-login
-
https://<domain>:<port>/callback/acl. For environments with reverse proxy https://<domain>/callback/acl
-
-
Go to Certificates & secrets and click + New client secret. Optionally, set the Expires value according to your security policy. Click Add.
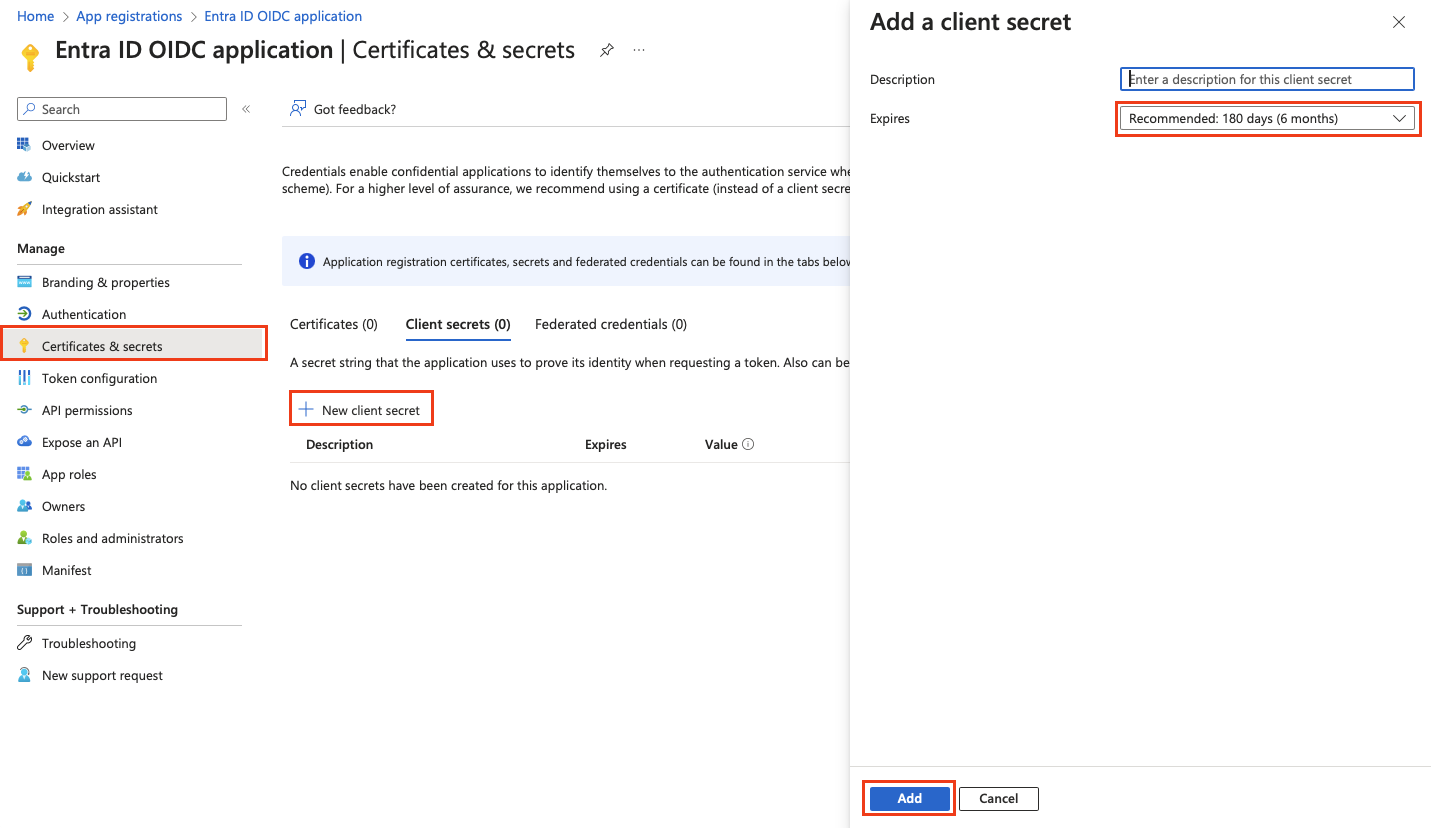
-
Copy the secret value and save it securely. You will need it later for the SAFEQ Cloud authentication provider configuration.
You can only see the secret value during creation time for security reasons. Once you leave the screen, the value will not be shown again.
Because the Client secret has limited validity, remember to create a new one before it expires and replace the old one either in SAFEQ Cloud Web UI or using SAFEQ Cloud API. See the API documentation > API Functions > section Authentication provider.

-
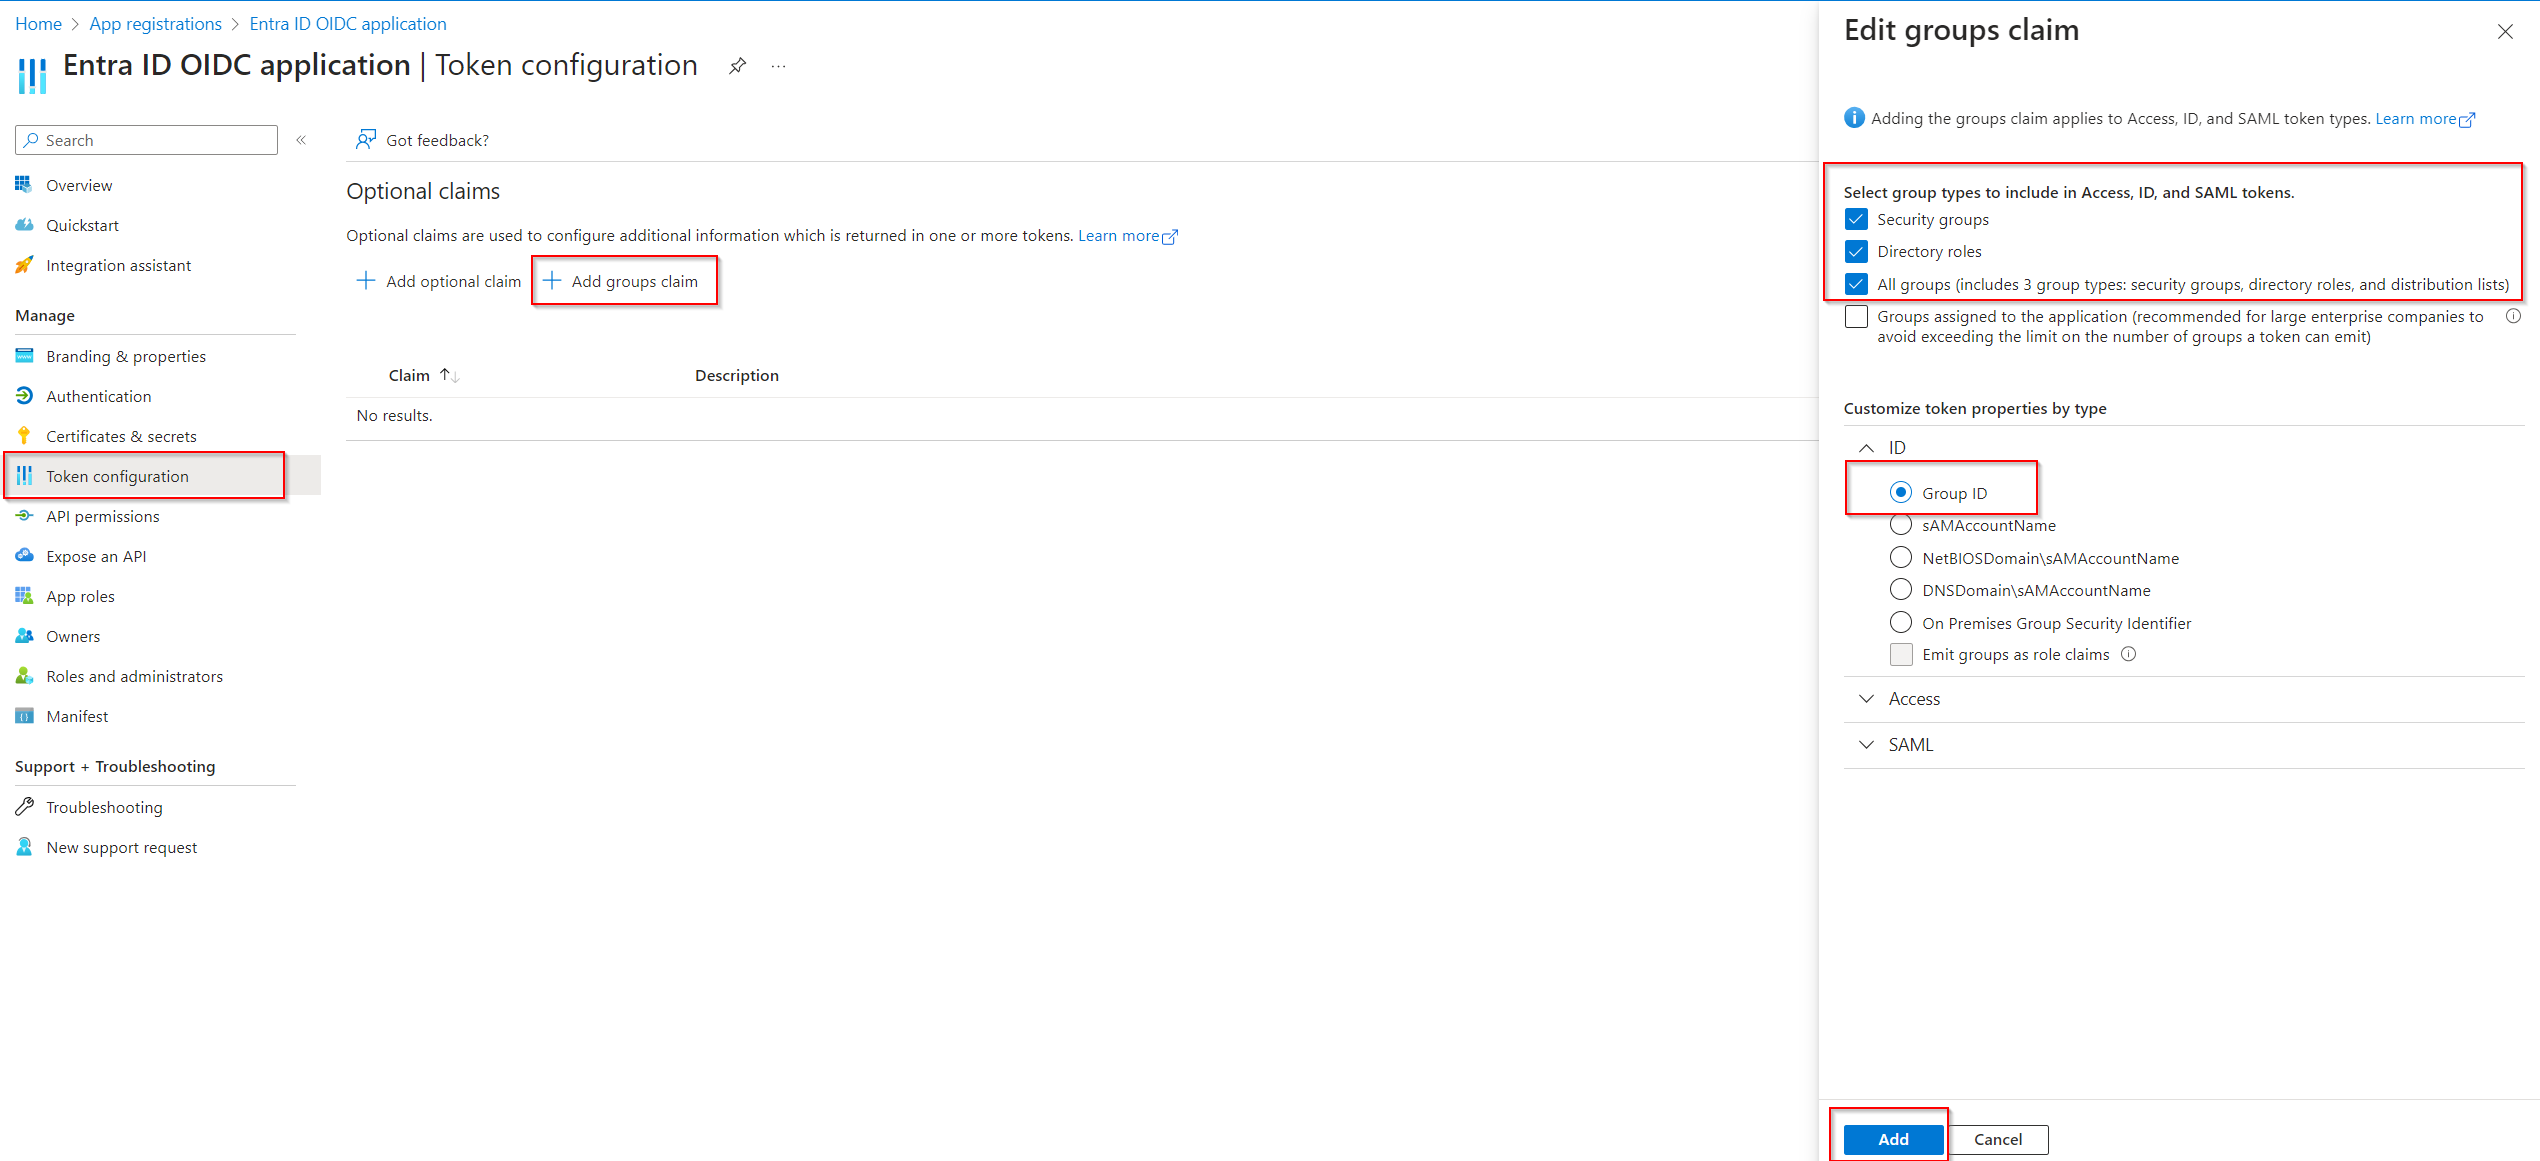
Go to Token configuration, click + Add groups claim, and define the groups that will be part of the users' ID Token. This will be used later in the Access Control configuration in SAFEQ Cloud.
-
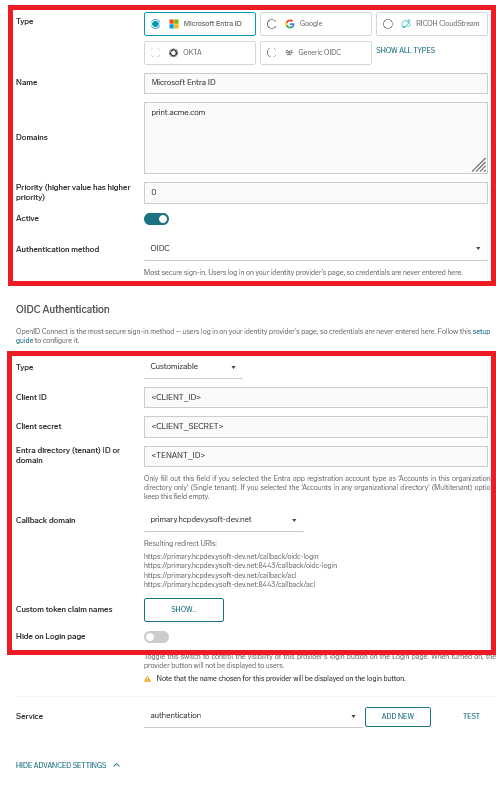
The result will look like this. Microsoft Entra ID app configuration for OIDC authentication is now finished.

Next, you must create the Authentication provider in SAFEQ Cloud, which will use the app registration you just created.
Creating an Authentication provider in SAFEQ Cloud
-
Log in to SAFEQ Cloud Web UI and go to Users page and Authentication providers tab.
-
Click Add and fill in the general settings (Type, Name, Domains, Priority, Active, and Authentication method).
-
Select OIDC in Authentication method drop down list.
-
OIDC Authentication section – in Type drop-down list, choose Customizable and fill in the fields accordingly:
-
Client ID – The ID of the registered Azure App you created in previous steps.
-
Client secret – The secret value you created for the registered Azure App in previous steps.
-
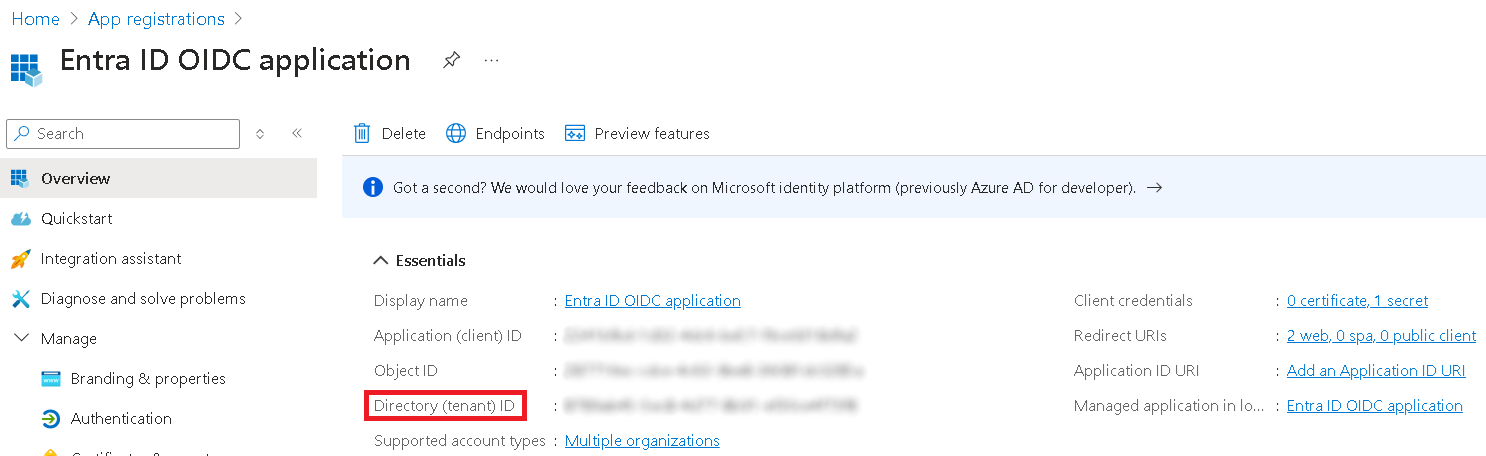
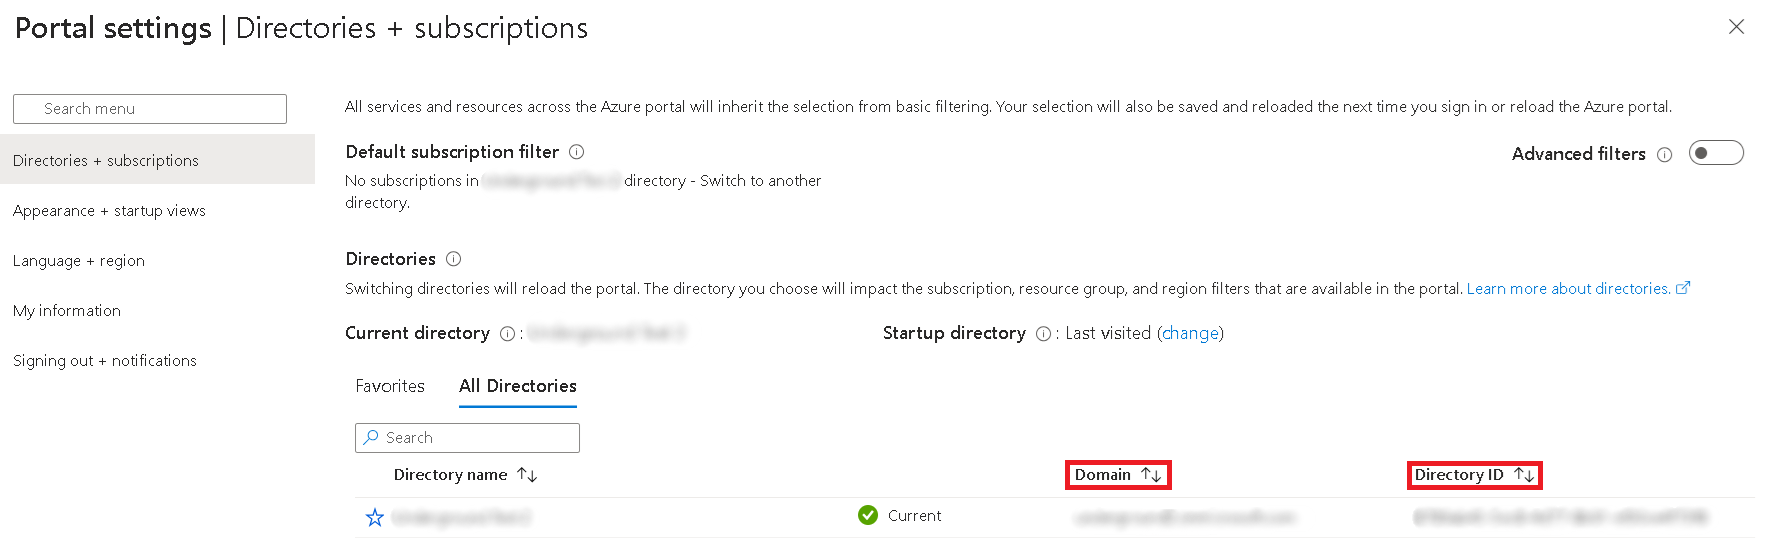
Entra directory (tenant) ID or domain – If you selected the Multitenant account type during the Entra App registration, keep this field blank. Fill it only if you selected the Single tenant account type. You can find the directory (tenant) ID in the Overview section of the registered Entra App or in the Directories + subscriptions menu in Portal settings.
-
Callback domain for custom application – Select from the list of available domains the one that you defined in Azure App registration as Redirect URI in previous steps, e.g. print.acme.com .
-
Custom token claim names – Click Show to change the mapping between the ID token and Microsoft Entra ID user attributes, such as preferred_username, name, email, and groups.
-
Hide on Login Page – Enable this option to hide the Microsoft Entra ID button on the SAFEQ Cloud login page. Otherwise the name displayed on the button is taken from the Name field.
Example:

If the Hide on Login Page option is enabled, no "Login via <Provider Name>" button will be displayed on the login screen. To authenticate via such an authentication provider, users need to fill in the username containing a domain matching the authentication provider, which will redirect them to the OIDC authentication flow (the same way as clicking the "Login via <Provider Name>" button.
-
-
Service account Authentication section: is shown when OIDC + Service account authentication method is selected and then OIDC is used with combination with service account.
-
Click Save.
-
The Microsoft Entra ID users can now log in to SAFEQ Cloud.
Every user logged in via this provider will have the Authenticated Users group assigned. You can use this group to manage access controls. See Access Control.
When users log in for the first time, they must consent to the SAFEQ Cloud Microsoft Azure application. To prevent this confirmation for each user, you may grant tenant-wide admin consent for the predefined SAFEQ Cloud Microsoft Azure application. For more information, see https://learn.microsoft.com/en-us/entra/identity-platform/permissions-consent-overview.