
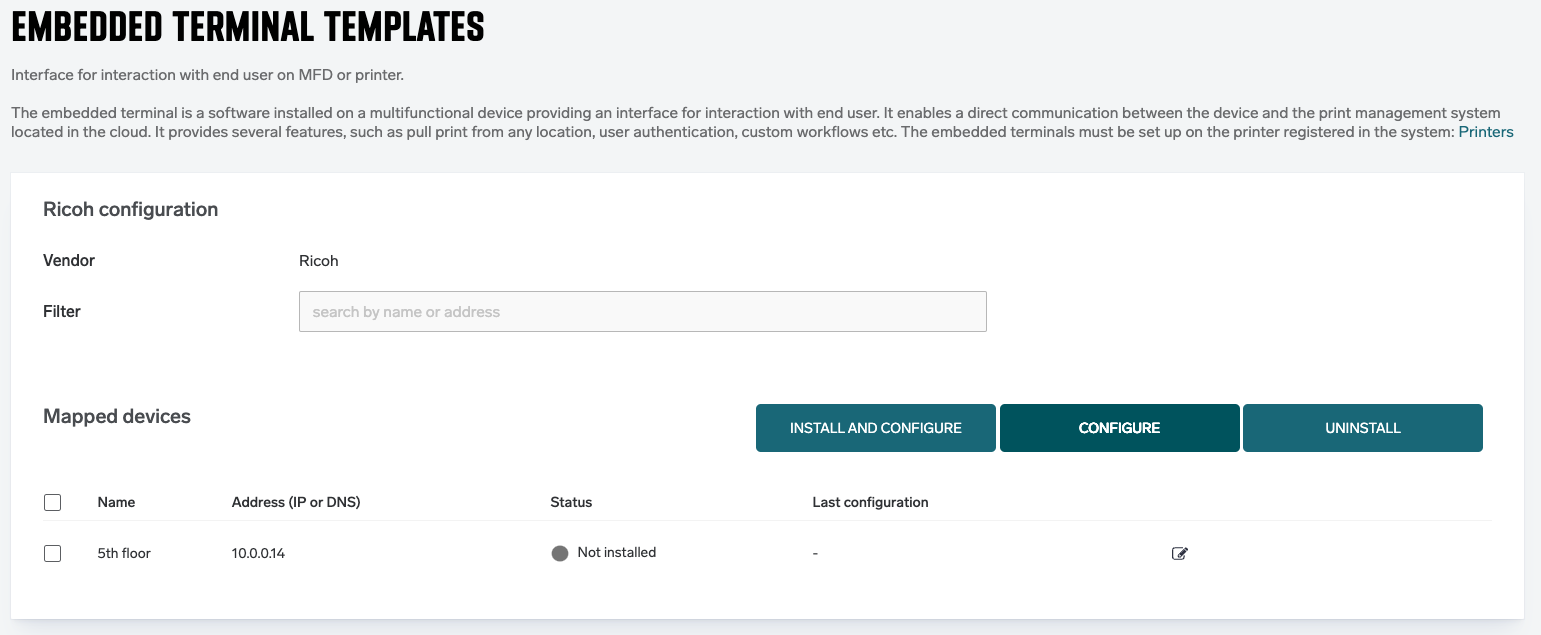
Support for this terminal will end on 1st January 2025.
With SAFEQ Cloud version 3.1 onwards, we have updated Ricoh’s rxop libararies which requires that SSL is enabled on Ricoh devices prior to installing the embedded client
Ricoh Java SDK/J based embedded client can be installed from SAFEQ Cloud directly to the device where Java SDK/J is available on device by default. Follow steps in section Install Embedded on Ricoh devices from SAFEQ Cloud.
For IMC devices, where Java SDK/J is not present by default, additional installation of SD card with Java SDK/J is required. For installation in this scenario, follow steps in section Sideload Java Embedded on Ricoh IMC Device.
Before you begin, make sure your secondary gateway is configured according to Secondary Gateway mapping.
Install Embedded on Ricoh devices from SAFEQ Cloud
After setting up the printer on the network and configuring in SAFEQ Cloud, push out the Embedded configuration from the embedded screen in SAFEQ Cloud.
Sideload Java Embedded on Ricoh IMC Device
Prerequisites
Get java embedded client bundle (Xlet) with support for SDK 10.xx and forward for supported Ricoh devices:
The java embedded client bundle is available on the gateway. The file is located in /opt/safeqcloud/clients folder, the command for listing the folder is:
ls -al /opt/safeqcloud/clients/*xlet*. If you don’t have access to an SAFEQ Cloud gateway, contact your solution provider.
For list of supported devices, please visit https://www.ysoft.com/safeq/hardware-compatibility-list/ysoft#cloud.Once logged in, go to SAFEQ Cloud > Technical Documents > Embedded client device support and open pdf file corresponding to the Ricoh device.
Verify if SDK/J is on the Ricoh device:
-
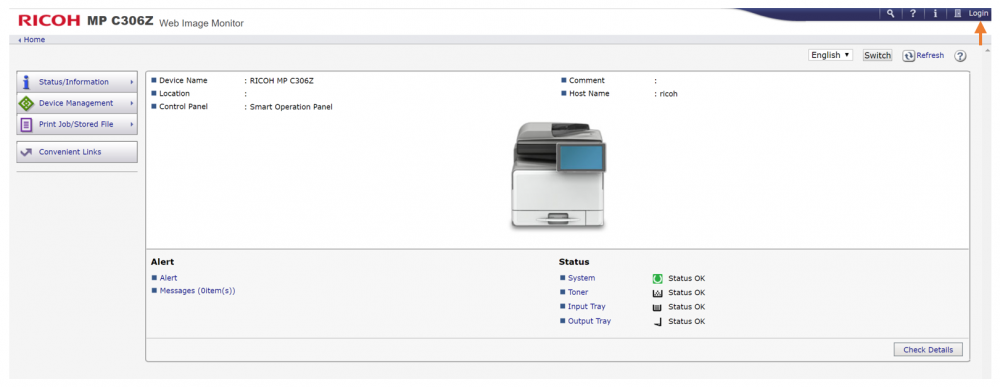
Go to Ricoh Web Image Monitor (type IP address of Ricoh device in browser)
-
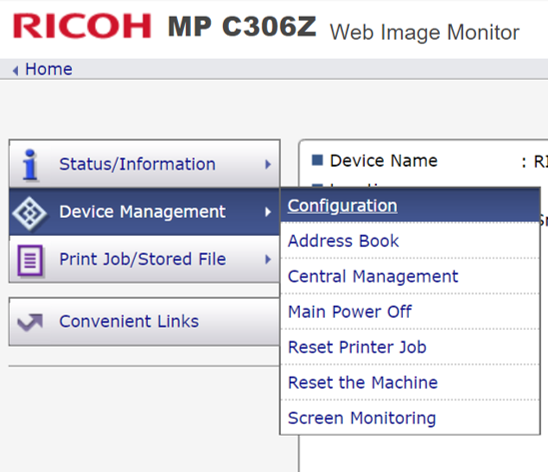
Login as admin and go to Device Management > Configurations (Some models have direct link to Configuration)
-
Navigate to Extended Features Settings > Administrator tools

-
Confirm there are memory settings in Heap/Stack Size Settings section in the Heap Size and Stack Size fields. For example, it would look similar to as shown below which says “72” as Heap Size and shows heap in use etc. You can set Stack Size to 512.

If SDK/J is not running, the fields would be there, but there would be no entries.
NOTE – If SDK/J not running, check that SD card is in the device in the right slot. See section on Installation of SD card below. Otherwise, if SDK/J is present and running, follow steps in section Preparation
Installation of SD card and SDK/J

-
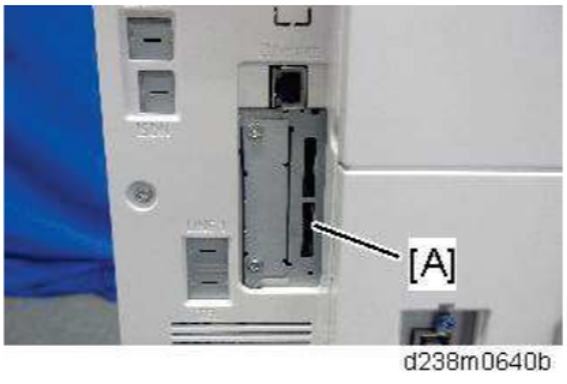
Installing the SD card – Turn OFF the device and remove SD card slot cover [A]

-
Install the VM Card in SD card slot2 [A: Lower Slot]
-
Reattach the SD card slot cover and turn ON device
Installing the Java Platform
Insert the SD card and turn the main power on as described in section above, then the Java platform is automatically installed. Automatic installation takes around 1-2 minutes.
NOTE – If you turn the power off during installation, the VM card may be damaged.
Preparation
For every Ricoh device, push the configuration with the Embedded Configuration action. For configuring the Embedded Configuration follow this link and see the section Setting the Embedded Configuration.
Installation Steps
-
Login to Ricoh Web Image Monitor (type IP address of Ricoh device in browser) as administrator
-
Go to Device Management > Configurations (Some models have direct link to Configuration)
-
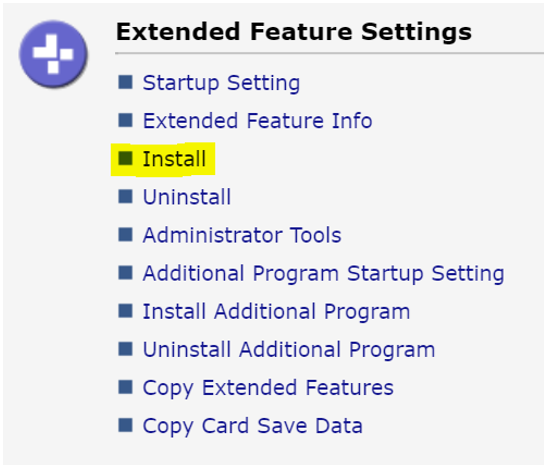
Navigate to Extended Feature Settings and press Install. It will open a new page
-
Choose Local File and press ‘Choose File’ button
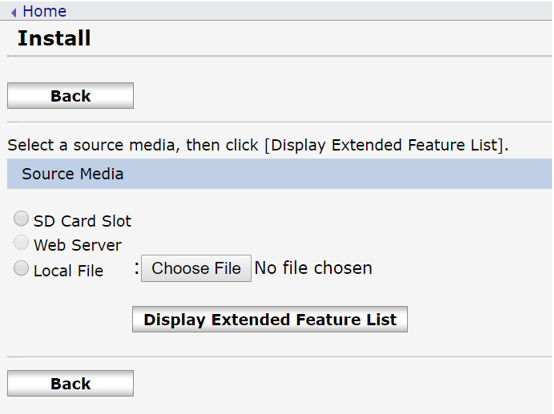
-
Browse the embedded client prepared from section Preparation above and press Open
-
Press Display Extended Feature List and wait until the new page loads
Note – Only press the button ONCE!! -
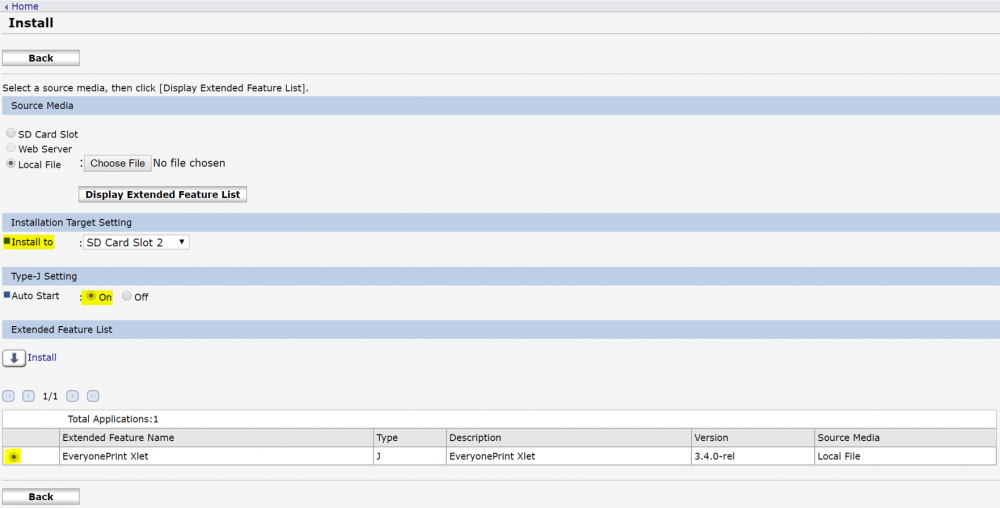
On the new page –
-
in Installation Target Settings, select the location where SDK/J was installed in section Installation of SD card and SDK/J
-
Enable Auto Start
-
Select Y Soft Xlet
-
Press Install and confirm installation when asked
-
Once the installation procedure is completed press Back and go to Startup settings
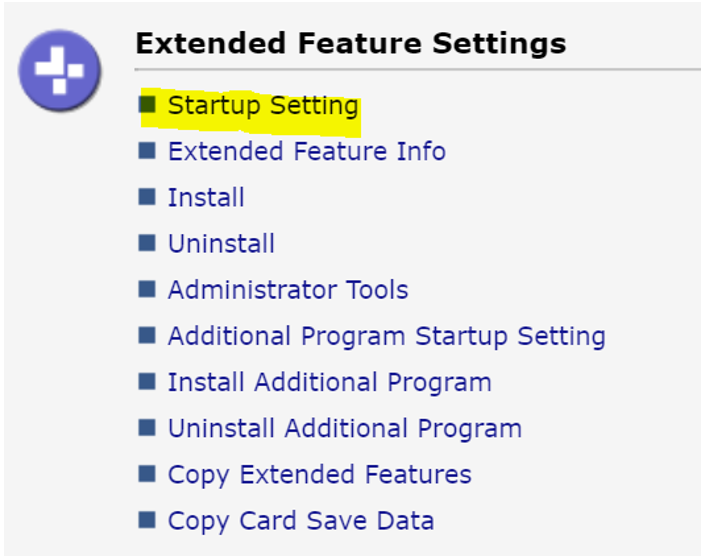
-
Select Y Soft Xlet and press Start Up/Stop

Locking the device
-
On Web Monitor
-
On Ricoh Web Image Monitor (type IP address of Ricoh device in browser) login as administrator
-
Go to Device Management > Configurations (Some models have direct link to Configuration)
-
Navigate to Extended Feature Settings and press Administrator Tools. It will open a new page
-
Under Select Available Functions section, make “PanelService API” as “Active”

-
Press Apply and Back
-
On Ricoh Device
-
On Ricoh device, go to Service Menu to enable lock. To go to Service Menu on your device follow instructions given by Ricoh. Ensure that all prerequisites stated in section 2.1 above are met.
-
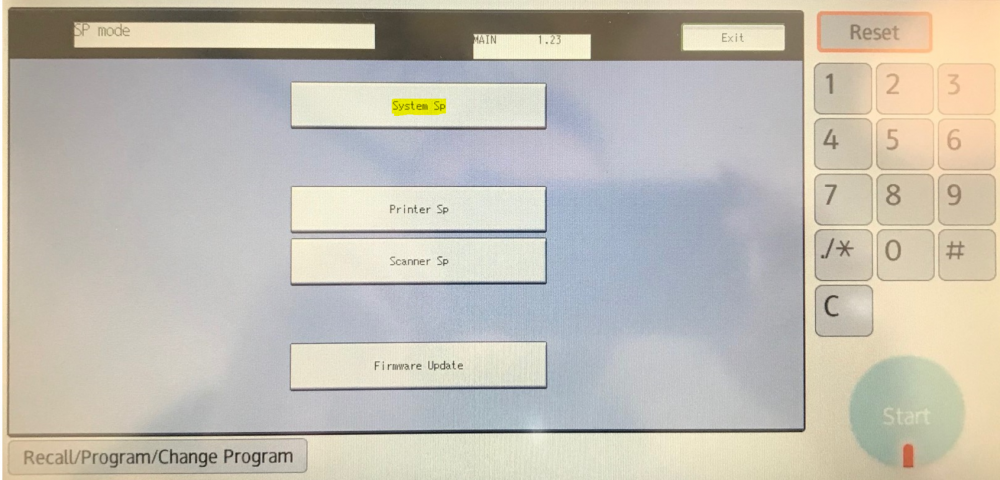
In Service Menu, press System Sp
-
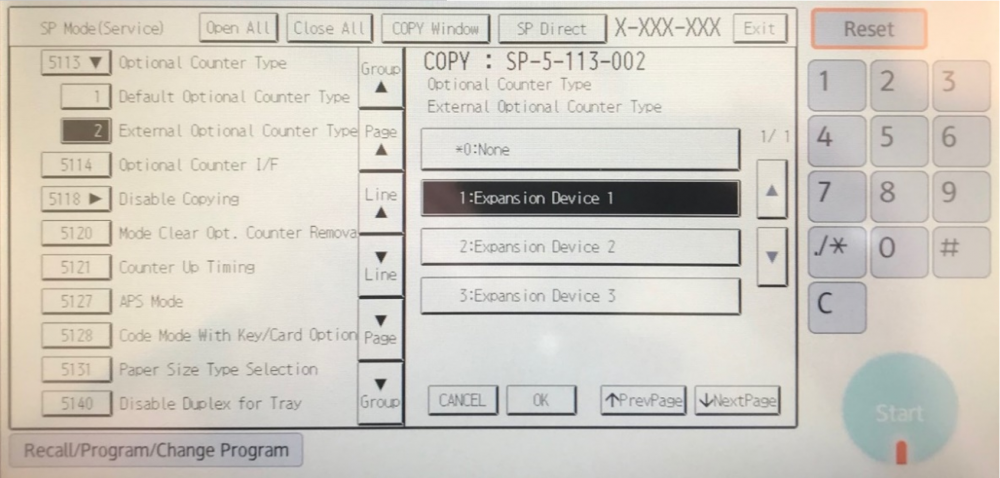
Then go to menu 5113 – Optional Counter Type and choose 2 – External optional Counter Type and then 1 – Expansion Device 1
-
Press OK and Exit to exit service menu
-
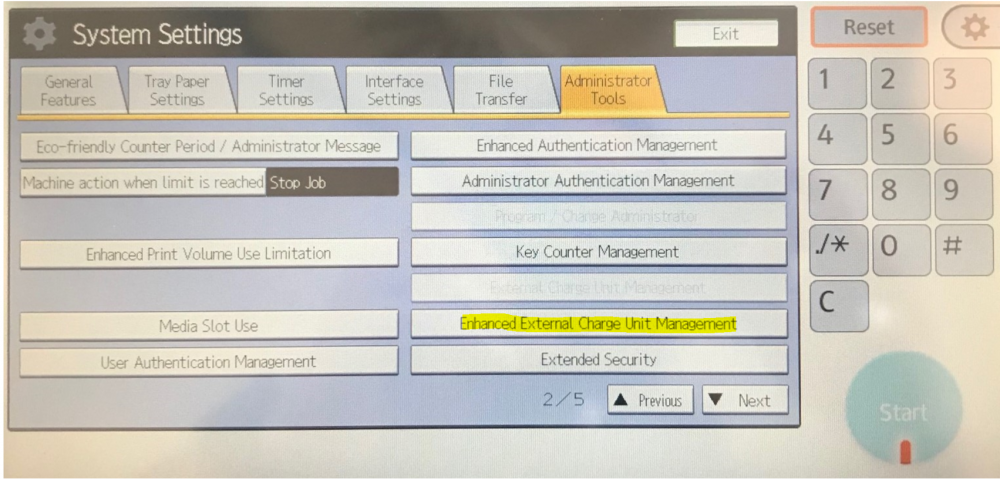
Now, go to System Settings in Administrative interface on device. Navigate to Administrator Tools and press Enhanced External Change Unit Management
-
Then select the features that you wish to be locked without authentication.
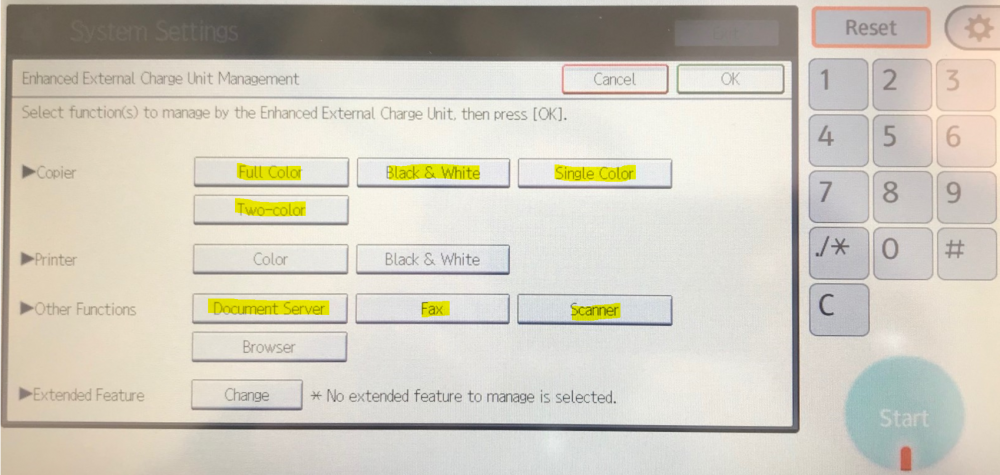
Note – Make sure though that you do not lock the print functions because the server will not be allowed to print. Also Java should not be locked since that will prevent the users from unlocking the device.