
Relevant Products
Client-side authentication is available in pro print pro mfp
SAFEQ Cloud supports client-based authentication where user authenticates against OAuth2 identity provider such as Microsoft Entra ID, Google G Suite or Ping Identity platforms, using SAFEQ Cloud Client. Client-based authentication also allows to use multi-factor authentication in combination with SAFEQ Cloud server.
Client-based authentication must be configured on two sides: the SAFEQ Cloud Client and the server:
-
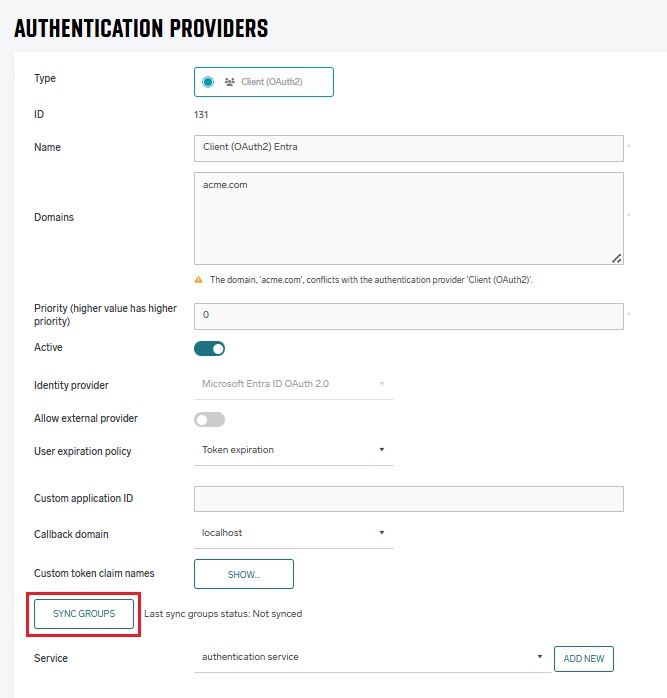
Type – should be set to “Client.”
-
Name – choose a name for the authentication provider. Should be prefilled with selected type.
-
Domains – this field should match the domains of the organization and the “@domain” part of the users which authenticate.
-
Priority – A number determining the order in which authentication providers will be called until one succeeds. Higher-priority providers will be called first
-
Identity provider – currently the following identity providers are supported: Microsoft Entra ID, Google G Suite, Ping Identity.
-
Allow external provider – Used only in combination with External provider. For more details see External authentication.
Common
When the user is authenticated on the client side it will be created in SAFEQ Cloud database and visible under Users section, when the corresponding Client provider is chosen from the drop-down list. User properties can be changed by the administrator or this user can be added to Access Controls.
-
User expiration policy – choose the policy for user records expiration (see below).
-
Custom user expiration, min – field is visible only when user expiration policy is set to custom one.
-
Service – choose authentication service in this field. In case no service is already created, it can be added using the Add button.
User expiration policy
Users which are authenticated via Client provider will have an expiration time. This means that after particular time after authentication using SAFEQ Cloud Client or Chrome extension they won’t be able to authenticate at printers using cards or short id unless the token is refreshed and user expiration time extended.
Traditionally, this time is defined by the identity provider and delivered as one of the access token fields. The usual expiration time is one hour but can be changed by the directory administrator. Users must be refreshed by SAFEQ Cloud Client periodically, otherwise they won’t be able to print or authenticate. The SAFEQ Cloud Client tries to refresh the user several minutes before expiration. The user can also be refreshed by manual login to the SAFEQ Cloud Client or Web UI. If the SAFEQ Cloud client is not running or offline, the user will expire.
Another approach for prolonging user lifetime is to change the expiration policy to one of the custom values: Custom expiration for card login or Custom expiration for all login types and set custom expiration period. For example, if you choose Custom expiration for card login and set 480 to Custom user expiration, mins field, you’ll let to use card for authentication during 8 hours since SAFEQ Cloud Client or Chrome extension login even if SAFEQ Cloud Client is not running.
For Microsoft Entra ID
-
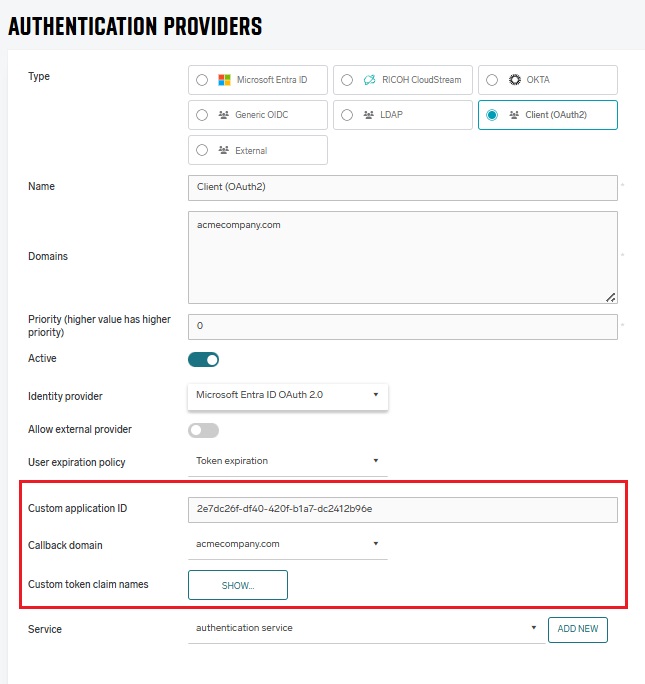
Custom application id – this field is optional, and it’s used for syncing the Entra groups in case of
Identity provider= Microsoft Azure. In case the value is empty, will be used the SAFEQ Cloud build-in client ID. In case of on-premises installations this value must be set. -
Callback domain for custom application – this field is used only in case the Custom application id is not empty. It should match the Redirect URIs from Entra ID where the custom application is created.
-
Custom token claim names – in this section, you can define claim names in the token. Their values will be stored in the user attributes after login.
When a new Client authentication provider is created, it will have a default group added called Authenticated users and the groups from Entra ID (by clicking Sync groups) when Entra identity is used (not ADFS). These groups can be used in access controls to enable permissions for authenticated users.
For Google G Suite
-
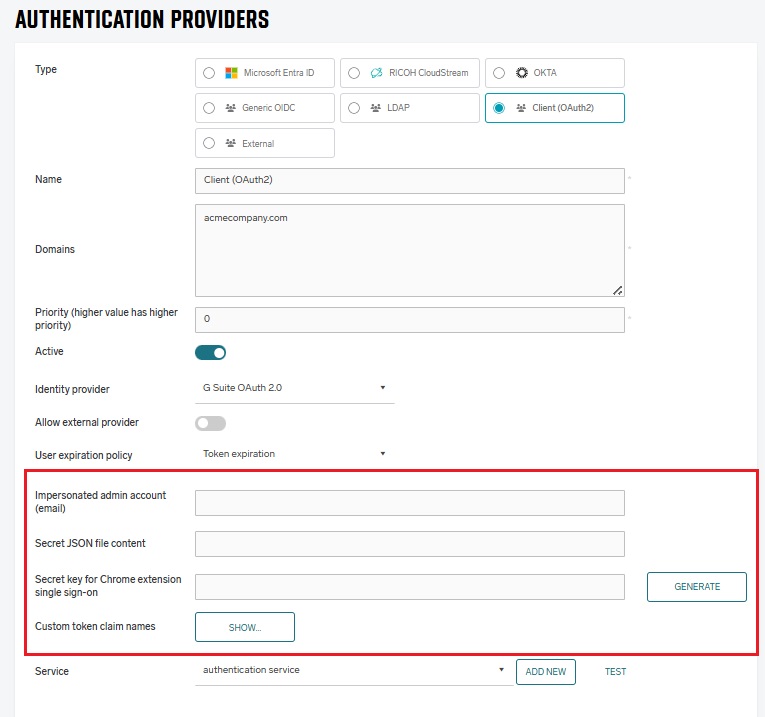
Impersonated admin account (email) – email of the account with administrative rights in your G Suite domain. Service account that you’ll use for authentication will be limited to the scopes you provide, so SAFEQ Cloud won’t have full administrative access to your domain.
-
Secret JSON file content – paste here the entire content of the secret JSON file that you’ll download when creating the service account.
-
Secret key for Chrome extension single sign-on – (optional) improves security when you want to use Chrome extension without authentication. The key is used to verify authentication requests. You can either generate or enter your own key. The same key must also be set in the Chrome extension in order to work. The key should never be shared.
-
Custom token claim names – in this section, you can define claim names in the token. Their values will be stored in the user attributes after login.
When a new Client authentication provider is created, it will have a default group added called Authenticated Users and the groups from G Suite domain (synchronized by clicking Sync groups). These groups can be used in access controls to enable permissions for authenticated users.
For Ping Identity
-
Custom application id – required field, the ID of the application created in the Ping Identity portal.
-
Ping environment id – Ping environment ID.
-
Ping region – Ping region, one of “eu”, “com”, “asia”
-
Callback domain for custom application – This field should match the Redirect URIs from Ping application configuration.
-
Custom token claim names – in this section, you can define claim names in the token. Their values will be stored in the user attributes after login.
For Auth0 Identity
Add a new Auth0 authentication provider with configuration of custom fields as explained below.
-
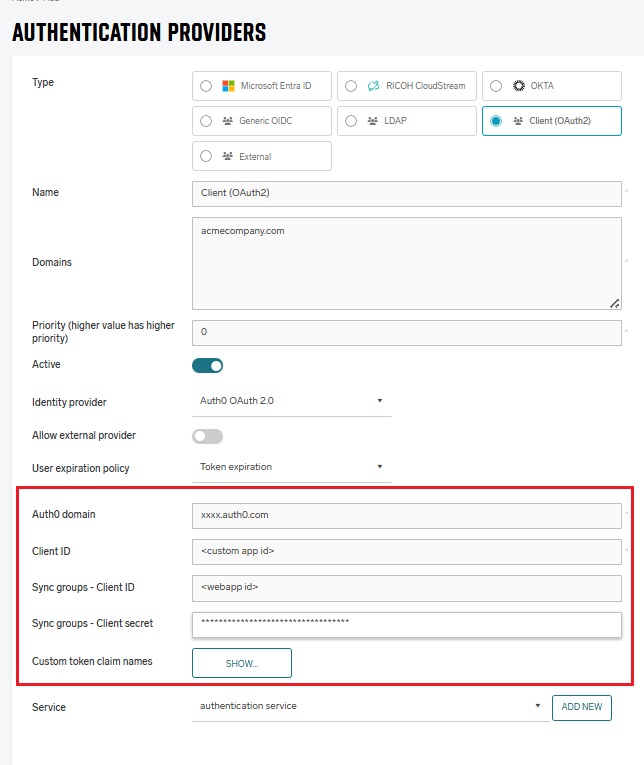
Auth0 Domain – required field, Client ID of Native Application created in the Auth0 Identity management.
-
Client ID - Client ID of the Native Application.
-
Sync Groups - Client ID - Client ID of Regular Web Application created in the Auth0 Identity management.
-
Sync Groups - Client Secret - Client Secret of the Regular Web Application.
For more info about the above four fields and the relevant Auth0 applications, see Add a custom app in the Auth0 identity platform.
-
Custom token claim names – in this section, you can define claim names in the token. Their values will be stored in the user attributes after login.
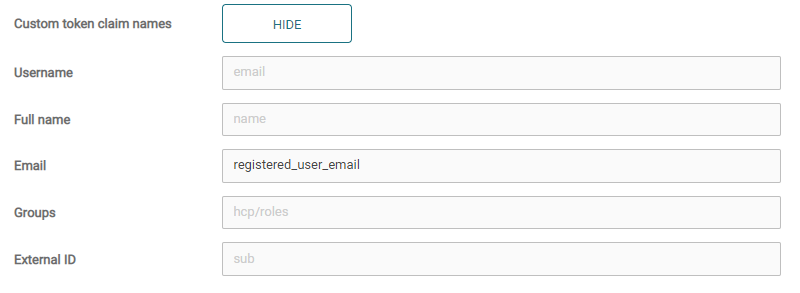
Custom token claim names
In this section, you can define claim names in the token. Their values will be stored in the user attributes after login.
For example, if the Auth0 provider is returning email value in its token claims (named registered_user_email), you can input registered_user_email into the email field, and upon successful login, the email from the custom token claim will be stored under the email user attribute.
Sync groups
When a new Client authentication provider is created it will have a default group added called Authenticated Users. To synchronize more groups, click Sync groups in the provider view.
These groups can be used then in access controls to enable permissions for authenticated users.
For Microsoft Entra or Ping Identity, the group sync requires an OAuth2-based workflow. By clicking Sync groups, a confirmation window will appear:
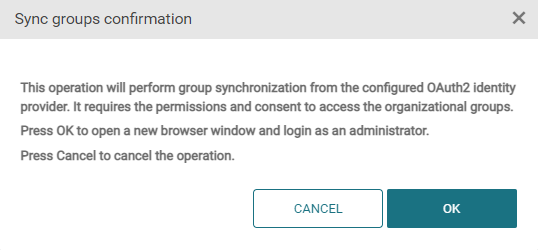
If you click OK, the groups will be retrieved from the identity provider and added or updated in SAFEQ Cloud server.
For Azure AD identity provider, there are two scenarios:
-
If the Custom application id field is empty in the client authentication provider, then the sync groups will be done using the SAFEQ Cloud build-in client ID (for build-in client ID is mandatory to be on [custom domain].eu/[us]/[uk]/[ap].ysoft.cloud).
-
If the Custom application id field is not empty, the value should be taken from a native Entra application. Also, should be a match between Callback domain for custom application and one of the Redirect URIs set for the new created Entra application. In this case the sync groups will be done using the new created Entra application.
For more details, see Add a custom app in Microsoft Entra ID.