This is the HP Workpath Gen 1 terminal, not the HP Workpath Gen 2 pure cloud terminal. For the pure cloud terminal, see HP Workpath Gen 2 Cloud Terminal.
This guide is to install, configure and setup the HP Workpath Application which has the following parts:
-
Prerequisites
-
Installation of EveryonePrint HCP Pull Print from Command Center
-
SAFEQ Cloud Server Setting using Web UI
-
EveryonePrint HCP Authentication application remote configuration
-
HP Workpath embedded application setup
Prerequisites
-
Ensure all necessary ports on SAFEQ Cloud server are open. Please refer to Ports and Protocols, section Embedded clients to Cloud Server or Gateway.
-
If using SAFEQ Cloud Client in local storage mode, please ensure that all necessary ports on the MFD are open. Please refer to Ports and Protocols, section SAFEQ Cloud Clients to printers – print operations.
-
On the MFD, under Network Identification, please make sure that you configured the Host Name, Domain Name and DNS.
-
If you have an account on SAFEQ Cloud Cloud, please ensure that the communication between the MFD and the SAFEQ Cloud server is working.
-
On the MFD, under Security -> General Security, HP JetAdvantage Link Platform setting must be enabled.
-
If the mobile service does not need the SAFEQ Cloud CA, please skip this. Otherwise, you need to have a valid certificate under “Private certificate chains.”
-
As a precondition to establish the communication between a printer and SAFEQ Cloud server successfully, the printer has to trust the Certification Authority (CA), which issued certificates used by SAFEQ Cloud server. By default, it is the well-known CA "Let’s Encrypt". The "Let’s Encrypt" root certificate "ISRG X1" can be downloaded from the web page https://letsencrypt.org/certificates/. Please note that at the Vendor or Customer level, CA certificates other than those issued by "Let’s Encrypt" can be specified.
-
Set up Mobile Print under the customer. Select from drop-down the mobile service and make sure that “Enable MDM Single Sign On” is unchecked.
-
Set up the remote configuration from HP Command Center for EveryonePrint HCP Authentication application.
-
SAFEQ Cloud API Access Key is required, the Default key for client and gateway is preconfigured. See Secondary Gateway mapping.
Installation of EveryonePrint HCP Pull Print from Command Center
The access can be exclusively provided by HP after their Verification and Validation process.
HP embedded contains two applications which can be downloaded and installed from HP Command Center:
-
EveryonePrint HCP Authentication
-
EveryonePrint HCP Pull Print
On the MFD, check the following:
-
In Security > Access Control, EveryonePrint HCP Pull Print application should be locked, using EopAuthAgent
-
In HP Web Services, enable the web services
For SAFEQ Cloud Workpath app 3.20 & above, you must install HP Firmware 5.4 as a minimum.
SAFEQ Cloud Server Setting using Web UI
-
Log in to the SAFEQ Cloud Web UI.
-
If you are hosted on Y Soft side, make sure you have selected Primary’s mobile print service in Settings > General settings > Mobile Print tab.

-
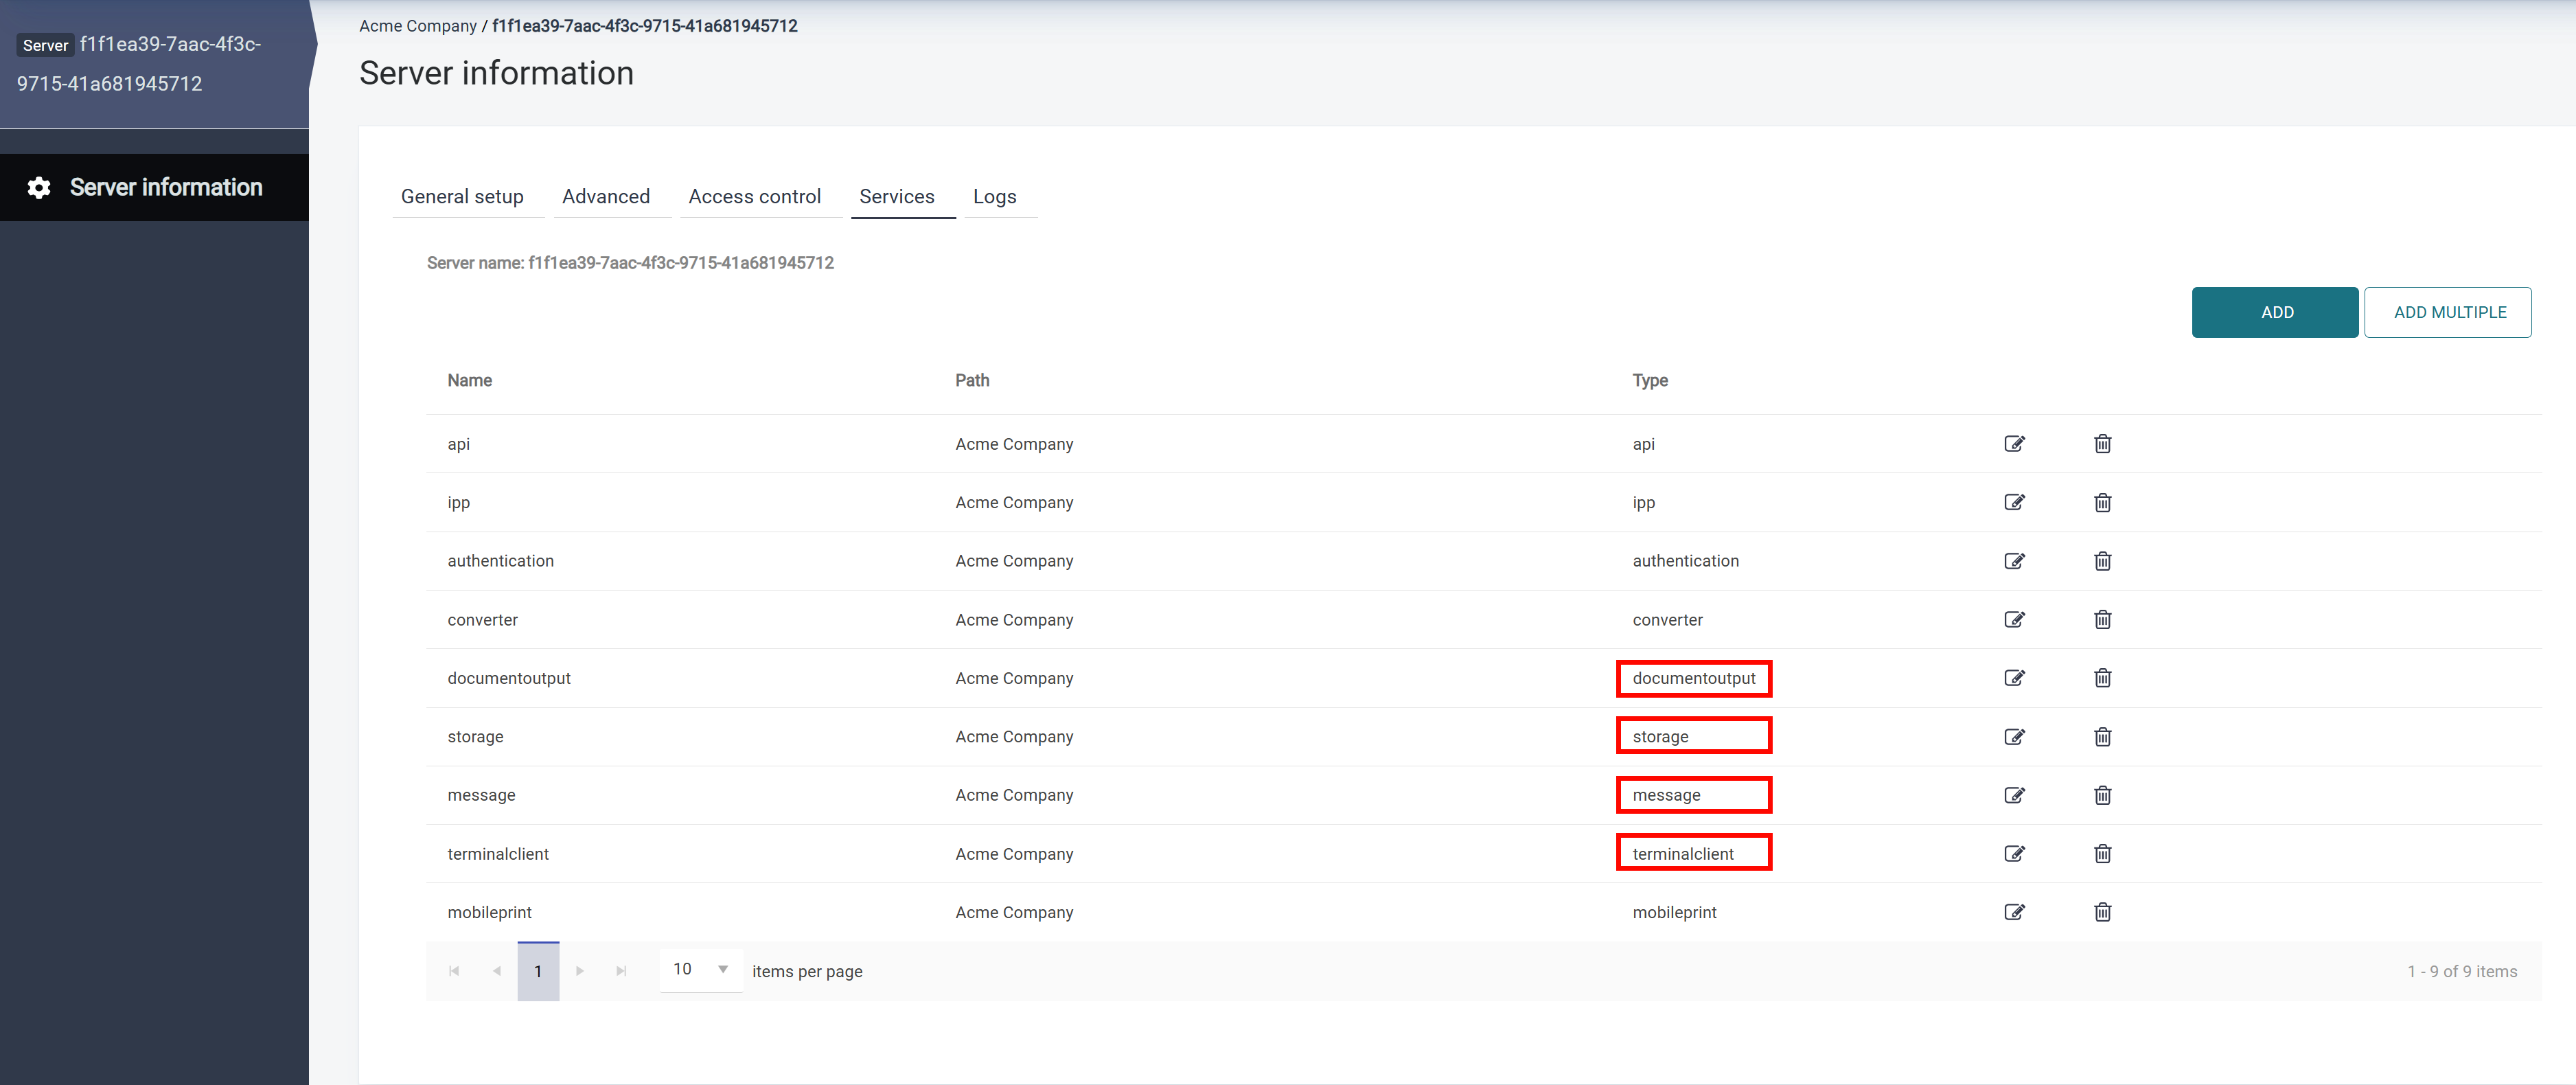
Otherwise, make sure that you have the following services under your hosted server (gateway): terminal, document output, mobile, and messaging.
-
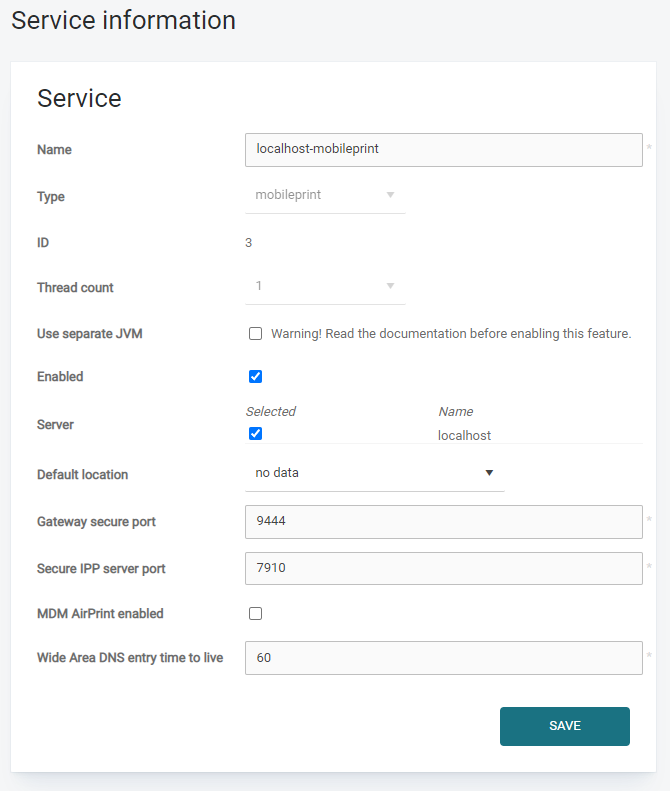
Set the mobile service in the following way:
-
Click Messaging and fill in all the required details.
-
Create an embedded configuration. It is required for Scan to My Email functionality (note that this feature is available in the embedded application only if “Enable scan application” is checked). Fill in the required details: Name, Vendor as HP, valid device admin username and password, USB Card Reader Vendor ID, USB Card Reader Product ID, Check Enable Scan Application, Select SMTP Configuration, Select Mapped Devices.
-
Add one Input Port under the customer. Select Port Type as Pull Queue for it.
-
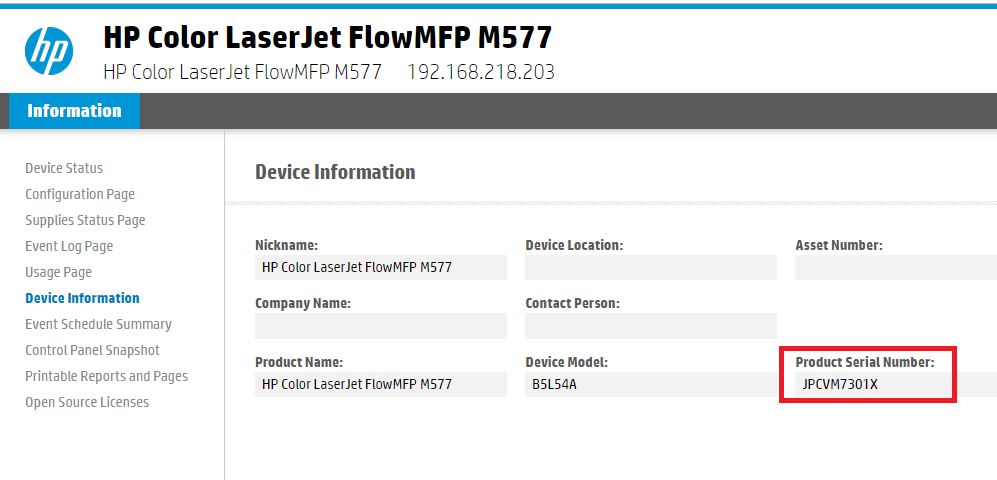
Add the HP printer. The following parameters are mandatory:

You can retrieve the device serial number from the MFD UI:
EveryonePrint HCP Authentication application remote configuration
Note – SAFEQ Cloud HP Workpath version 3.6 or later is required for Remote Configuration
The remote configuration can be done from HP Command Center by choosing the EveryonePrint HCP Authentication application, selecting the option Configure and following the wizard. The below settings screen is displayed:
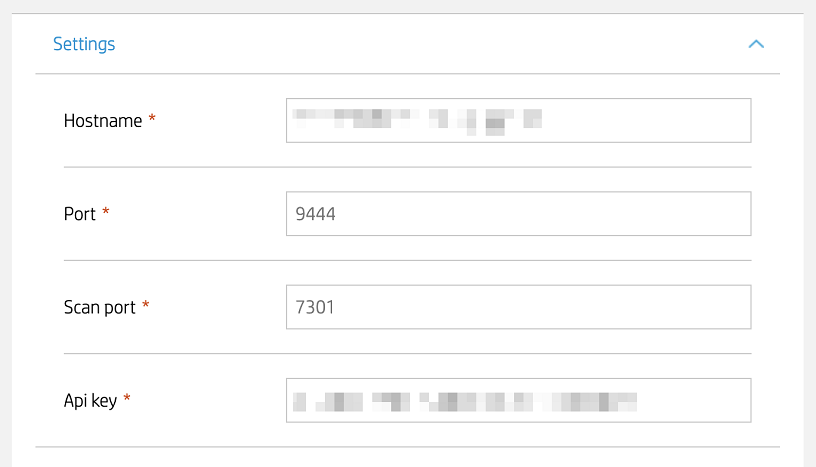
Hostname
Domain name of the account to which the applications will be connecting.
Port
The secure (SSL) server port for the mobile service. The default value is 9444.
Scan port
The secure (SSL) server port used by the scan to my email feature. The default value is 7301.
Please make sure that 7301 and 9444 ports are opened.
Api key
A valid SAFEQ Cloud API Access Key. If defaults to Default key for client and gateway, but customers who have disabled or changed the default key have to supply a valid alternative.
HP Workpath embedded application setup
1. Go to the MFD. The Home screen with installed applications will be displayed.
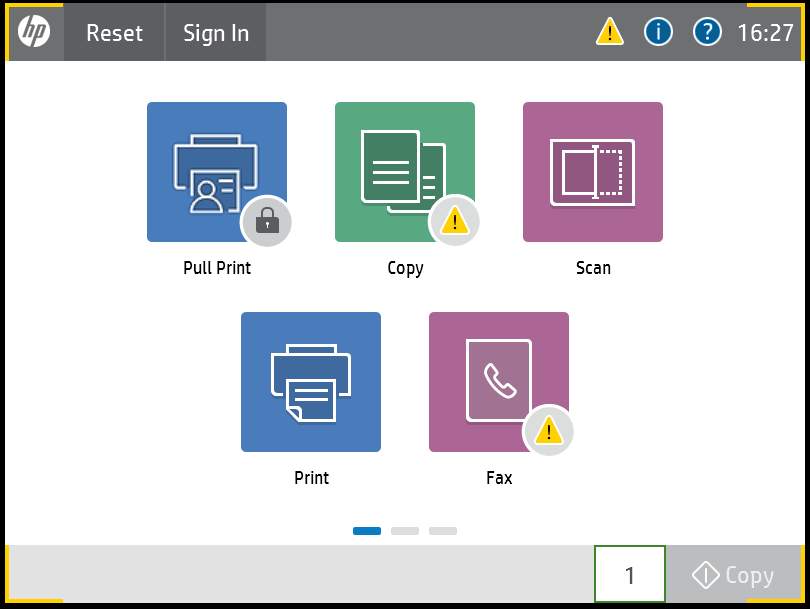
2. Click on Pull Print Icon to go to the application. The login on MFD is possible using “Short ID Login” or “Keyboard Login” or by swiping the card.

At this step the remote configuration file is loaded in the application and is checking the server configuration. Also, at this step the account logo is retrieved from the server and displayed in the main screen.
-
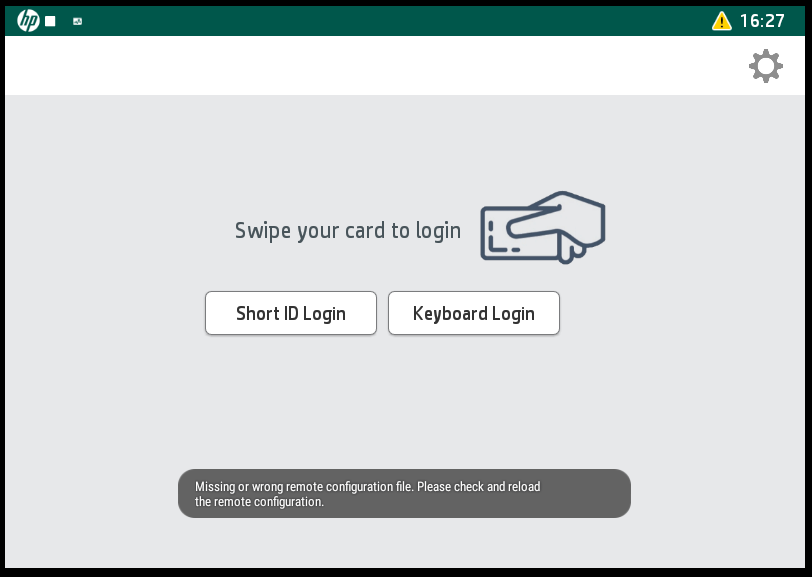
In case the application has no remote configuration file uploaded, the error from the below image will occur:
-
In case the admin uploaded wrong settings in the configuration file, this error is displayed:
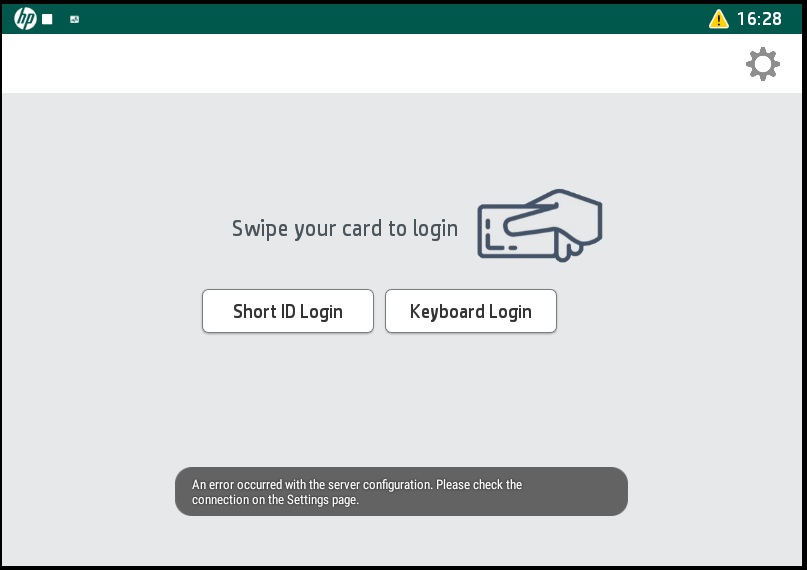
For the above two cases the admin should re-upload a valid configuration file from HP Command Center. If the authentication application is still opened, the new configuration settings will be automatically reloaded.
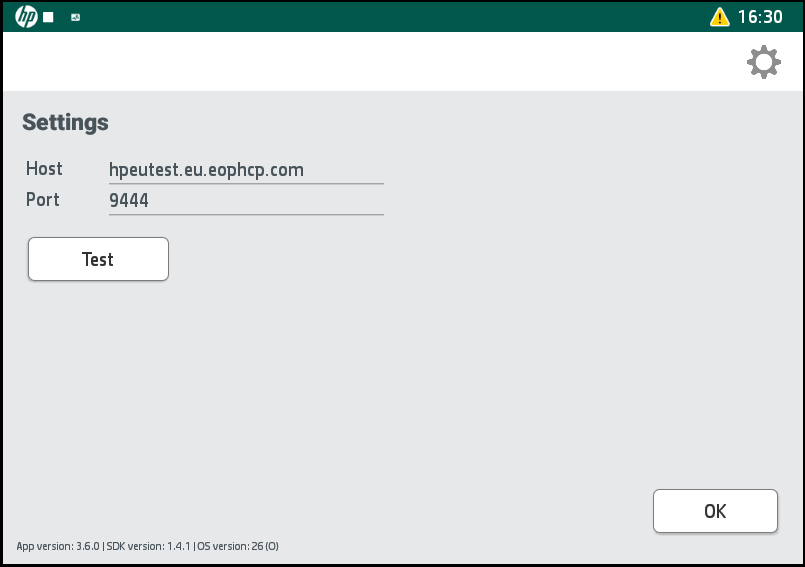
3. Go to the Settings page by clicking on the top-right icon to check the settings and SAFEQ Cloud connectivity. The host and the port fields are read-only and their values are retrieved from the remote configuration file. The “Test” button is used for testing the SAFEQ Cloud connectivity. The API Access Key is not displayed, but the key is also validated in the connectivity test. The OK button will set up the connection to the server according to the settings for future actions. Then, the application will navigate to the main screen and the account logo will be refreshed.
Important Remark: HP MFD should have internet connection
4. User can login to the application using one of those three methods:
-
Short ID login: use the “Short ID” value from the user you want to login
-
Keyboard login: use the “Username” and “Password” values from the user
-
Swipe card: it is working from the application and from HP Launch screen
For card authentication please refer to section Supported Card Readers – VIDs and PIDs to check the supported card readers.
When user will swipe card for the first-time, application will ask for card registration process. Register the card using Username and Password.

5. After successful login using any of the three methods there are two options:
-
the screen with “Pull Print” or “Scan to my email” buttons is displayed in case the setting “Enable Scan application” under the embedded configuration is checked. By pressing one of them, the user will be redirected to the corresponded page.

-
if the “Enable scan application” setting is unchecked then the Pull print page is displayed after launching the application.
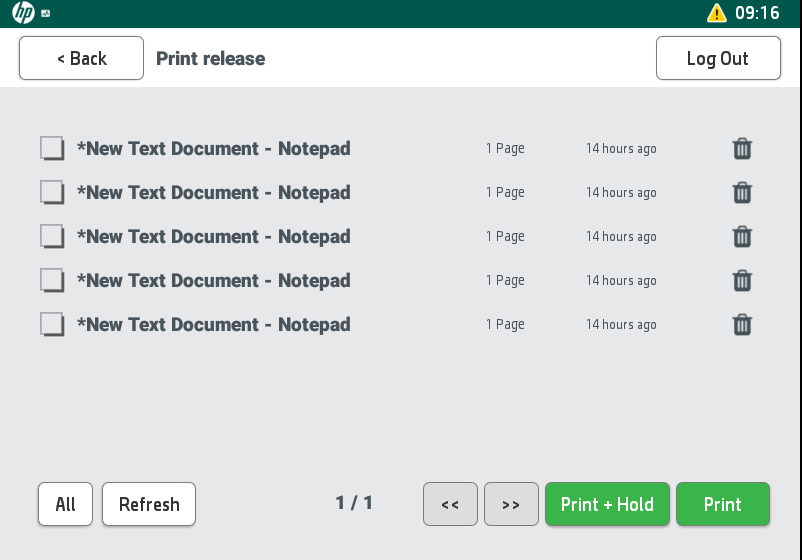
6. Pull Print
-
All – select all jobs from all pages
-
Refresh – refresh the job list, retrieve the job from the server
-
Navigation buttons
-
Print – will print the selected documents on MFD
-
Print + Hold – will print the selected documents on MFD. The printed files will remain stored in MFD and will be available for another jobs
-
Delete button on the right on every row will remove the job from the server
7. Scan to My Email
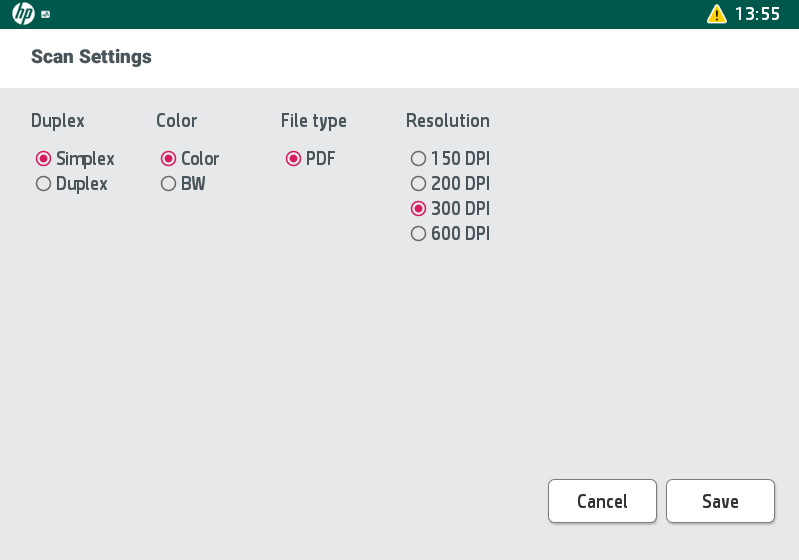
“Start Scan” button will begin the scan process.
If your gateway use the standard certificate, you will have to install the SAFEQ Cloud CA, certificate in the printer for scan jobs to send successfully.
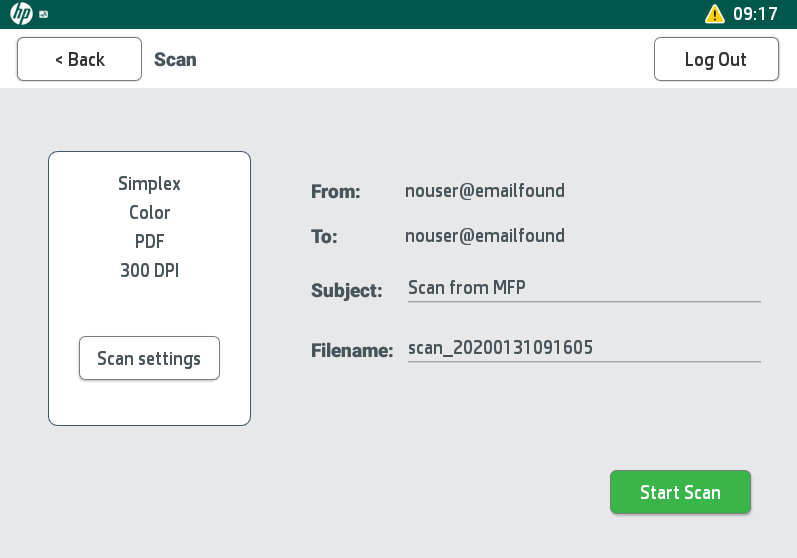
By pressing the button “Scan settings” user can select settings for scan operation.