
Relevant Products
SAFEQ Cloud Client with Quick installation is available in BREEZE PRINT BREEZE MFD PRO PRINT PRO MFD
Advanced isntallation is available in PRO PRINT PRO MFD
SAFEQ Cloud Client installer can be downloaded from SAFEQ Cloud Web UI.
SAFEQ Cloud Client can be installed in two ways:
-
Quick installation – preconfigured installation without the possibility to change configuration after installation
-
Advanced installation – installation with the possibility to change the configuration after installation
For general requirements and prerequisites, see System requirements.
Quick installation
Limitations
-
The client can not be installed in local storage mode.
-
The Client is installed with the SAFEQ Cloud OAuth2 login authentication type.
-
Once the Client is installed, the Configuration option is removed from the menu.
Do the following to install SAFEQ Cloud Client using the quick installation type:
-
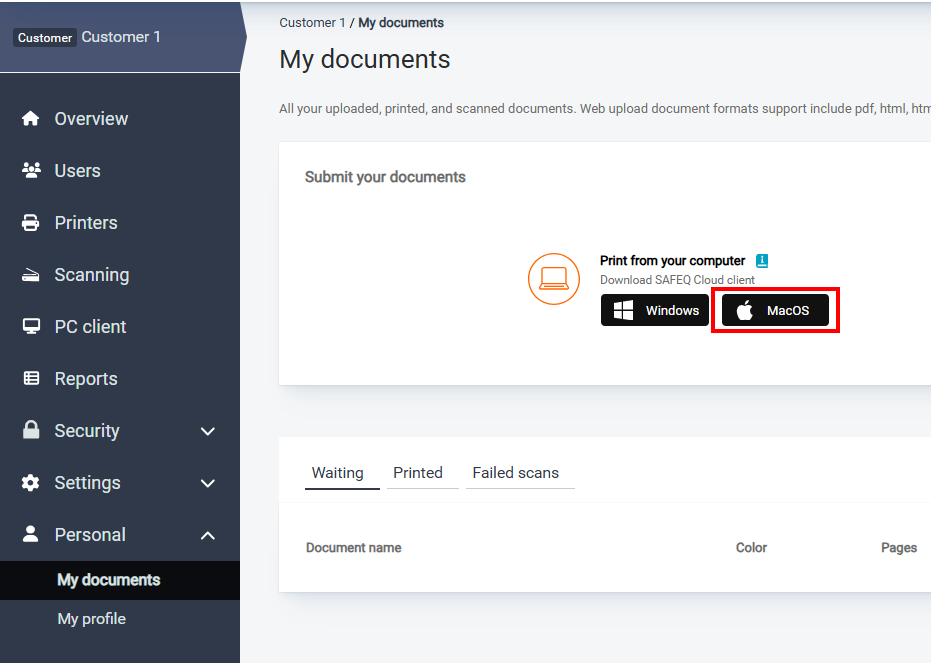
Log in to your Web UI, navigate to Personal > My documents, and click MacOS.
-
Run the installation file.
-
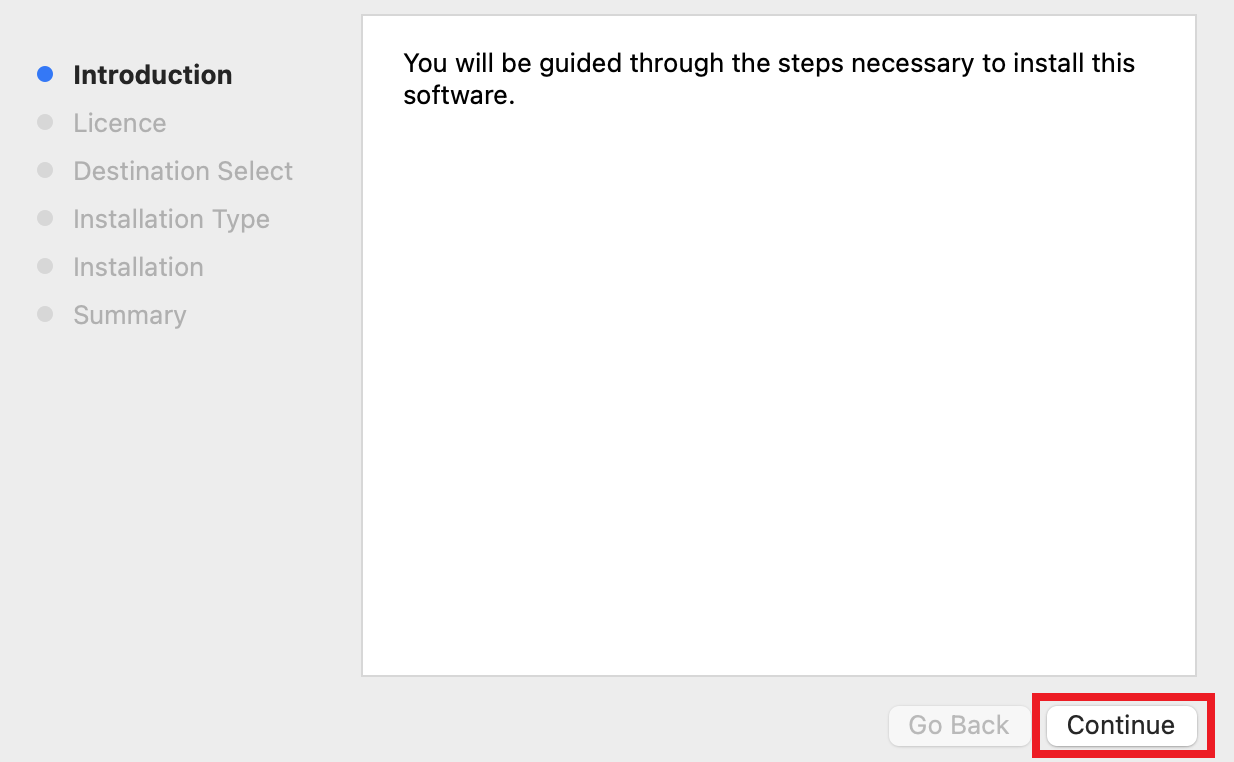
On the welcome screen, click Continue.
-
On the next screen, read the license agreement and click Continue. A pop-up screen will appear.
-
On the pop-up screen, click Agree.

-
On the Installation Type screen, click Install.

-
Authorize the installation, wait until the SAFEQ Cloud Client is installed, and then click Close.

-
Log in on the login screen opened in your web browser.
-
The application starts automatically.
Advanced installation
Do the following to install SAFEQ Cloud Client using the advanced installation type:
-
Log in to your Web UI, navigate to Personal > My documents, and click MacOS.
-
Modify the installer name so it does not contain your domain name in square brackets. Example:
safeq-cloud-client-x.x.x-setup[acme.eu.ysoft.cloud].pkg->safeq-cloud-client-x.x.x-setup.pkgIf you keep the square brackets in the name of the installer, the installer will default to quick installation and you will not be able to configure the SAFEQ Cloud Client after installation.
-
Run the renamed installation file.
-
On the welcome screen, click Continue.
-
On the next screen, read the license agreement and click Continue. A pop-up screen will appear.
-
On the pop-up screen, click Agree.
-
On the Installation Type screen, click Install.
-
Authorize the installation, wait until the SAFEQ Cloud Client is installed, and then click Close.
-
The application will start automatically.
-
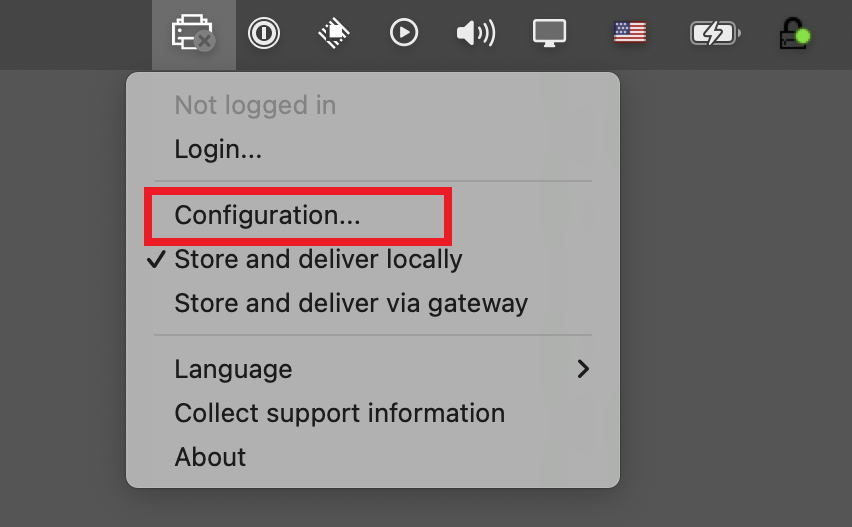
Click the SAFEQ Cloud Client icon. In the menu, select Configuration.
-
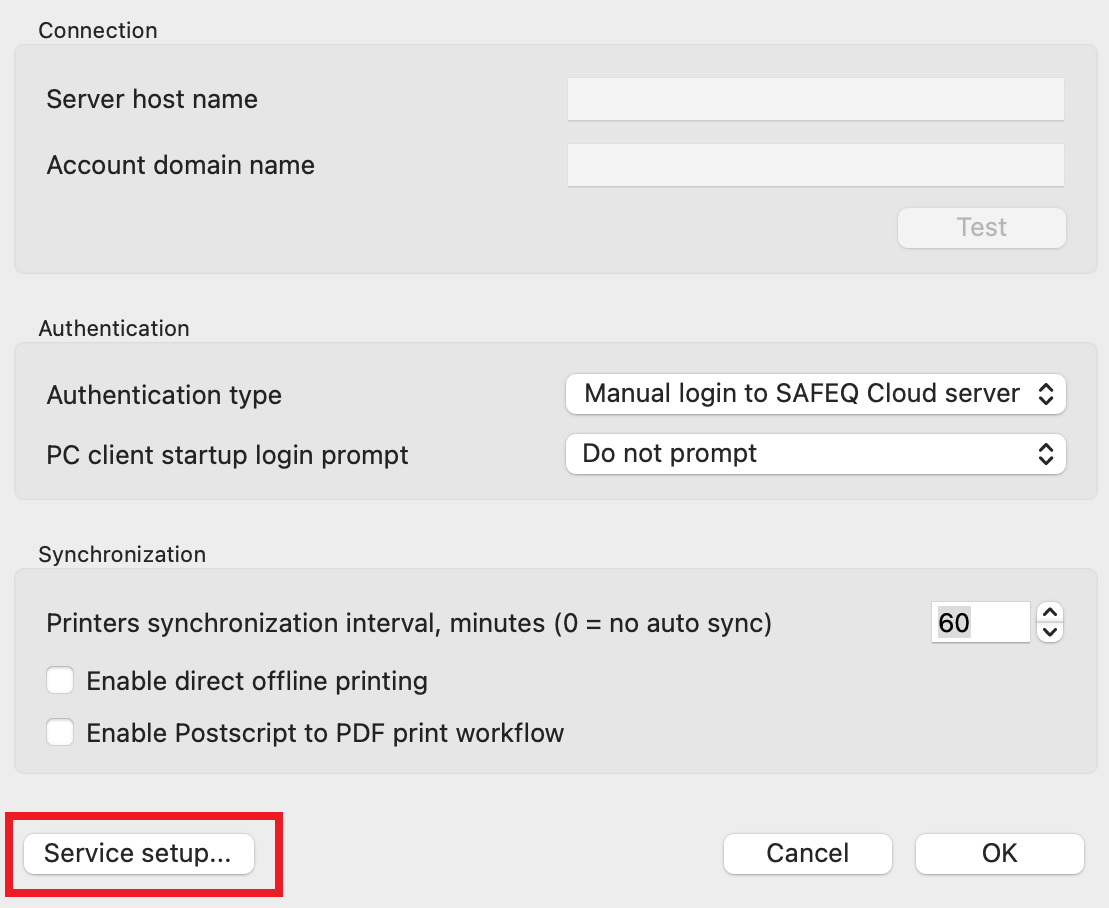
On the configuration screen, click Service setup and enter your password for the privilege elevation.
-
On the Service configuration screen, set your custom configuration, and then click Register service.

-
Server host name – address or host name of the SAFEQ Cloud server to connect to. For “Local storage mode” the address should be the DNS of the SAFEQ Cloud primary server.
-
Account domain name – domain name of the target account. It can be found in SAFEQ Cloud Web UI on the Customer information tab.
-
Authentication type – select user authentication type.
-
Storage type– select where SAFEQ Cloud Client stores the data: Cloud storage, Local storage, and Hybrid (direct print locally, secure print to cloud).
-
API key – API key from the account settings. If omitted the default (restricted) API key will be used. Default API key will be removed in the future product versions.
-
Enable secure login for session authentication types – see secureSessionLogin option below for details.
-
-
After the configuration, users can log in.
Unattended installation
You can also use this guide to push the SAFEQ Cloud Client to Mac devices using tools like jamf or Workspace ONE.
For further information, you can refer to these Jamf guides:
Download this sample .plist file to update it with the desired SAFEQ Cloud Client configuration parameters. Make sure the file is named as com.ysoft.safeqclient.plist
Below is a description of each of the parameters:
-
accountDomain– account domain name. -
allowConfiguration– true = enable configuration menu item, false = disable configuration menu item. The default value istrue(falsefor QuickInstall). -
allowRememberLogin– true = show the “Remember login” option when showing a prompt to enter a custom username and password, false = do not show this option. The default value istrue. -
apiKey– custom API key to use instead of the default one. -
authType– User authentication type: 0 = session user, 1 = username + domain name, 2 = custom login, 3 = user principal name, 5 = OpenID Connect, 6=SAFEQ Cloud OAuth2 login. The default value is6. -
directOfflinePrint– true = enable direct offline printing. The default value isfalse. -
gatewayAddress– SAFEQ Cloud gateway address. -
loginPopupType– specify the type of the login popup: 0=no popup, 1=informational bubble, 2=dialog. The default value is0(2for QuickInstall). -
offline– if set to true, it will install the SAFEQ Cloud Client in offline mode, without registration or server connectivity check. See this section for details. The default value isfalse. -
refreshPeriod– an automatic synchronization period in minutes. The default value is60. -
rememberLogin– turn on or off the login remembering option. The default value isfalse. -
secureSessionLogin– this option is applicable only when authType is set to 0 (Session user), 1 (Session user + domain name), or 3 (User principal name), which are considered insecure login types. This parameter is ignored during updates. The default value is true, meaning the SAFEQ Cloud Client registers an endpoint, requiring administrator authorization. When set to false, no endpoint is created, and the SAFEQ Cloud Client will only function if both Allow unauthenticated requests and Allow untrusted endpoints are enabled in the API key settings. -
serverCheck– This option is deprecated in favor of theofflineoption. The default value istrue. -
storageType– specify the type of storage: 0 = cloud, 1 = local storage, 2 = hybrid (direct print locally, secure print to cloud). The default value is0.
Example of a .plist file:
<!DOCTYPE plist PUBLIC "-//Apple//DTD PLIST 1.0//EN" "http://www.apple.com/DTDs/PropertyList-1.0.dtd">
<plist version="1.0">
<dict>
	<key>accountDomain</key>
	<string>
acme.local</string>
	<key>authType</key>
	<integer>1</integer>
	<key>gatewayAddress</key>
	<string>server.acme.local</string>
	<key>loginPopupType</key>
	<integer>2</integer>
	<key>refreshPeriod</key>
	<integer>60</integer>
	<key>storageType</key>
	<integer>0</integer>
	<key>offline</key>
	<true/>
</dict>
</plist>
Jamf best practices
For Jamf deployment, it is recommended to use a script that runs before the pkg file is installed and copies the .plist file to the proper location.
SAFEQ Cloud Client supports two locations for the .plist file: /Library/Preferences and /Library/Managed Preferences. The latter can be used by Jamf deployment tool to deploy the preferences automatically without the custom script.
Script example:
#!/bin/bash
PLIST=/Library/Preferences/com.ysoft.safeqclient.plist
cat << EOF >$PLIST
[xml plist content]
EOF
defaults read $PLIST
Replace [xml plist context] with the actual .plist file.
Steps for silent installation
You can also copy the .plist file to /Library/Preferences if the configuration is to be shared by all users. This requires a restart of Mac devices or running the defaults read /Library/Preferences/com.ysoft.safeqclient.plist command.
1. Copy the updated .plist file at /Users/[username]/Library/Preferences on Mac device
sudo cp <from path> /Library/Preferences
2. Install SAFEQ Cloud Client
sudo installer -pkg safeq-cloud-client-2025.02.06.2-setup.pkg -target /
3. Uninstall SAFEQ Cloud Client
sudo /Applications/safeqclient.app/Contents/MacOS/uninstall