
Relevant Products
OMNI Bridge is available for Pro Print Pro MFD
Target audience: Vendors.
This step is necessary only in the edge printing scenario.
In the edge printing scenario, perform the following steps to set up an OMNI Bridge for your customer:
1. Infrastructure preparation
The YSoft OMNI Bridge address has to be reserved.
You can do the following:
-
Reserve an IP address for the YSoft OMNI Bridge MAC address.
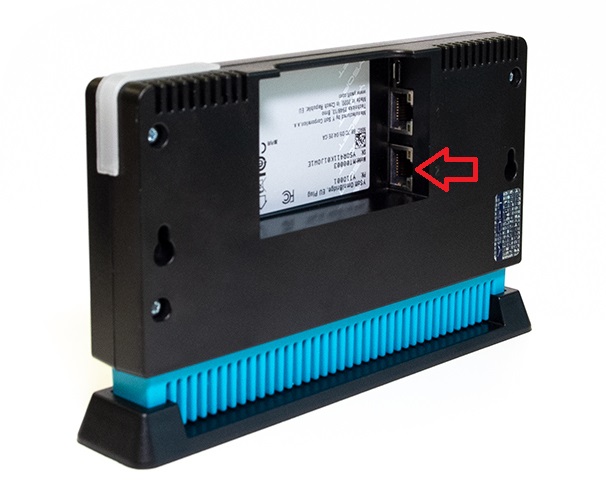
After your OMNI Bridge receives an IP address from DHCP, reserve this IP address in your DHCP server/router for the MAC2 address of your OMNI Bridge. You can find the MAC2 address on the sticker at the back of the OMNI Bridge and also on its packaging box.
-
Assign a domain name for YSoft OMNI Bridge in the local DNS.
-
Configure the network manually on the device (YSoft OMNI Bridge).
During the initial setup, the IP address of the OMNI Bridge is set to DHCP. If you want to change the IP address to static, you must run the initial setup again until the device verification code is displayed. Changing the IP address during the initial setup of the OMNI Bridge may cause problems with the device. The IP address should be changed after the initial setup is completed.
For information on how to configure the network manually on the device, see OMNI Bridge operation manual section Network.
NTP server must be available for the YSoft OMNI Bridge device.
-
If you have your own NTP server or have a specific NTP server already allowed in your firewall, allow traffic from YSoft OMNI Bridge to your NTP server. Make sure your NTP server is properly specified in your local DHCP server.
-
If the NTP address is not obtained via DHCP, YSoft OMNI Bridge defaults to Google NTP servers. Create a firewall rule to allow UDP traffic on port 123 to these servers: time1.google.com, time2.google.com, time3.google.com, and time4.google.com.
-
Change the NTP server manually on the device (YSoft OMNI Bridge).
To configure the NTP server manually on the device, do the following:
-
Press 0 to enter the service menu.
-
Enter PIN and press ▶.
-
Select Time settings and press 0.
-
Select Set NTP servers and press 0.
-
Select Add new NTP server and press 0.
-
Enter your NTP server and press ▶.
-
Press ▶ to save your changes.
Network connectivity
IoT Hub
The following connectivity to IoT Hub is required:
-
Connectivity to IoT Hub Device Provisioning Service (DPS) - worldwide endpoint. DPS is a helper service for IoT Hub that is used to configure zero-touch device provisioning to a specified IoT Hub.
Reference: https://docs.microsoft.com/en-us/azure/iot-fundamentals/iot-glossary?toc=/azure/iot-dps/toc.json&bc=/azure/iot-dps/breadcrumb/toc.json#device-provisioning-service -
Connectivity to IoT Hub where DPS assigns the device to. When the OMNI Bridge is receiving configuration from IoT Hub, it uses port TCP 443 to connect.
Reference: https://www.cloudelicious.net/azure-region-and-datacenter-find-your-best-match/
-
Connectivity to Azure Container Registry (ACR) - The OMNI bridge will download the latest updates/containers from ACR.
Reference: https://docs.microsoft.com/en-us/azure/container-registry/container-registry-intr
Firewall rules
The following external domains and their communication ports must be allowed in your network firewall for the edge devices to function correctly.
|
|
443 |
Microsoft Container Registry |
|
|
443 |
Data endpoint providing content delivery |
|
|
443 |
Deploy modules from the Marketplace to devices |
|
|
443 |
Device Provisioning Service access (optional) |
|
|
443 |
Personal and third-party container registries |
|
|
443 |
Download Azure Container Registry image deltas from blob storage |
|
|
5671, 8883, 4431 |
IoT Hub access |
|
|
443 |
Docker Hub access (optional) |
|
|
443 |
Partner Portal |
|
|
443 |
SAFEQ Cloud Primary |
|
|
UDP 123 |
NTP server (time{1-12}.google.com) or any chosen NTP server |
|
|
80 |
Official Ubuntu package repository for non-x86 architectures |
|
|
443 |
SAFEQ Cloud Secondary Installation Files |
Use of HTTP (Port 80) for APT Traffic to ports.ubuntu.com
The ports.ubuntu.com repository serves Ubuntu packages for non-x86 architectures and primarily uses HTTP over port 80 for package distribution. Although HTTP is unencrypted, APT ensures the security and integrity of all downloaded packages and metadata through robust GPG signature verification. This cryptographic validation guarantees that any tampering or unauthorized modification of packages is detected and rejected before installation.
As a result, the use of HTTP on port 80 is considered secure and is the standard method employed by official Ubuntu repositories, including ports.ubuntu.com. Therefore, allowing outbound traffic on port 80 to this endpoint is necessary and generally poses no undue security risk within the APT package management context.
2. OMNI Bridge Preparation
-
Plug an Ethernet cable into network port 2 and note down its MAC address.
-
Make sure you have reserved an IP address for the MAC address of your YSoft OMNI Bridge. For more information, see section https://ysoft.atlassian.net/wiki/spaces/SQCDMIG1/pages/26805088/Setting+up+OMNI+Bridge#The-YSoft-OMNI-Bridge-address-has-to-be-reserved. above.
Do not change the assigned IP address! If the address changes, the device must be reconfigured.
-
Make sure your YSoft OMNI Bridge has access to an NTP server. For more information, see section https://ysoft.atlassian.net/wiki/spaces/SQCDMIG1/pages/26805088/Setting+up+OMNI+Bridge#NTP-server-must-be-available-for-the-YSoft-OMNI-Bridge-device. above.
-
Attach the power supply. YSoft OMNI Bridge will start to initialize. This process usually takes several minutes, but it can take a longer time for the device to download the necessary modules and configure itself.
Do not turn the power during the initialization process off.
-
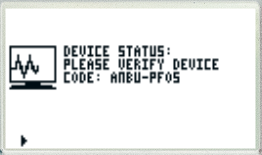
When the OMNI Bridge is ready, it will show an eight-letter device verification code and its LED light will be orange.
If the device code is too small for you to read:
-
On the Device status screen, press ▶ two times.
-
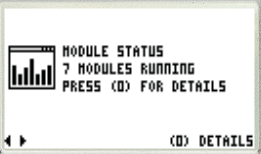
This will take you to the Module status screen. Press 0 and ▶.
-
You will see the device code displayed in bigger letters.

When the OMNI Bridge is ready, it will show an eight-letter device verification code and its LED light will be orange.
The code expires after 10 minutes and a new code is generated.
-
3. Adding the device in SAFEQ Cloud Web UI
-
Log in to SAFEQ Cloud Web UI.
Only Chrome, Firefox and Edge browsers are supported.
-
Go to Security > Endpoints.
-
Click Add edge device.
-
Fill in the following:
-
Serial number – You can find it on the sticker at the back of the device.
-
Device code – The eight-letter device verification code which your OMNI Bridge displays after the initialization phase.

-
-
After it succeeds, you will see this message.

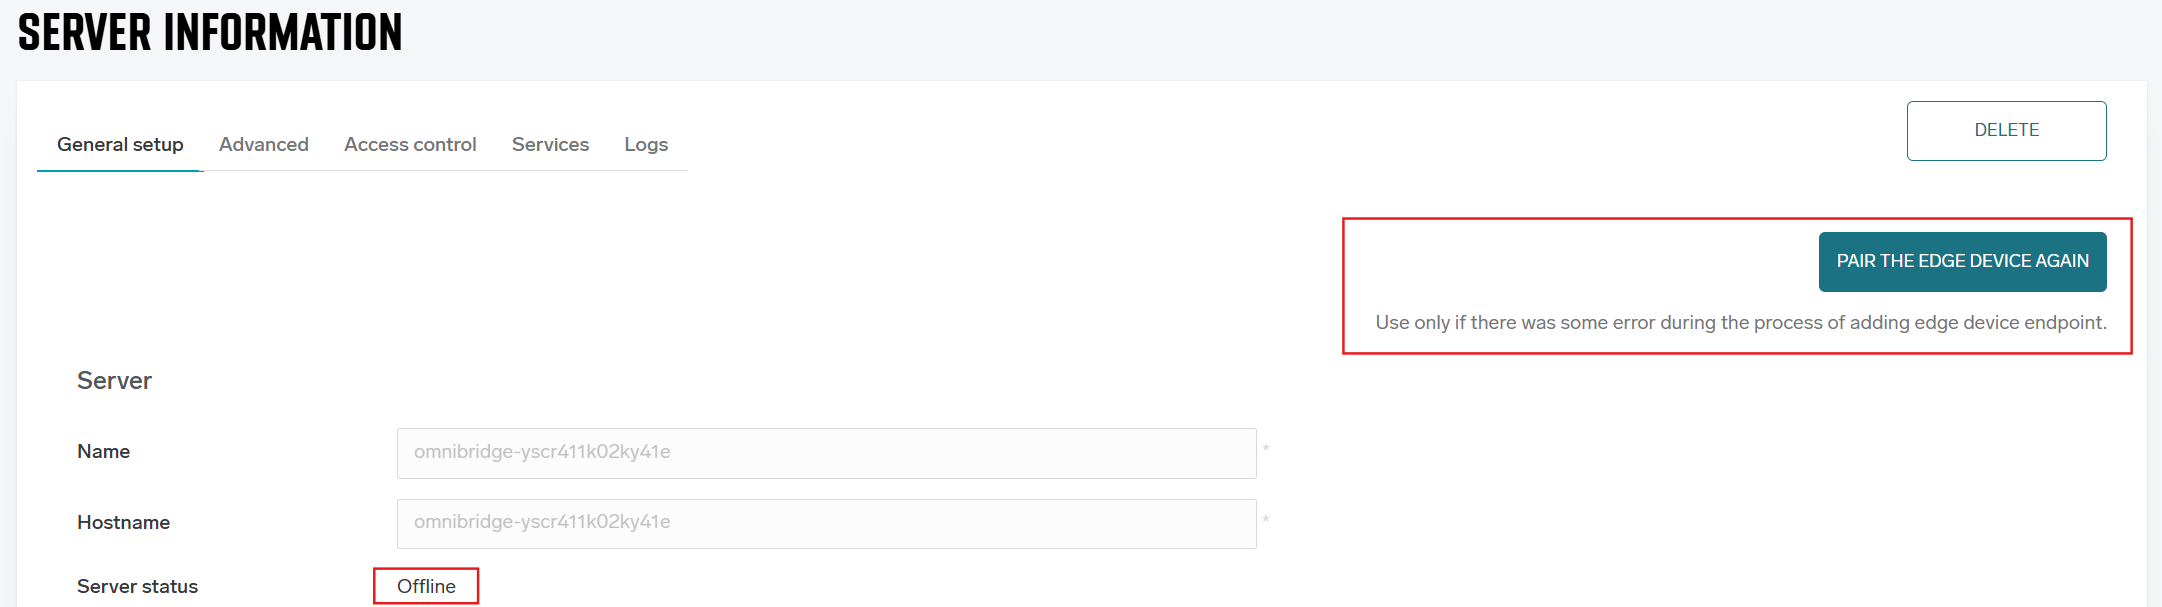
If you need to start the enrollment process for a device that was added some time ago, or if the enrollment was not completed earlier, you can do so from its server detail page in the SAFEQ Cloud Web UI.
-
This option is only available for devices that are authorized and offline. To successfully complete the enrollment, the device must still be configured according to the Setup section of this document.
-
On the Server information page, click Pair the edge device again. Do not do this while an enrollment process is already in progress. The process may take several minutes, so starting another one will not work.
-
You will see the newly added device in Endpoints. Select it and click Authorize selected.
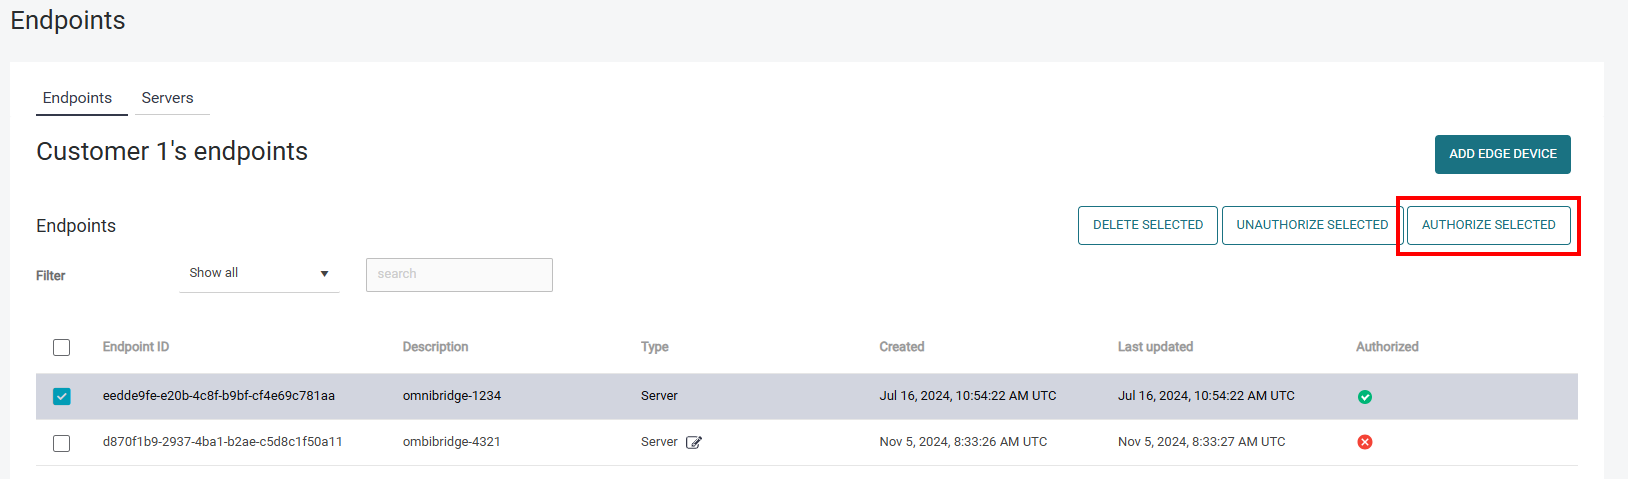
You can see the device details by clicking the link icon next to server. You can authorize the device from the details view as well.
-
The device will continue downloading and installing modules. The process may take up to 10 minutes. When finished, the LED will turn blue.
Startup of the necessary services can take more than 10 minutes, depending on which services were configured. The service state is not visible in the Web UI. You can only monitor it in server siteapp.log. Note that service startup also happens after each reboot or software update of the OMNI Bridge.
The embedded terminals connected to your OMNI Bridge may be slower to respond during your first interaction (such as logging in at the MFD) as the components may still be loading.
-
When you add a new OMNI bridge device, a new value is automatically added to the default Edge API key. See API access keys.
4. Performing secondary gateway mapping
After all the modules are downloaded, perform the secondary gateway mapping as described in Secondary Gateway mapping.
5. Adding services to your OMNI Bridge
As a minimum, add the following services to your OMNI Bridge so that it can function as a gateway:
-
Converter
-
Storage
-
Documentoutput
For how to do that, see Services.
Optional services:
-
Add Api if you plan to use Gateway storage rather than Local storage or Cloud.
-
Add Authentication if you need the edge device to connect to Active Directory or Microsoft Entra ID directly. Otherwise, the cloud instance of the Authentication service will be used.
-
Add Terminalclient if you plan to use the legacy embedded terminals.
-
Add other services according to your needs.
6. Security
Physical security
We recommend you to keep your OMNI Bridge in a physically secure area to prevent unauthorized access or theft. The OMNI Bridge has strong overall security, but its internal storage which contains print data and meta data (including user information) is not encrypted on HW level.
Changing the manager password
If you wish to change the manager password for your OMNI Bridge, see OMNI Bridge operation manual section Change manager password. We strongly recommend changing the password only after the enrollment of the device in your SAFEQ Cloud is complete.