
This guide explains how to add standby PostgreSQL 16 database to existing YSoft SafeQ 6 installation running with embedded PostgreSQL 16 database.
Overview
Error rendering macro 'gliffy' : Page loading failed
PostgreSQL offers various ways how to achieve high availability, replication and archiving of PostgreSQL databases. This guide is aimed to describe how to setup a database cluster with one primary and one standby database (in hot-standby mode), that will use Streaming Replication mechanism to replay all data from primary to standby database. It will also describes how to configure automatic fail-over service with user notification and describe how to recover failed databases in order to restore the replication feature.
More information about Streaming Replication, WAL files and others PostgreSQL concepts could be seen in official documentation here https://www.postgresql.org/docs/16/admin.html
Supported database architectures
There is possibility to use replication for all database deployment types. Now we support Single Server Single Database deployment only.
Single Server Single Database deployment (SSSD)
Basic deployment with all schemes placed in one database. We replicate all data. Supported embedded and external PostgreSQL installation.
Error rendering macro 'gliffy' : Page loading failed
Single Server Multiple Database deployment (SSMD)
Enterprise deployment with separated warehouse database. We replicate all data. Inter database connectivity is provided by db_link via localhost IP, because of replication needs. Supported embedded and external PostgreSQL installation.
Error rendering macro 'gliffy' : Page loading failed
Multi Server Multiple Database deployment (MSMD) - not supported yet
Special deployment with separated warehouse server. We replicate only working database. Warehouse database fail-over is provided by regular database backup. Supported external PostgreSQL installation only.
Error rendering macro 'gliffy' : Page loading failed
Limitations
Database validation
Running database validation within PostgreSQL cluster requires that database referenced in DBValidator.properties file is current master (read/write mode). Before running validation it is recommended to check out which database is current master, then adjust DBValidator.properties according these findings and then run database validation.
External data warehouse database replication is not supported
Streaming Replications, Automatic fail-over and Recovery scenarios are not designed to be used on external data warehouse database. Hence in the deployment scenario First server installation with standalone data warehouse database only production database could be setup using Streaming Replications and automatic fail-over.
Network connectivity
Guaranteed network connectivity between database nodes is required.
YSoft SafeQ 6 server update
In case of Updating YSoft SafeQ 6, the database role has to be the same as it was in the time of the installation - meaning the database, that was configured as master has to be master again, and previously configured standby database has to be also standby database now. In case the Fail-over and subsequent Recovery had been applied, the roles of the databases has been switched in which case one of the following action has to be taken to restore the original database deployment, either:
-
Promote current slave to primary master and recover current slave to primary master.
-
Change etcd configuration to follow current database cluster state ().
Configuration
Prerequisites
-
Windows administrator privilege to give Full control permission on database folders
-
Sufficient disk space on both primary and standby database servers. In addition to database size, the WAL replication files may require several GB, depending on the configuration, see bellow examples for
wal_keep_sizeconfiguration property -
PostgreSQL 16 binaries
PostgreSQL 16 binaries are located in the full installation package <installation package>\Complementary Solutions/PostgreSQL or could be downloaded from the internet on this address https://www.enterprisedb.com/download-postgresql-binaries
Both single node and clustered installations are supported. This guide refers to the original database created during installation as a primary database and newly added database is referred as a standby database.
This guide will use following placeholders with sample values:
|
PATH_TO_PRIMARY_DATABASE_ROOT_FOLDER |
<safeq_folder>\Management\PGSQL |
|
PATH_TO_PRIMARY_DATABASE_DATA_FOLDER |
<safeq_folder>\Management\PGSQL-data |
|
PRIMARY_DATABASE_IP_ADDRESS |
10.0.124.110 |
|
PATH_TO_STANDBY_DATABASE_ROOT_FOLDER |
C:\PGSQL |
|
PATH_TO_STANDBY_DATABASE_DATA_FOLDER |
C:\PGSQL-data |
|
STANDBY_DATABASE_IP_ADDRESS |
10.0.124.151 |
This guide refers to pg_hba.conf and postgresql.conf files. All these reside in PostgreSQL data directory (e.g. in case of embedded PostgreSQL installation the path is <safeq_folder>\Management\PGSQL-data). All SQL command in this guide could be executed either using psql CLI tool (located in PGSQL/bin folder) or using pgAdmin 4 web interface.
PostgreSQL cluster setup
-
Stop YSoft SafeQ services. In clustered environment this needs to be done on each cluster node.
-
Use binary database files from full installation package (path
<installation package\Complementary Solutions\PostgreSQL\) or download PostgreSQL 16 binaries. -
Extract database binaries to target directory on server for standby database, for example: c:/PGSQL.
-
Create data directory for standby database, for example: c:/PGSQL-data.
-
Make sure Administrator account has Full control permission granted on both directories.
On each directory: right click and select Properties → switch to Security tab → click Advanced → on Permissions tab → click Add
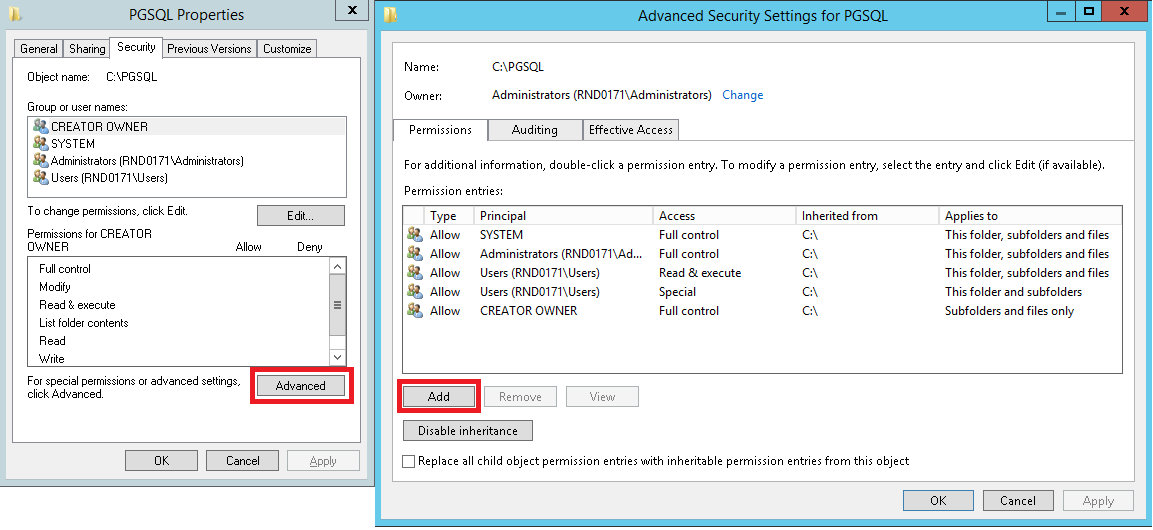
Click on Select a principal link → fill in Administrator account (in our example it is RND0171\Administrator, this might differ on production environment) → click OK.
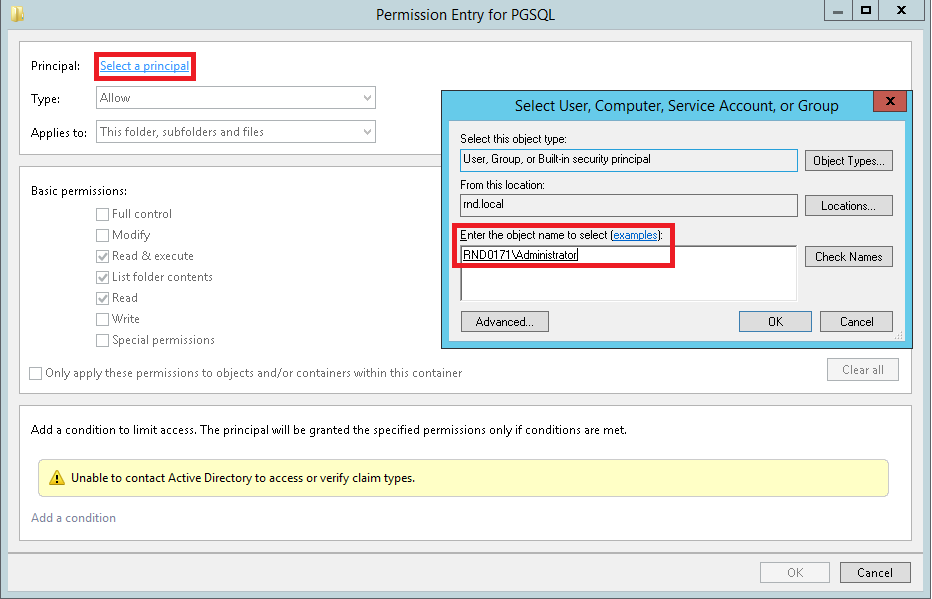
Check Full control checkbox → click OK.

-
On primary database create user for replication,
SQLCREATE USER replicator WITH REPLICATION ENCRYPTED PASSWORD 'replicator' -
On primary database, configure following options in
postgresql.conffile. The lines will be commented, uncomment them as below.listen_addresses = '*' max_wal_senders = 2 wal_level = replica wal_keep_size = 180 -
On primary database, add following entries in pg_hba.conf directly underneath the #TYPE DATABASE USER ADDRESS METHOD
# TYPE  DATABASE        USER            ADDRESS                                     METHOD
host    all             all             <PRIMARY_DATABASE_IP_ADDRESS>/32            md5
host    replication     replicator      <PRIMARY_DATABASE_IP_ADDRESS>/32            md5
host    replication     replicator      <STANDBY_DATABASE_IP_ADDRESS>/32            md5
host    all             all             <STANDBY_DATABASE_IP_ADDRESS>/32            md5
with example values in place entries in
pg_hba.confwill like this:# TYPE DATABASE USER ADDRESS METHOD host all all 10.0.124.110/32 md5 host replication replicator 10.0.124.110/32 md5 host replication replicator 10.0.124.151/32 md5 host all all 10.0.124.151/32 md5Please note, that allowing connection for replicator user on both primary and standby databases is required by recovery scenarios.
-
On standby database, take base backups with following command (port needs to be same port as was originally used when setting up management server DB connection in installer):
pg_basebackup -h <PRIMARY_DATABASE_IP> -U replicator -p 5433 -D <PATH_TO_STANDBY_DATABASE_DATA_FOLDER> -Xs -R -P -vwith example values in place,
pg_basebackupwill execute aspg_basebackup -h 10.0.124.110 -U replicator -p 5433 -D "c:/PGSQL-data/" -Xs -R -P -vThe default location of pg_basebackup CLI tool is in <PATH_TO_STANDBY_DATABASE_ROOT_FOLDER>/bin.
In the PostgreSQL data directory, add the following content to the
postgresql.conffile (assuming 10.0.124.110 was used as primary database IP address - PRIMARY_DATABASE_IP_ADDRESS). See official Standby Server Operation for more details.PostgreSQL 11 and below used a configuration file named
recovery.confto manage replicas and standbys. Support for this file was removed in PostgreSQL 12.The server will not start if a
recovery.confexists.See official guide for more details.
primary_conninfo = 'user=replicator password=replicator host=10.0.124.110 port=5433 sslmode=prefer sslcompression=0 krbsrvname=postgres target_session_attrs=any'sslmode=preferinpostgresql.confis default and backward compatible, but it is not recommended for secure deployments. Usesslmode=verify-fullfor data encryption and for protection against man-in-the-middle attacks. See official SSL guide for more details.hot_standbyoption should be enabled inpostgresql.confon standby databasehot_standby = onpg_hba.confon standby database should have following entries# TYPE DATABASE USER ADDRESS METHOD host all all <STANDBY_DATABASE_IP_ADDRESS>/32 md5 host replication replicator <STANDBY_DATABASE_IP_ADDRESS>/32 md5 host replication replicator <PRIMARY_DATABASE_IP_ADDRESS>/32 md5 host all all <PRIMARY_DATABASE_IP_ADDRESS>/32 md5with example values in place,
pg_hba.confentries will look like:# TYPE DATABASE USER ADDRESS METHOD host all all 10.0.124.151/32 md5 host replication replicator 10.0.124.151/32 md5 host replication replicator 10.0.124.110/32 md5 host all all 10.0.124.110/32 md5 -
Update
safeq.properties. (C:\SafeQ6\Management\conf\safeq.properties)database.host = <PRIMARY_DATABASE_IP_ADDRESS> database.url = jdbc:postgresql://${database.host}:${database.port},<STANDBY_DATABASE_IP_ADDRESS>:5433/${database.name}?charSet=UTF-8&targetServerType=masterIn case of Management clustered environment, update
safeq.propertieseach Management cluster node.with example values in place:
database.host = 10.0.124.110
database.url = jdbc:postgresql://${database.host}:${database.port},10.0.124.151:5433/${database.name}?charSet=UTF-8&targetServerType=master
For multidatabase deployments - deployments with separate database for warehouse - make sure that connection URL for warehouse database is configured with both primary database and standby database.
databaseWarehouse.url = jdbc:postgresql://${database.host}:${database.port},<STANDBY_DATABASE_IP_ADDRESS>:5433/${databaseWarehouse.name}?charSet=UTF-8&targetServerType=masterwith example values in place
databaseWarehouse.url = jdbc:postgresql://${database.host}:${database.port},10.0.124.151:5433/${databaseWarehouse.name}?charSet=UTF-8&targetServerType=master -
Update
application.propertiesfor IMS service. In clustered environment this needs to be done on each cluster node.spring.datasource.url = jdbc:postgresql://<PRIMARY_DATABASE_IP_ADDRESS>:5433,<STANDBY_DATABASE_IP_ADDRESS>:5433/SQDB6_IMS?charSet=UTF-8&targetServerType=masterwith example values in place
spring.datasource.url = jdbc:postgresql://10.0.124.110:5433,10.0.124.151:5433/SQDB6_IMS?charSet=UTF-8&targetServerType=master -
If you have installed YSoft SafeQ Payment System update
environment-configuration.properties.database.url=jdbc:postgresql://<PRIMARY_DATABASE_IP_ADDRESS>:5433,<STANDBY_DATABASE_IP_ADDRESS>:5433/SQDB6_YPS?targetServerType=masterwith example values in place
database.url=jdbc:postgresql://10.0.124.110:5433,10.0.124.151:5433/SQDB6_YPS?targetServerType=master -
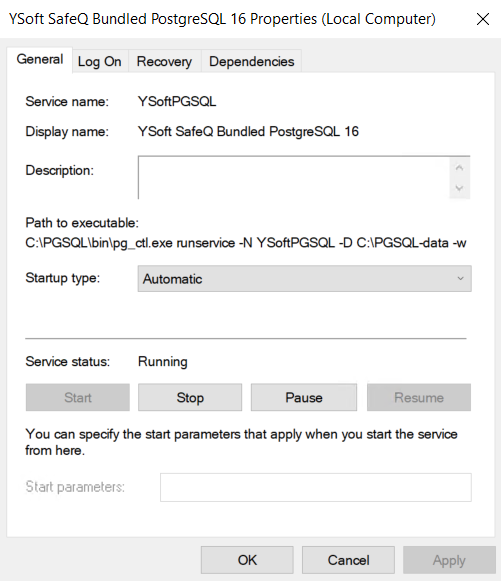
Setup PostgreSQL database service Startup type to Auto on both primary database and standby database.
-
Start database services on both primary database and standby database. On standby database there is no PostgreSQL service registered in local services. Switch to directory with extracted PostgreSQL 16 binaries (this guide uses: C:\PGSQL), navigate to its
binsubdirectory. Use following command to start PostgreSQL service from command line.pg_ctl.exe start -D "<PATH_TO_STANDBY_DATABASE_DATA_FOLDER>" -wwith example values in place
pg_ctl.exe start -D "c:/PGSQL-data" -wFor ease of use, you can register a service from pg_ctl executable:
SC CREATE "YSoftPGSQL" start=auto binpath=""<PATH_TO_STANDBY_DATABASE_ROOT_FOLDER>\bin\pg_ctl.exe" runservice -N "YSoftPGSQL" -D "<PATH_TO_STANDBY_DATABASE_DATA_FOLDER>" -wwith example values in place
SC CREATE "YSoftPGSQL" start=auto binpath=""C:\PGSQL\bin\pg_ctl.exe" runservice -N "YSoftPGSQL" -D "C:\PGSQL-data" -w"The new service may need to be started manually. After starting it on standby database, check PostgreSQL logs. In newest log following log entries should indicate that database cluster is up and running.
LOG: entering standby mode LOG: redo starts at 0/945AFF8 LOG: consistent recovery state reached at 0/945B0D8 LOG: database system is ready to accept read only connections LOG: invalid record length at 0/945B0D8: wanted 24, got 0 LOG: started streaming WAL from primary at 0/9000000 on timeline 1 -
Start YSoft SafeQ services. There should be no errors in service logs. Data created by services should be present in both databases.